NSP provides its End Users to access the tickets created by them or reported by them in the portal. All the tickets are displayed in a single list under Check my existing Tickets tab. Click this tab to view existing tickets.
Below figure shows the page Check my existing Tickets:
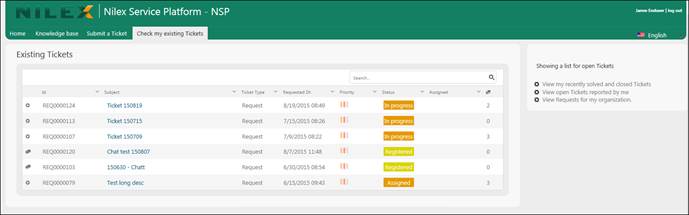
Existing Tickets
The page contains a list of tickets submitted previously and to the right links to filter the display to show different tickets.
Each row in the list is a ticket that includes: source icon, Id, Subject, Ticket type, Requested date, Priority, Status, Assignee and number of comments. When you mouse over any Subject in the list, a small quick info panel is opened on the right side of the column. The Subject info panel contains basic information about the ticket like its Id, Priority, Status, Subject, Description and latest comment if any exist.
Click on any ticket in the list to see its details page. Below figure shows the page:

Ticket Details
All the important points in the ticket detail page are labeled in the above figure and are explained in the same sequence in the below text:
1. Button to Close ticket. End User has right to close the ticket created by himself. Ticket can be closed in case it is resolved by the End User himself, or using instructions given by Agents, or any other reason.
2. This field shows the title of the ticket (Subject).
3. Displays the description of the ticket.
4. Ticket Id, creation date and type of the ticket.
5. This section is the comment text box where you can enter comment text. Formatting options and hyperlink insertion are available in the buttons above the comment box. Below the comment box, the link Select a file is available which is used to attach e g an image with the comment for reference. Preview button is provided in the panel used to preview the comment text. After adding comment and possible attaching files, click Save Comment button.
6. No of comments.
7. This option contains Collapse All function. Collapse all is used to minimize all the comment just displaying image and name of user made the comment. The comments can be expanded again using Expand All.
8. Search box is provided to search comment. You enter desired keyword in the search box and select Enter or click the search icon. Based on the keyword entered, the list of comments gets updated.
9. This section shows the list of comments made to the ticket. Each item in the list includes: profile image of the user, source icon, an option to collapse/expand the item, name of the user who posted the comment, comment text, IP address, like button, and date and time the comment was posted.
Click Check my existing Tickets tab to see all the tickets again.
The links in the box to the right of the screen could contain different links due to system settings. The heading in the box describes what is currently displaying in the list.
Those links could be available:
•View my recently solved and closed Tickets: When you click this link, the list gets updated to display recently solved and closed tickets if any available. The link text is changed to View my open Tickets. When you click the link again list is refilled with existing open tickets.
•View open Tickets reported by me: This link is available only if you have Power User permissions. Clicking this link will display open tickets created by you, On Behalf of someone else. The link text is changed to View closed Tickets reported by me. Clicking this link toggles display of open and closed tickets created by you On Behalf of someone else.
•View Tickets for my organization: This link is available only if you have Power User permissions and a system setting gives you permission to see tickets created by anyone in your organization. The list will display all tickets created by the organization you are a member of. The link text is changed to View closed Tickets for my organization. Clicking this link toggles display of open and closed tickets created by you organization.