
When you click Add new Entity Field button, one row will be added in the entity fields section. This row has all the fields set by default. After the row is added, you need to edit the properties by clicking the particular row. When you click the row, a popup will be displayed where you can edit the properties. Following figure displays such a popup:
Add Entity Field
The popup contains following properties for an entity field:
•Field Name: Enter name of the field (Translation Key) which can be used to store the localized names for the entity field.
•Data Type: Select from the available data types: Reference (to define the field as a dropdown list, which contains options derived from the selected reference entity), Boolean, Number, Text (Clickable link), Date with Time, Date Only, Multilanguage Text, Image, Html, MultiSelect, TreeView, AddressType and Double.
•Reference Entity / Maximum Length / Decimal Point: This field is displayed based on the selection in the Data Type dropdown list:
o Reference Entity: This field is displayed below Data Type dropdown list if you select MultiSelect, Reference or TreeView in the dropdown list. You can use this option to use other entity as a field in the form of an entity being created. For example, you can use “Asset Type” as a reference entity in “CI” entity. You select the respective entity from the dropdown list. Display field of the selected reference entity will be used as options for the field. Note that in case of Reference data type, the field being added will be displayed as a dropdown list in an entity form.
o Maximum Length: This field is displayed below Data Type dropdown list if you select Text or Multilanguage Text in the dropdown list. You define the maximum number of characters allowed for that field.
o Decimal Point: When you select Double data type, this field is displayed below the dropdown list. You define the number for decimal points allowed in the field. For example, if you define “2” then you can enter value up to two decimal points, e g “150.25”.
•Mandatory: You can select this to mark the field as mandatory.
•Is Unique: You can select this to mark the field as unique.
•Is Auto complete: This field is displayed below dropdown list if you select Reference in the dropdown. If this option is set, then auto complete is used when you search for object. When you type characters in the search field a dropdown displays the objects that corresponds to the input and you can choose an object from here.
•Language & Field Label: You can select the language from the dropdown list to define the Field Label for the selected Language. You first select a Language and then define respective Field Label. Field Labels can be defined for the multiple languages.
•After entering the data in all the fields, click OK button available in the header of the popup to save an entity field.
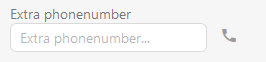
•Phone and Chat icons can be added alongside Text fields. These are nifty when you use the CTI function by allowing the user to instigate a phone call/chat with a click on a user profile page. The icons are activated using a script:
4. Add property on Person Entity
5. Add the corresponding field in person form,
6.
Run database script to enable the icons:
exec
app.spSetGlobalSetting 'EnableMultipleCtiFields', 'Property1,Property2,…'
where
'Property1,Property2,…'
are the database name of the properties of the fields that shall are to show
icons.
Example:
The following set-up
is activated by the script
“exec
app.spSetGlobalSetting 'EnableMultipleCtiFields', 'u_ExtraPhone'”