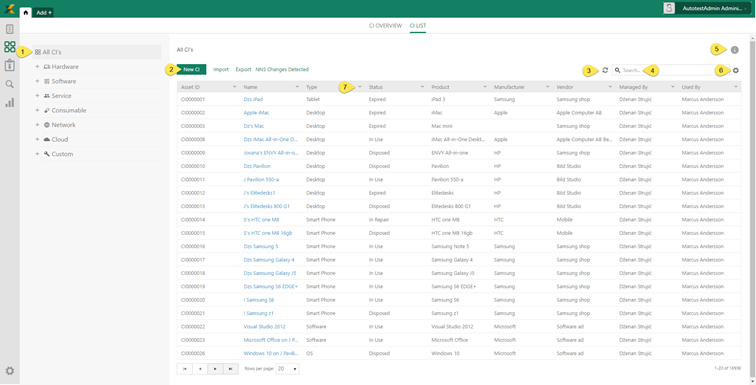
Configuration Item List form is broken down in two main areas:
•Panel – Panel on the left side, contains lists of all CI Types
•Table with a list of CIs. The list could be filtered based on selected CI Type or performed search.
CI List
Panel on the left side (1) is used for selecting CI types. Left panel contains Seach box for ease of reference. Search feature allows you to search CI types from the tree. After choosing CI type table is filtered due to selected type (and it´s sub-types). Button for adding new CI (2), is also changing due to selected type. Adding new CI functionality is explained in xxx.
These buttons are explained below:
•Import: Used to import CIs. See Import function.
•Export: Used to export CIs to Excel or PDF file.
•Scan for Changes: Used for creating synchronization with NNS agent. Scan for Changes functionality is described in detail here.
Refresh button  is used for refreshing the list.
Search feature in this section allows you to search any CI from the list. You enter keyword related to the CI that you want to find. Search box here comes with the autocomplete feature. As soon as you types the keyword in the search box (4), the auto complete box gets filled with the search result. You can select desired CI from that box. System searches for the keyword in all columns data.
Info button  opens popup with more information about
CI List. In popup there is a link to open user manual for this
function.
opens popup with more information about
CI List. In popup there is a link to open user manual for this
function.
In the top right corner you find a button for settings with which columns to be
displayed in list. You can only select to display common properties in this
list, properties that exist for all CI Types. Configuration function have three
options: Save, Reset
and Configuration. Each agent can save their own
personalized configuration.
for settings with which columns to be
displayed in list. You can only select to display common properties in this
list, properties that exist for all CI Types. Configuration function have three
options: Save, Reset
and Configuration. Each agent can save their own
personalized configuration.
After click the Configuration option, pop up with common properties will appear, and by selecting checkboxes you can choose which columns will appear in table. Also you can change position of columns using drag and drop principle.
You can also change column width in the table. Put the mouse pointer just right to sorting and filtering option in the table header and drag to the desired width. After customization click the Save button in configuration function dropdown.
Reset option is used to reset all configuration to default one. Default columns are: CI ID, Name, Type, Status, Manufacturer, Location and Used By.
Filtering, sorting and paging functions available are similar to other lists and described in General User Interface.