CI CSV Direct Import
Data can be imported to NSP CMDB in CSV-format by
clicking on Import at CI list page, and select
Import in the dropdown. Import is done in three
steps:
The first step –
Choose CSV file
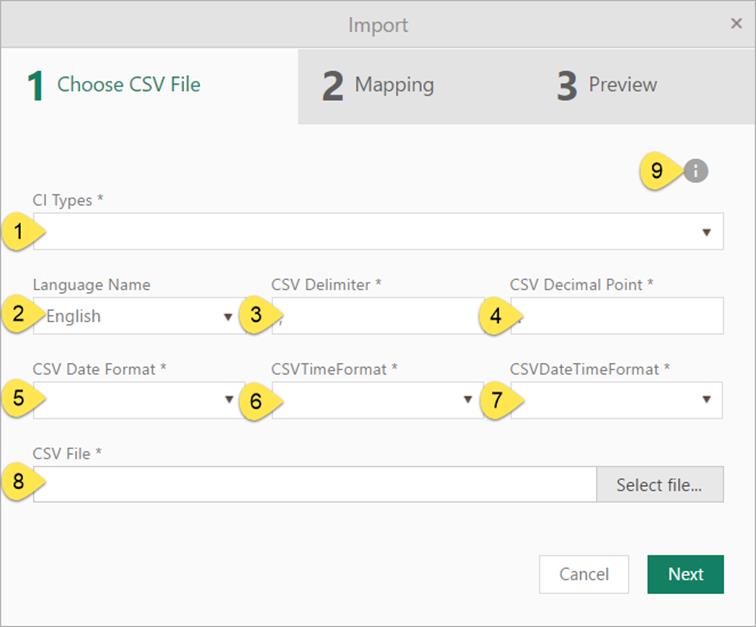
First step will be the selection of the CI Type of the data contained in a CSV file as well as
the selection of the file itself (path and filename):
Import data
The first step Choose CSV
file contains following fields:
1. CI Type:
Mandatory field. Choose CI type from dropdown
list (the type that the CSV file contains data of).
2. Language: Choose import
language. Language name represent language of the properties values in CSV file.
3. CSV
Delimiter: Mandatory field. Type symbol
for separating columns in CSV file.
4.
CSV Decimal Point: Mandatory field. Type symbol for decimal point used in
CSV file.
5. CSV Date
format: Mandatory field. Choose date
format used in CSV file from dropdown list. Date format can also be edited. See
format rules below.
6. CSV Time
format: Mandatory field. Choose time
format used in CSV file from dropdown list. Time format can also be edited. See
format rules below.
7. CSV Date and
Time format: Mandatory field. Choose date
and time format used in CSV file from dropdown list. Date and time format can
also be edited. See format rules below.
Note: All dates and times in CSV file must have the same
format!
8. CSV File:
Mandatory field. Choose desired file for
import. Only CSV format is allowed, and must be saved with UTF-8
encoding.
This step also
contains info button (9) which opens popup with more information about CI
Import. In popup there is a link to open user manual for this
function.
Date and Time format specification rules
1.
d - Day of the month as a number from 1 through 31.
2.
dd - Day of the month as a number from 01 through 31.
3.
ddd - Represents the abbreviated name of the day (Mon, Tues, Wed
etc).
4.
dddd - Represents the full name of the day (Monday, Tuesday etc).
5.
h - 12-hour clock hour (e.g. 4).
6.
hh - 12-hour clock, with a leading 0 (e.g. 06).
7.
H - 24-hour clock hour (e.g. 15).
8.
HH - 24-hour clock hour, with a leading 0 (e.g. 22).
9.
m – Minutes.
10.
mm - Minutes with a leading zero.
11.
M - Month number(eg.3).
12.
MM - Month number with leading zero(eg.04).
13.
MMM - Abbreviated Month Name (e.g. Dec).
14.
MMMM - Full month name (e.g. December).
15.
s – Seconds.
16.
ss - Seconds with leading zero.
17.
t - Abbreviated AM / PM (e.g. A or P).
18.
tt - AM / PM (e.g. AM or PM).
19.
y - Year, no leading zero (e.g. 2015 would be 15).
20.
yy - Year, leading zero (e.g. 2015 would be 015).
21.
yyyy - Year, (e.g. 2015).
The second step -
Mapping
When you click Next system
will perform data structure and integrity check that control if the file uses a
correct CSV format. This means it will be checked to determine if the data in
the CSV file are in a table format. After the data verification procedure you
will be redirected to a second step of the import wizard, the tab Mapping.
After the data verification procedure you will be
redirected to a second tab Mapping. Here
you perform custom mapping linking CSV-objects to CI properties. The form will
hold the list of all available CI properties specific for the selected CI type
you selected in step 1. Select appropriate CSV column for each property that you
want to import. Required properties, marked with * by the property name, must be
mapped.
Note that some composed or complex property types cannot
be imported because they cannot be represented in table format in CSV file, e g
Checkbox group, Dropdown, Radio Button
group, Image, Rating and Like/Dislike.

Manual mapping of CSV
file
This form contains four columns:
1.
Property: Contains list of all CI properties
for the selected CI type. The list of CI properties and data types is shown in Default properties
for all CI types.
2.
CSV Fields: Used to select appropriate
column for the property from CSV file.
3.
Data Example: Preview of property values.
4.
Missing Reference Handling: Used only for
referenced properties. You can choose some of given action for handling
reference property value.
Possible actions are available if a reference is missing
during the import:
• Error (7): Error notification will show if property
value does not exist in database.
• Add (5): If the value of property does not exist in the
NSP database, a new object will be inserted in database and import will use that
new inserted value.
• Empty (6): The value of property do not pass validation
and integration check, system will ignore this value and set property value to
empty.
• Default (8): Shows a dropdown field with list of all
values existing in database for chosen property where you choose which value of
property want to use.
List of all referenced properties, common for each ci
types and the allowed action for each:
• State: Error, Default
• Organization: Error, Add, Empty, Default
• Department, Impact, Used by, Managed by, Location, Product,
Vendor: Error, Empty, Default
Mapping step also offers possibility of saving custom
mapping for selected CI type, set default mapping and Load preferred mapping
from list of saved mappings.
In case you want to use same manual mapping of CSV file
for next import process just click Save Mapping
(10) button and in opening form enter name of mapping. You also have possibility
Set mapping as default. Saved mapping refers only
for the CI Type chosen in import step 1.
If you already have saved mapping, you may just load it
clicking on Load Mapping (9) button. In opening
form you can chose which saved mapping want to load, delete mapping or set
mapping as default.
There is also possibility of Reset Mapping (11)
fields.
When mapping is done, click Next.
The third step -
Preview
After the mapping is determined, preliminary import into
the temporary staging table will be performed. That table will be shown in Preview tab of the import wizard where you can visually
check the data that will be imported. Click Back
to re-map the import data, or Import to perform
actual import of the previewed data into the database. Unmarking checkboxes you
can exclude posts from import.
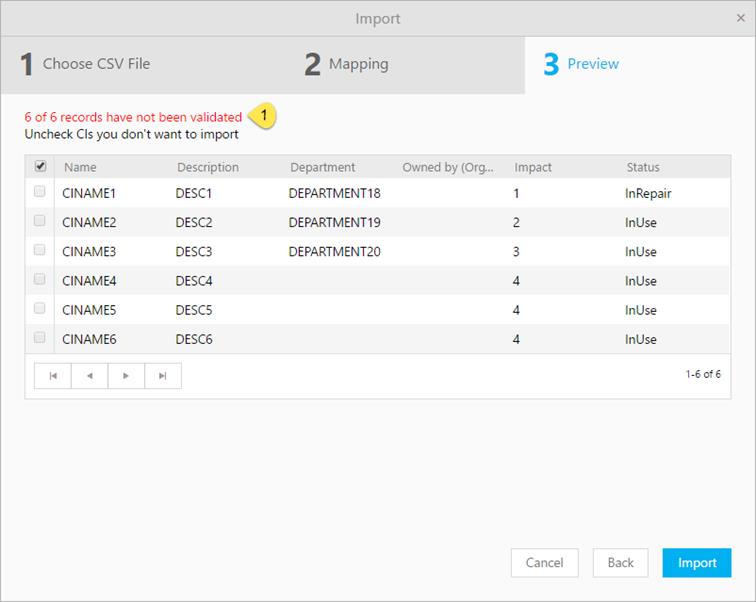
Preview of CIs
In case some of the lines contains errors (invalid data)
then that record will not be possible to select mark for import.
Also you will get notification message (1): records
have not been validated. Otherwise, in this step valid data can be selected
/ excluded from further processing, and you get notification message: records
have been validated
Button Import will
transfer data into the CMDB database.
Updating existing
CIs
External Reference is used
to determine whether insert or update will be performed. If the field is not
defined, or is defined but not in the NSP system, then new CI will be inserted.
If the External Reference exists in the NSP, then
the data which are mapped will be updated with new data.
External Reference
<-> CI ID
The External Reference is the Identifier of the CI and
is used like this during the import:
• If the CI in CMDB
has same External Reference in CSV file the data of the CI will be updated with
import data.
• If the External
Reference does not have a counterpart in CMDB a new CI will be created
• Warning: If External Reference is missing all together, no
updates of the existing CI are possible. New and possible duplicate CIs may be
created.
Updating CI properties is performed by following the
same procedure like when importing new CI’s. In second step, during manual
mapping, it is necessary to select External Reference, and other properties that need to be
updated.
In the case External
reference of CI already exists, the wizard will only update the remaining
selected properties of CI with that same external reference.
Example:
Configuration Item with CI ID 001 is existing in
database and have some properties. After collecting new property value, you want
to update its properties using Import functionality. Precondition for this
is that your CSV file contains column with CI ID values, and contains CI with ID
001. During import, in second step, you should mapping external reference with
CI ID column In CSV file, and all other desired properties you want to update.
After finishing import your CI 001 will be updated with new property
values.