Groups are used to manage NSP users and to handle the ticket workflow. Groups can contain Agents and End Users. Agents must be assigned to at least one Group but they can be member of more than one.
Setting up Groups could be done in different ways depending on e g the business logic and the support workflow NSP is used. There are some common ways where Groups are used:
•Support service level agreements.
•Provide support by expertise.
•Support customers by location and language.
•Escalation of tickets based on their complexities.
To access Groups page, go to Configurations > Manage > People > Groups tab.
Group list is divided in two tabs, Active and Inactive. The action button Activate/Deactivate alternate group between those.
Each item in the list has Group logo, Name, Escalation group and Actions. Actions include three buttons: Activate/Deactivate, Edit and Delete.
The list provides searching, sorting, filtering and paging functionality, export buttons for Print, PDF and Excel similar to other lists in the NSP system. Deleted groups can be selected back similar to the other tabs in Configurations > People.
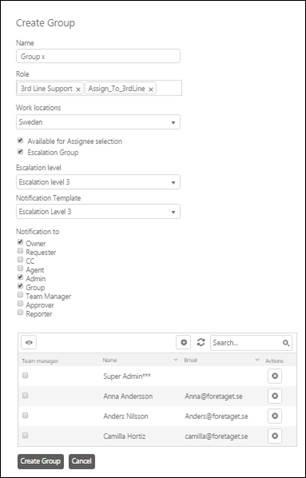
The Create Group form is used to create new Groups. Click the Add new record button above the list. When you create a new group, you can add existing users to the group. The figure below shows the Create Group form.
Create Group
Explanation of the fields in the Create Group form:
•Name: Name for the Group.
•Role: Select one or more Role to be assigned to the Group. Roles selected here will be assigned to all members of the Group.
•Work location: Select Work location of the group. This can be used for fulfillment condition of SLA/OLA.
•Available for Assignee selection: If this checkbox is enabled, the Group (and users belonging to the group) could be selected in popup/dropdown where an Assignee should be selected, e g for a ticket, Service Item, etc. For End User groups this checkbox should not be enabled.
•Escalation Group: Enabling this option means that members of the group belong to an Escalation Group. The escalation should be assigned to an Escalation Level. Agents have been provided with an option to raise escalation. When you enable the Escalation Group option, a few more fields get visible in the form. These fields are: Escalation Level, Notification Template, and Notification to.
o Escalation Level: Select escalation level here. Currently three types of Escalation Levels are supported: Level 1, Level 2 and Level 3. Only Escalation Levels not yet assigned to a group will be displayed.
o Notification Template: Select a notification from the dropdown which is sent to the group when an escalation is raised.
o Notification to: Select the users to whom the notification will be sent when an escalation is raised.
Note! Only one Group can belong to each Escalation Level. If you want to use a level on one group and this level is already used in another group, you need to unmark the level in the other group before you can use it in the new.
•User List: Users of the group are displayed in a list.
To add users to the group, click on Add new record
button  provided on the top of the
list. The User list will be displayed in a popup
window from where you can add one or more users to the group.
provided on the top of the
list. The User list will be displayed in a popup
window from where you can add one or more users to the group.
After adding all the values, click Create group button.
In new NSP version Group is one of the Permission Scope Types. A Group is a Permission Scope that could be member of other scopes and could have users as members. Some parts of the Group management is moved to User & Permission Management. Read more about this new functionality here.