The tab shows Relations connected to the CI. You can add new relations by clicking on Add Relation(s) button. In opened pop-up you choose Relation Type (required field), you can choose one of the defined available (default or system specific) relationships types. A Relation Type consists of both Relation and Inverse relation, e g Uses and Used by.
You also choose Destination Type (required field) which is dropdown field, and you can choose related destination. Item can be related to other CI, Role, Group or Person. Depending of chosen Destination Type third field is changing and you can browse for preferred CI, Role, Group or Person.
If you check the checkbox Inverse relation the relation will be reversed. Example: Instead of “A uses B” and “B is Used by A” it will be “B uses A” and “A is Used by B”.
This table will also be used for deleting existing relation.
In upper right corner of tab you can click the button to change list view into graph view.
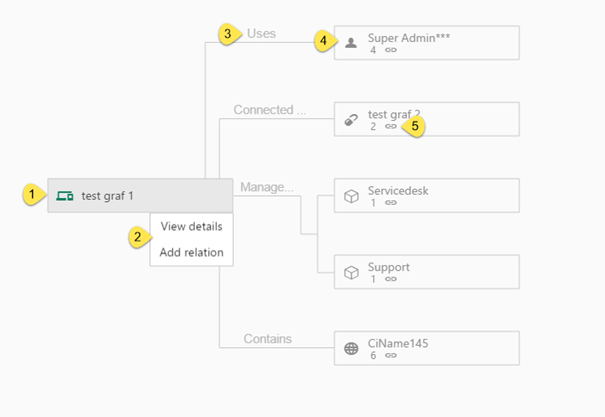
Graph view represent graphical representation of CI relationship. In this mode you can view all CI relation, add new relation, view detail or delete relation according to allowed options.

CI Relations in graphical view
1. Chosen CI
2. Hovering graph item, option button will appear (three dots rightmost on symbol) and by clicking it option menu will appear.
3. Relation between CI and destination item.
4. Destination item (can be a CI, Role, Group or Person)
5. Number of existing relation for graph item.
Depending on object type the choices in the menu (2) varies:
•For Root element you can Add relation. Opens form for adding new relation.
•For CI destination type you can View details, Add relation or Delete relation. View details open CI in new tab, Add relation open form for adding new relation and Delete option delete relation.
•For Person destination type you can View details or Delete relation. View details open pop-up with Person details. Delete option delete relation.
•For Role and Group destination type you can only Delete relation.
Relation list can be exported to Excel or PDF. Select link Export at the top of form. The relation sheet can be filtered according to the functional stage status of the related item. In the drop-down menu you can choose between statuses All, Active or Inactive. Those statuses refer the descriptive state of the stage name itself, as a functionality (e.g. if the stage is called “in use”, it means that it is in active function / use, if it is called e.g. “damaged”, then it is not active/ in function, although it physically exists in the inventory).
General export functions is described here.