New CI can be added in two ways:
•Add CI button above the CI List. This button changes based on selected CI Type in the left pane. If e g Software is selected, than text on button is Add Software, and the form to create a new Software CI will be opened. If you have not selected any CI Type (All CIs is selected) you first have to select CI Type in a popup shown below.
•Click the Add+ button In Dashboard and choose CI from dropdown list. First step is to select appropriate CI Type or subtype from the list of default and custom CI Types.
Note: CMDB functionality is license controlled, meaning that there could be a limitation in the number of CIs the system can hold. If it is not possible to add CI this could be the reason and you need to upgrade NSP to other product version, see Nilex Products.
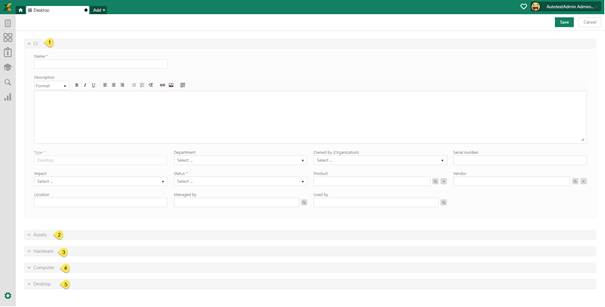
After selecting CI Type, you will get a list of default properties which need to be edited (the example below shows the form when CI Type Desktop has been selected, form includes properties for inherit CI Types Computer, Hardware and the default CI properties), because Desktop is a subtype of Computer is a subtype of Hardware.
Same form is shown when you Edit a CI.
Properties for new CI (example)
1. CI: List of default properties that each CI has, and which are same for all CI Types. Name, Type and Status are mandatory fields. Type is generates value from the chosen CI, and can’t be edited.
2. Assets: Information about asset. Only Hardware and Consumable CI types have these properties.
3. Hardware: Properties inherited from CI Type Hardware.
4. Computer: Properties inherited from CI Type Computer.
5. Desktop: List of properties only for the particular CI Type Desktop.
This is only the example of adding/editing a Desktop CI. Other CI contain other default properties from their parent, depending on their Type.
List of default properties for each type is displayed in Default properties for all CI types.