Tap on the Browse Tickets in the Tickets Main Page opens the screen showing a View (a filtered list of tickets). The first view in the list is displayed initially. Page shows a list of the tickets. For each ticket following fields are displayed: •Source Icon: The icon defines the source of the ticket, from where the ticket is originated. It can be System, Facebook, Email, etc. See Ticket Source Icons. •Ticket Subject •Ticket Id: Unique id for the ticket. •Status: A label with ticket status, shown as a colored circle followed by Status name. Above the list is a List Header (1) section that displays name of the currently displayed View. Refresh button (2) reads new data and updates the list. Map View button (3) shows locations on map. |
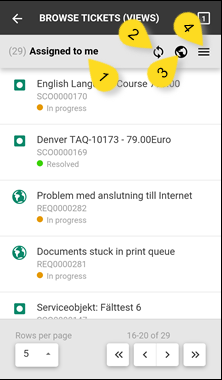
Browse tickets |
To see details of a ticket, tap that ticket in the list. This action opens Tickets Details page page.
Paging features are available below the list similar to other lists. You can select to show 5, 10, 20 or 50 items per page. If the list contains more than selected number of tickets, only first page is displayed initially.
Menu (4) on the right side of the list header opens the Views menu where you can select view to display:
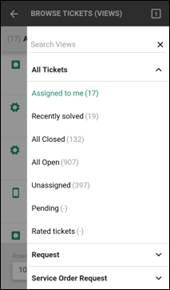
The content in Views menu is dynamic, available ticket filters in the list are defined by administrator in web interface. The Views are divided into different Ticket Types. You can expand/collapse the view list for each type by tapping the arrow symbol. Note that here you can select also Task views to get a list of tasks. Tap a view, then slide panel closes and ticket list filtered according to the view is displayed. If you want to close list without choosing a view, tap on header or in grey area to the left of the list. |
Views |