The Agreements tab is one of the components of the SLA/OLA functionality to define SLA/OLA service targets in the NSP to effectively manage and monitor service level performance and meet the service level goals.
SLA/OLA provides an interface to attach the SLA/OLA agreements and also allows the ability to capture the information like start date, end date, representative of the customers who has signed the agreement and SLA/OLA Conditions as a part of the agreement details. NSP provides simplified SLA/OLA mechanism by mapping agreement details to the SLA/OLA for each customer or organization. Below figure depicts the Agreements page.

SLA/OLA Agreements
Agreements tab lists the SLA/OLA Agreements created earlier in the NSP account. Each agreement item in the list contains various columns:
•Id: The Id-number of the SLA/OLA -agreement
•Customer: The Customer that has signed the agreement
•Valid From: Start Date
•Valid To: The date that the agreement cease to be valid
•Contact Person: The person in the customer organization responsible for the agreement.
•Actions: Buttons for action to do with the Agreement (4). Include Activate, Attachment, Edit and Delete. Activate button is used to activate or deactivate the SLA/OLA. Attachment is used to attach SLA/OLA document associated with the SLA/OLA. When you click Edit button, the SLA/OLA form will be displayed. This form is similar to SLA/OLA form displayed when you Add SLA/OLA, except that Edit Form contains details already filled in it. Delete button is used to delete the SLA/OLA from the NSP. When you click this button, confirmation alert is displayed.
Search box (3) is also provided to search the agreement in the NSP. Search is useful when there are many service agreements in the NSP account.
Each agreement item is collapsible here. To see the SLA/OLA conditions for any SLA/OLA agreement, click on the small arrow icon (6) available for that particular item in the list. This action will open up SLA/OLA Conditions section under the selected agreement. This gives the basic information about the SLA/OLA Conditions.
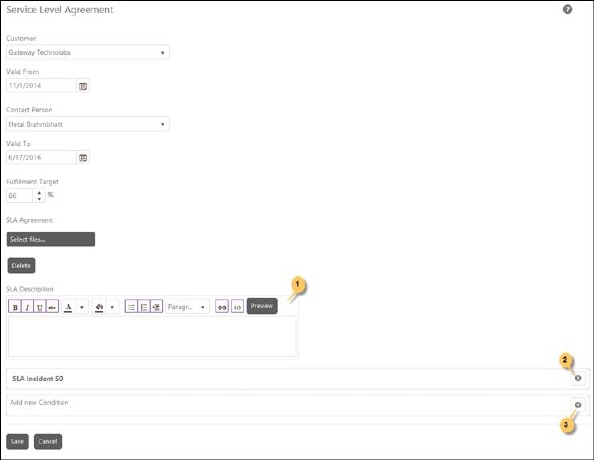
To add a new SLA/OLA agreement, you click Add new record button (2) available just above the list. When you chose to add new agreement, the SLA/OLA page will be displayed:

SLA/OLA Agreement
The SLA/OLA form contains different fields as shown in the above figure:
•Customer: Select the organization from the dropdown for which the new agreement is going to be created.
•Valid From: Select the date from which the agreement is valid.
•Contact Person: Select the contact person from the dropdown. It is a representative of the customer’s organization whom you can contact for any query regarding SLA/OLA. This field is disabled by default and enabled only if Customer is selected using above dropdown list. It displays the users of selected organization.
•Valid To: Select the date till which the agreement is valid.
•Fulfillment Target: Percentage of the tickets that must comply with the SLA/OLA conditions entered here.
•SLA/OLA Agreement: Select the SLA/OLA agreement file. You can also delete the uploaded agreement file by clicking the Delete button.
•SLA/OLA Description: Enter proper and valid description for the SLA/OLA. This is useful to identify the SLA/OLA objective. You can format and Preview the description.
•SLA/OLA Conditions: These conditions are used to filter data for the SLA/OLA. These conditions are added from the SLA/OLA Conditions set created earlier. To add SLA/OLA Condition to this form, you click Add button (3). When you click that button a popup is displayed where you select appropriate SLA/OLA Condition from the dropdown list. An option to delete the added condition is also provided in this form (2).
When you have entered all the data in this form, click Save button to save the agreement details and create the new SLA/OLA Agreement.