
SLA/OLA Conditions is used to apply filters on the SLA/OLA. Using these conditions, you are able to retrieve only the SLA/OLA data which is required. The SLA/OLA Conditions can be added from the predefined conditions set.
You are able to add multiple SLA/OLA Conditions as per the different requirements. SLA/OLA Conditions tab (4):
SLA/OLA Conditions
The SLA/OLA Conditions page contains a list of the conditions added to the system earlier. The list contains active SLA/OLA Conditions followed by inactive ones. Each condition in the list contains condition Name and Actions buttons (3). Actions include Activate, used to activate or deactivate the respective SLA/OLA condition, Edit and Delete.
This page also contains search and filter functions similar to other lists in NSP.
To add new SLA/OLA Condition, click on the Add new record button provided on the page just above the list (1). When you click this button, a popup with a dropdown list is displayed. You select Ticket type from the dropdown for which you want to create SLA/OLA Condition. When you select any value from the dropdown, the respective SLA/OLA Condition form will be displayed. Following figure depicts this form for Ticket type Incident:
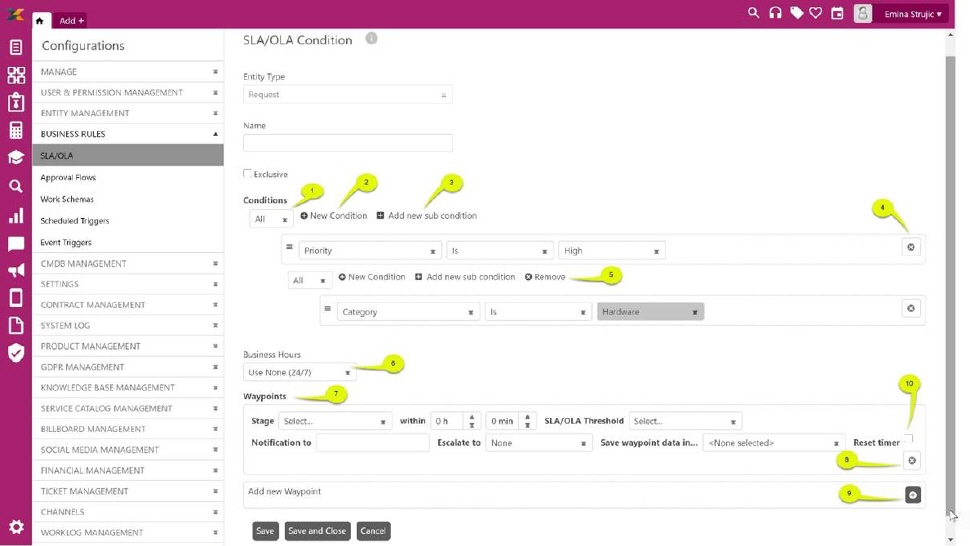
SLA/OLA Condition
The Add SLA/OLA Condition form contains different fields:
•Ticket: This field shows the Ticket type selected earlier.
•Name: Enter name for the SLA/OLA Condition.
•Exclusive: When an exclusive SLA/OLA -condition is applied to a ticket, then no other SLA/OLA could be applied. If more than one Exclusive condition is met in the SLA/OLA, only the first in order will be activated.
•Conditions: In this field, you have to specify condition that must be fulfilled to achieve the SLA/OLA target. Defined conditions are matched against the properties of a ticket. This field contains three sub fields; Dropdown list to select condition type, Add New Condition button and Add New Sub Condition button:
o Condition Type (1) – Two options are available here: All and Any. You can select All to require match of all the conditions and you can select Any to require match of any single condition from the conditions defined below this field. For example, if you need to define filter criteria like “Priority is Critical” or “Priority is High” then you need to select condition type Any. Similarly, if you want to define criteria like “Ticket is registered” and “Priority is Critical” then you need to select All. Based on the selected type, ticket properties are matched with the conditions. Tickets are filtered based on the defined conditions. If Any is defined then all the tickets for which any single condition is matched from the defined ones are considered for SLA/OLA, in case of All, only those tickets for which every defined condition is matched are considered for SLA/OLA.
o Add New Condition (2) – Initially no condition is added. You click Add New Condition button to add new condition for the selected condition type. Clicking this button creates a new row with a dropdown list. This dropdown list contains the values based on the Ticket type selected. For example, you have selected Request in the Ticket type then field dropdown list contains values like Requester, Assignee, Subject, Description, etc. When you select a value from the dropdown, more input fields are displayed in the same row. You have to select or enter appropriate value in those input fields. You can add more than one condition by repeating the process. You can remove any condition by clicking on Remove button (4) provided at the end of the row. Conditions will be matched in the defined order.
o Add New Sub Condition (3) – When you click this button, four fields; Condition Type, Add New Condition, Add New Sub Condition and Remove button are displayed below parent condition. The functionality of the first three fields is similar to the functionality described above. Remove button (5) is used to remove the sub condition. All the conditions and sub conditions created for the defined sub condition will be removed when you click this button. This functionality is used to define sub conditions which can be matched to fulfill any single condition. For example, if you want to define criteria like “Ticket is registered” and “Priority is Critical or Priority is high” then you need to define sub conditions for the second condition of priority using Any condition type. Note that sub conditions can be defined only up to three levels for any condition.
•Business Hours (6): You can define the scheme for working hours. You select the business hours in which SLA/OLA conditions are applicable. Three options are available for this field:
o Use None (24/7): 24/7 business hours are considered as working hours.
o Use Location Default: Business Hours defined for Assignee of a ticket are considered as working hours. Working hours of an Assignee is defined in his Group by specifying Work Location. Work Location is associated with Business Hours.
o Use Specific: You can choose from the available business hours. When you select this option, one more dropdown is displayed containing Business Hours defined in the Work Schemas. Select an option to be applicable on the defined SLA/OLA condition.
•Waypoints: You can add Waypoints for the condition using this field. After selecting this option, you need to click on Add button (9) to add a new waypoint. When you click this button, a new row gets added to the table. You specify values to the fields (7):
o Stage: Select Stage to be measured from the dropdown.
o Within: Select time in hours and minutes. This defines the time within which the condition should be fulfilled i.e. Ticket can stay in the Stage for the defined time.
o SLA/OLA Threshold: Select threshold to which the SLA/OLA belongs for fulfilling the SLA/OLA condition. Select Threshold definition defined earlier.
o Notification to: Select User to whom notification will be sent for each SLA/OLA Threshold level. You can select more than one user in this field.
o Escalate to: Select User or Group to whom the escalation is raised if the SLA/OLA condition is breached.
o Save waypoint data in…: Put measure data in a data object connected to the ticket. Data saved to the data object could be used to create reports. Data object selectable by default is Main waypoint stage.
o Reset timer (10) - The time in SLA / OLA is usually counted from the moment when a case is created. With the new function "reset timer", the time has been reset and it starts counting down from the moment when the condition for that SLA has been met. If the reset timer setting is not selected, SLA / OLA works just as before.
When you have filled up the form with the valid data, you need to save the form by clicking the Save or Save and Close button to generate the SLA/OLA conditions.
The SLA/OLA Conditions defined here can be used while the SLA/OLA Agreements is created.