The process for creating a barcode document template follows the same steps like adding an Document Template.The template feature allows you to export entity information from the NSP system to a document. When an entity is exported all tags are replaced with data from the selected entity and you have a choice of four different barcodes, depending on the type format. Currently the library supports generation of the following types of barcodes and QR codes:
•QR code is a two-dimensional barcode that can store a variety of data types, including numeric, alphanumeric, and special characters.
•EAN-8 is a 8-digit numerical code that provides a unique product identifier.
•EAN-13 is a 13-digit numerical code that provides a unique product identifier.
•Code 128 is high-density, alphanumeric symbology capable of encoding all 128 ASCII characters.
Barcode field tags must be properly constructed in order to obtain fields written in the appropriate localized format. Example:
This tag is used to create a EAN-8 barcode : [[EAN8:barcode(ean8)]].
Currently the library supports two ways of altering barcodes and QR codes:
•Cropping alters the composition of the barcode.
•Resizing maintains the composition but changes the barcode's size.
Example: This tag is used to create a QR barcode with a width of 100 pixels: [[QR:barcode]:resize(100)].
Setting a regex validator as explained here is a way of minimizing the risk of errors. Validator with this expression /^[0-9]{8}$/ ensures that the field values must contain only 8 numeric digits. Without specifying the regex expression and entering, for instance, 9 digits in an EAN-8 type barcode, the final product will only display a regular string expression.
Setting a fixed size
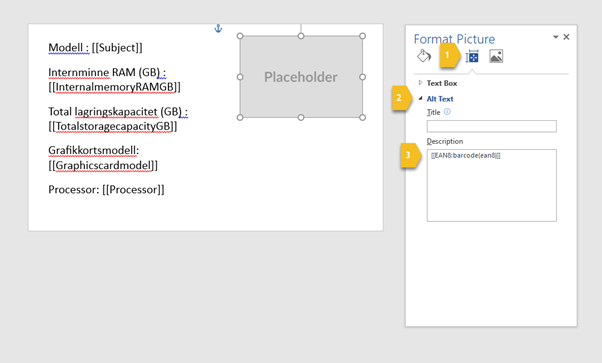
The process for creating a barcode document template follows the same steps like adding an Document Template.There is an exception, though, and that is when the user is creating a barcode with exact proportions. Inserting a placeholder(random picture) and resizing accordingly to your document size is the initial step. Next step is using the inbuilt function of alternative text (Alt text) found in Microsoft Office. The procedure is a bit different depending on the Microsoft Office product but can be found on this link.

Alt text edit (example)
1. Select Layout and characteristics.
2. Select Alt Text .
3. Select Description and insert the formatted tag.
These placeholders will be replaced with the actual value and size when the file is generated.