This function allows you to update a certain property in CIs either manually or with a scanner. Based on configuration inside the mapping process you are able to select the scan target and type of printing you wish to perform on the selected CI document template. This is limited to only DOC and DOCX files. The process is done in four steps:
Agent Portal> Configuration> CMDB Management> CI Registration Process
The first step - Select document template and printer type
Agent Portal> Configuration> CMDB Management> CI Registration Process > Setting

Ci Registration Process Settings tab
First step will be the selection of CI Document template as well as the selection of the type of print that will be executed:
1. Document template id: Select CI document template from the dropdown list.
2. Printer type*: Mandatory field. Select the type of print that will be conducted:
a. Browser printer - allows users to print web pages directly from their web browser.
b. Server printer - a print server is either software, dedicated hardware or a computer that manages and processes print requests within a network.
c. Nilex Client Printer - a local printer refers to a print queue that has been defined on a system that is local to the user.
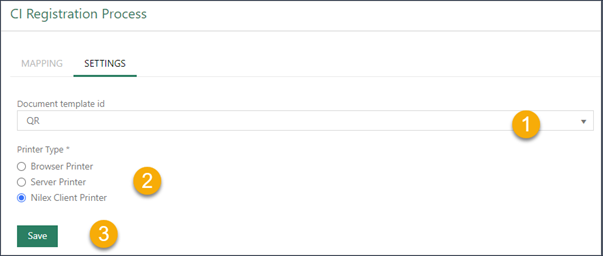
Ci Registration Process Settings tab
The second step - Mapping configuration
Agent Portal> Configuration> CMDB Management> CI Registration Process
> Mapping
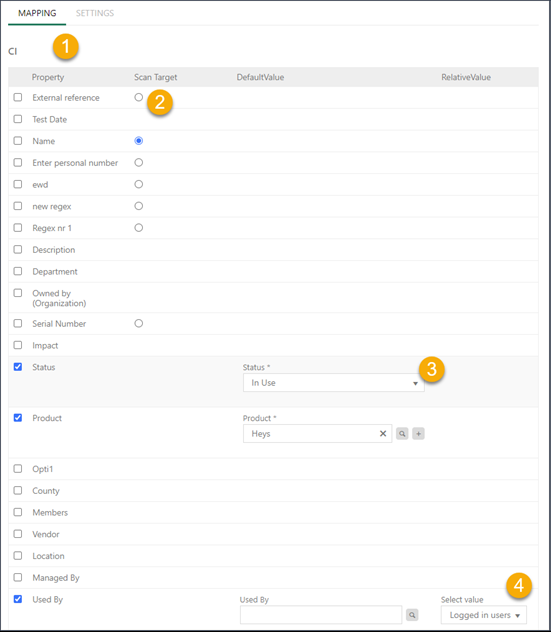
The second step is to select the target CI type and specify which properties will be mapped and changeable during the process.
Ci Registration Process Mapping tab
This form contains four columns:
1. Property: Contains list of all CI properties for the selected CI type. The list of CI properties and data types is shown in Default properties for all CI types.
2. Scan target: Specific properties are only available for scanning on the top node level of CI Types (CI).
3. Default Value: Default value for the corresponding property.
4. Relative Value: Field that dynamically refers to whichever user is currently logged in. This means its value changes depending on who is logged in at the time. This function is also available for setting date patterns.
Note!
@UtcNow – current time in UTC
@Now – current time on server
@Today - start of the day is 00:00 on the server
@UtcToday - start of the day is 00:00 in UTC
y - year
m - month
w - week
d - day
h - hour
min - min
example @Now - 5m10d5h15min
@Now - 24h
@UtcNow - 12h
The third step - CI Registration
The third step is to select the target CIs in CMDB and execute the process.
Select which CIs in CI List by Type that shall be updated. Use search and filter function to find the CIs. Enable checkboxes leftmost on rows for those CI. Above list there is a checkbox to enable/disable checkboxes for all CIs that are currently visible (Note: Only checkboxes for CIs on the currently displayed page are enabled/disabled, not all included in the view).
When checkboxes for chosen CIs are enabled, click link CI Registration above the list. In popup form there is a list containing all CI properties that could be changed for the set of selected CIs.
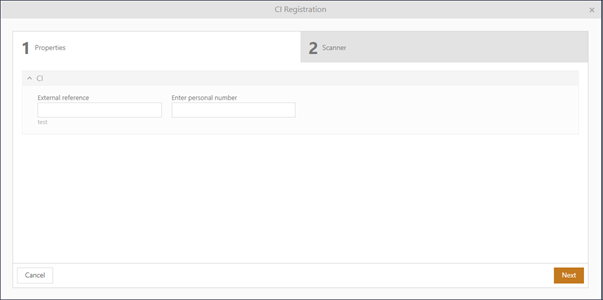
For each property, you can enter values into the predefined mapping process and selecting next will take you the Scanner tab.
Ci Registration Process Properties tab
Scanner tab form properties:
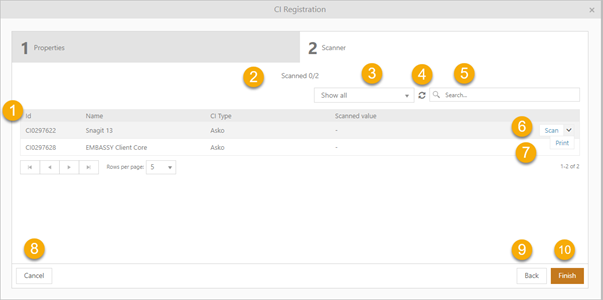
Ci Registration Process Scanner tab
1. CI Column Header: Shows Id, name and Scanned Value.
2. Scanned: Counter that shows the number of scanned CIs.
3. Scanned value dropdown: Dropdown that gives users the option to sort by scanned, not scanned and all CIs.
4. Refresh: Refresh list
5. Search: Search feature which allows you to search selected CIs.
Scan: Selecting scan opens a popup where you enter a value to the field selected as a Scan target in the second step.
Ci Registration Process Scanner tab
a. Value: Insert value as shown in this example which will be saved in the Name field.
b. Accept and print: Save the changes and redirect to the selected print type from the first step.
c. Accept: Save the changes and redirect to the previous step.
d. Cancel: Cancel the operation.
7. Print: Save the changes and redirect to the selected print type from the first step.
8. Cancel: Cancel the operation.
9. Back: Return to settings tab.
10. Finnish: Close and return to previous CI View.
Note: The CI Registration does not check if CI is currently opened by another agent. All selected properties will be overwritten for all chosen CIs.
Furthermore, inserted property values are not checked for plausibility or allowance.
Use the function with carefulness and try to update CIs during times when system activity is low.