If changes were detected during scan, this will be notified in the Scan History|topic=Network Scanning History with NNS Changes Detected info on the sow (hover mouse). Click this button to import changes to CMDB. The following window will appear:
Network Scan Report
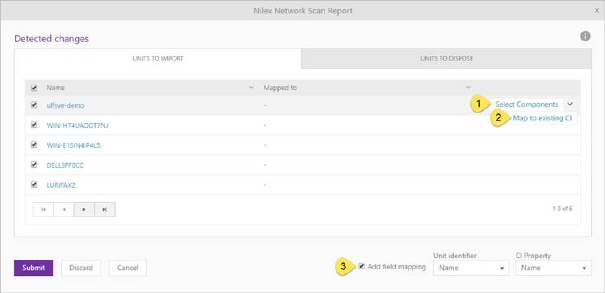
This form is divided in two tabs. First tab UNITS TO IMOPRT lists all changes detected by scanning NNS database. You can select which CIs you want to import by checking or unchecking checkbox on left side of CI name. Also you can click on button Select Components (1), and choose which CI components you want to import.
In case that you want to update already existing CI, use Map to existing CI (2) action from dropdown. When you click this button list with all CIs existing in NSP will appear, and you can choose desired CI. In this case the wizard will only update the remaining selected properties of CI.
This form contains once more option for updating existing CIs. Selecting Add field mapping (3) checkbox you can mapping CI by name. This option is similar like Map to existing CI, with difference, that you can use this option for mapping all CIs from list.
Second tab UNITS TO DISPOSE lists all changes between previously and current NNS scanning. e.g. If you have printer in NSP database which is imported from NNS database, and in meanwhile that printer is disconnected from the network. CMDB Integration will compare NNS database with all units in NSP which are previously imported from NNS and create lists of changes.
There are two different cases:
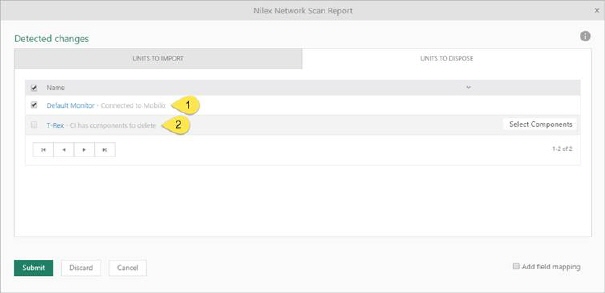
Units to dispose
If CIs (e.g. Monitors, OS and Printers) are disconnected, in the list you can see CI name, as well as name of related CI and name of relation type. Select which CIs you want to “delete” by checking or unchecking checkbox on left side of CI name. All selected CIs will change status to Disposed and relation will be deleted.
If CI’s components (e.g. Hard Disk, Network Adapter and RAM) are disconnected, you can see in the list name of CI having components to delete. Checkbox on the left side of CI name is disabled, but you can click Select Components button and choose which CI’s components you want to delete. All selected CI’s component will be deleted.
After choosing which CI, configurations, components, software and properties you want to import in CMDB, click on the Submit button. Importing will take a few minutes and after that all of chosen CIs will be imported in CMDB after which you will be able to find them in the CMDB list.