System for Cross-Domain Identity Management (SCIM) is an open standard protocol for automating the exchange of user identity information between identity domains (Microsoft Azure) and IT systems (NSP Application).
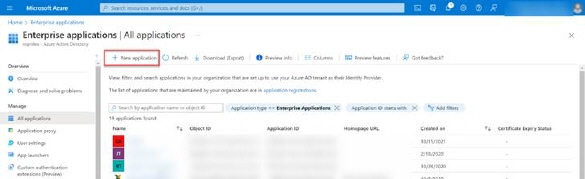
Create Enterprise Application
•Go to https://portal.azure.com/ and log in with your account.
•Go to Enterprise applications
•Click on New application

Click on Create your own application (1) and in the opened form insert Application Name (2), choose Integrate any other application you don't find in the gallery (Non-gallery) (3) and click on Create (4) button to finish creating of Enterprise application.
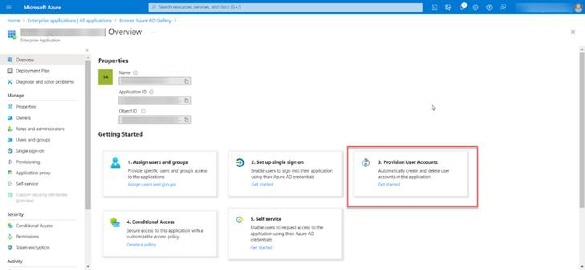
Configure Provisioning Users
Now, when application is created, choose Provision User Accounts – Get started
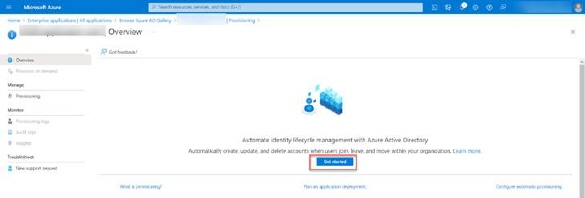
In opened screen click on Get started button
•In the Provisioning setup page choose Automatic (1) Provisioning mode.
•Asks the system administrator for the Tenant URL (SCIM service URL) and add /scim (2) path at the end.
•Insert Secret Token value (3) (Here is how to create your secret token).
•Click on Test Connection (4) button.
•If all configurations are valid, you will get positive confirmation and after that you should click on Save (5) button
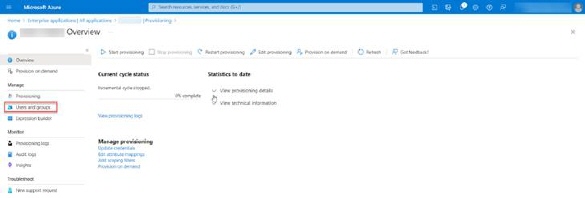
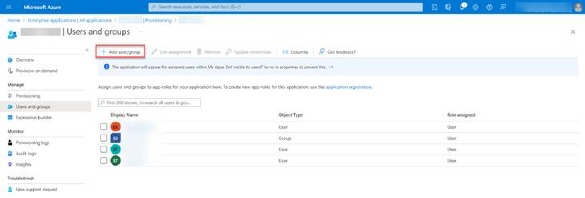
Assign Users and Groups
After provisioning setup is completed go back to Provisioning page to set users and groups.
•Click on Users and Groups item in the left menu
Click on Add new user/group
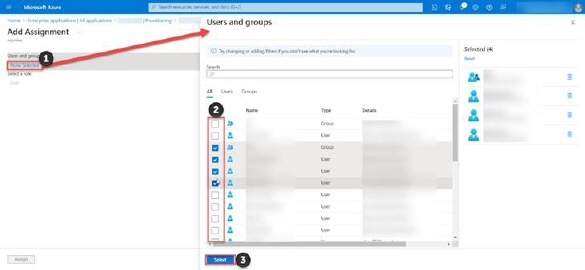
Here, you will be able to add desired users and groups from your Azzure account to enterprise application.
•Click on None selected (1) to open users and groups list. Choose users and groups from list marking the checkboxes (2) and click on Select (3) button
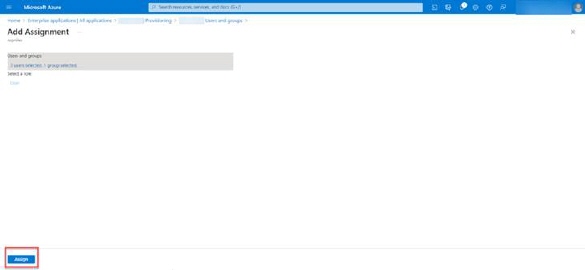
•After users and group selections Assign button will be available and just click on it to assignee selected users and groups to Enterprise application.
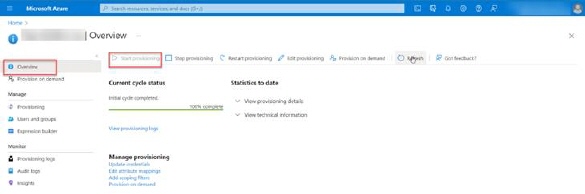
Start Provisioning
After all settings and configurations are done, and users and groups are assigned, go back to Enterprise Application – Overview page and click on Start provisioning
All assigned users and groups from Azure Enterprise Application should be created in NSP application.
Secret token
Go to NSP and open Configuration> Channels and Integration > API keys
•Click on Create API key button.
•In the opened popup enter the Name of API key (Secret token) you want to create and choose Expiry time.
•Use Save button to generate API key (Secret Token)
Note: This is your API key. Please copy it and store it in a safe place. You will not be able to see it again.
SCIM integration
System for Cross-domain Identity Management (SCIM) is a standard for automation of the exchange of user identity information between identity domains or IT systems.
For example, as a company hires new employees and separates existing employees, they are added to and removed from the company's electronic employee directory. SCIM could be used to automatically add/delete (or provision/deprovision) accounts for these users in external systems.
This feature allows you to integrate with Azure AD and set up the rules for the mapping.
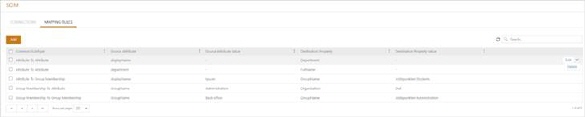
Agent Portal> Configuration> Channels and Integrations> SCIM> Mapping Rules
SCIM Mapping rules - Main configuration
Edit - Modification of mapping rules for selected rules.
Delete - Remove the select mapping rules.
Add -Select a mapping rule whose parameters you want to set.
SCIM Mapping rules
Set of predefined rules for mapping
The SCIM integration allows users to create mapping rules which ensure that user and group information can be successfully synchronized between Azure AD and NSP, with a focus on mapping rules. Adding a new of set of rules are set in two steps:
1. Select set of rules
2. Configure mapping attributes from Azure AD to SCIM.
Group Membership to Group Membership Mapping
End-uses attributes from group membership in Azure AD are correctly mapped to the corresponding group membership in NSP.
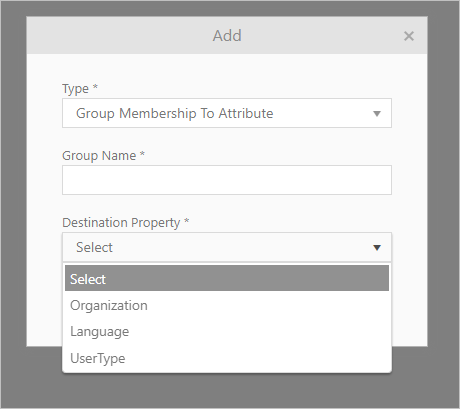
Group Membership to Attribute Mapping
Ensures that group memberships in Azure AD are correctly mapped to attribute memberships in NSP with predefined options.
Group membership to Attribute configuration
Attribute To Attribute Mapping
Ensures that an attribute from Azure AD (e.g., displayName) is correctly mapped to the corresponding attribute in NSP from the SysPerson table in the database.
Attribute To Group Membership Mapping
Ensures that an attribute from Azure AD (e.g., department) is correctly mapped to group memberships in NSP.
Attribute Value to Attribute Value Mapping
Ensures that specific attribute values in Azure AD (e.g., department) are correctly mapped to corresponding attributes in NSP.
SCIM – Connections
This feature allows you to set up the client connection with NSP and integrate with Azure AD, Curity, and further management platforms. The integration brings identity and API security together for robust authentication and authorization.
Agent Portal> Configuration> Channels and Integrations> SCIM> Connections
Edit - Modification of mapping and connection for selected connections.
Delete - Remove a connection.
Add - Create a custom connection
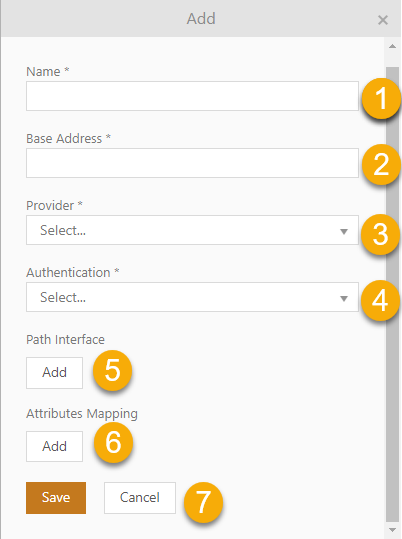
SCIM Configuration
1. Name - Enter connection name
2. Base Address - Enter the URL of the SCIM connector.
3. Provider - Select identity provider from Azure, Curity and others.
4. Authentication* - Select method of authentication between token and client secret:
a. Token authorization
i. Token - Enter issued access token.
ii. Client secret - Enter issued encoded client secret.
b. Client Credentials
i. Client * - Enter SCIM connection client Id.
ii. OAuth URL * - Insert https://<auth-server-url>/oauth/v2/oauth-token.
iii. Client secret - Enter issued encoded client secret.
c. Scope - Define specific actions that can be performed on user data within a system.
Example scopes for Curity:
•um:internal:user:read: Allows viewing user data.
•um:internal:user:write: Allows creating new user data.
•um:internal:user:patch: Allows partially updating existing user data.
•um:internal:user:delete: Allows deleting user data.
These permissions are critical in ensuring that users have the appropriate level of access to perform their tasks while maintaining the security and integrity of the system. Implementing such granular permissions helps in adhering to the principle of least privilege, ensuring that users can only perform actions necessary for their roles.
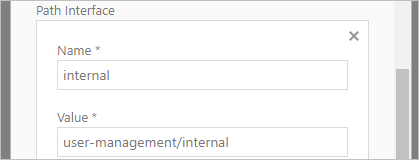
5. Path interface - For user management operations within the system. If no value is not inserted the default value is SCIM. If the path interface usage is different in your platform an example is given below.

Path Interface configuration example
a. Name - Enter namespace or category under which the interface functions.
b. Value - Specify the path or endpoint within the API that handles user management tasks.
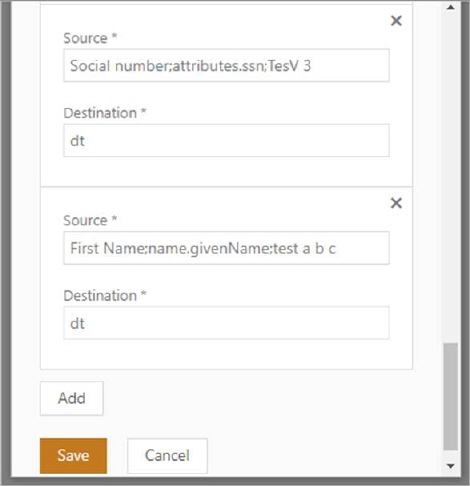
6. Attributes mapping – This function serves to map source attributes to destination attributes. If you wish to display the SSN in a dropdown list, the destination attribute is SSN. Similarly, if you intend to utilize filters and map the logged user's department, the target attribute is department. Mapping supports the use of a detail template.
a. Source * - Path from SCIM attribute from user object, and labels
b. Destination * - Value DT (this means detail template)
c. Add - Add new mapping.
To configure this, please indicate which data you wish to use in the following format. If you require two, three, or four columns in DT, please write dt, see given example.
"source":
Social number;attributes.ssn;Ssn
"destination": dt
"source":
First Name;name.givenName;FirstName
"destination": dt
"source":"
Last Name;name.familyName;LastName
destination": dt
Source configuration example
The first parameter is the label. If the label begins with "Common," it will be searched for in the translate key. Otherwise, it will simply be displayed as written.
The second parameter is the path to the value from the user object in SCIM, such as "name.familyName."
The third parameter is the identifier in NSP. It must be written without spaces, with the first letter capitalized (for example, "FamilyName"). However, if the third parameter is not provided, the system will use a randomly generated identifier.