The digital signature allows you to verify and sign all your valuable documents and distribute them within the NSP. To set the digital signature, you need to go through the following steps:
1. Have valid email configuration settings (see instructions here).
2. Create text template for the signature
3. Set digital signature form.
Signature text templates
Text template is used for creating content you want to distribute to specified users via email or SMS.
Go to Manage > Text templates > Entity text templates > Email/SMS > Add template
The digital text template has 2 main tabs: Template details and Template text.
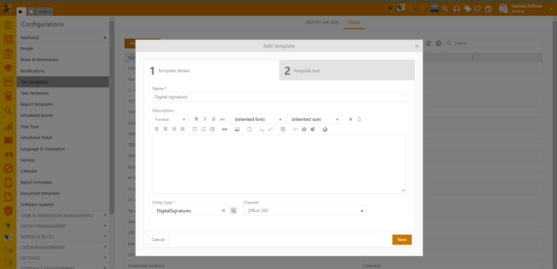
In the template details tab, you will need to enter: Name, Description (optional), Entity type (choose DigitalSignatures), Channel (your active email configuration).
Digital signature text template: Template details
The next tab is about the content of the template. Here you will enter the title of your email, and the body text. You can have a straightforward text or use tags available on the right section of the screen. Including tag “” in your body text, will take the user directly to the document that needs to be reviewed and signed.
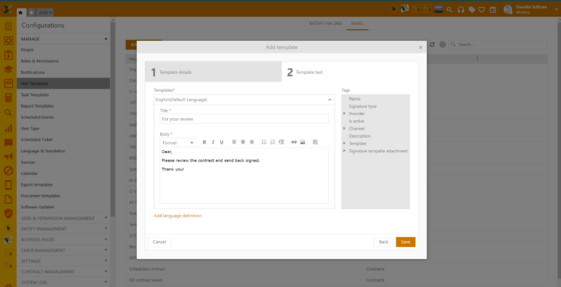
Digital signature text template: Template text
You can add as many text templates as you need.
Digital signature form
This is where you define how your digital signature is used.
Go to Channels and integrations > Digital signature > Add template
Digital signature is created/edited in steps; there are several tabs in the form. You can step between tabs using the Next or Back buttons. When setup is complete for all tabs, click Finish to return to the Digital signature list.
Tab Settings
Tab Settings contains the following fields:
•Name (mandatory)
•Signature template - Here you can upload your signature template, or you can continue using the one provided by the system. If you use your own, make sure you include all the relevant tags for your digital signature to work. There are also icons for PREVIEW and DOWNLOAD the current template.
•Description (optional)
•Certificate - Here you will see the list of available certificates installed on your local machine. If you already have an e-sign certificate, you can select it. Otherwise, leave it empty, and the NSP will generate one for you.
•Provider (mandatory - choose from available options)
•Signature type (mandatory – here you decide which type of signature you are allowing for the document's signatures):
•Type
•Draw
•Image
•Is Active – mark the checkbox if you want to activate the digital signature config.
•Is Default – mark the checkbox if you want to set the digital signature config as default.
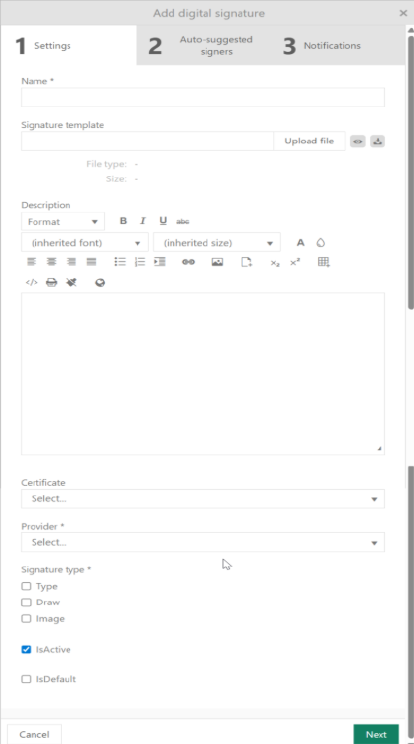
Digital signature form – tab Settings
Tab Auto suggested signers
In this tab, you select signers who will be predefined in the entity forms.
Signers are organized by entity, with each group containing system-user reference properties:
•Ticket: Requester, Assignee, CC
•CI: Used by, Managed by, Owner
•Contract: Contract approver, contract owner
•Knowledge base: Author
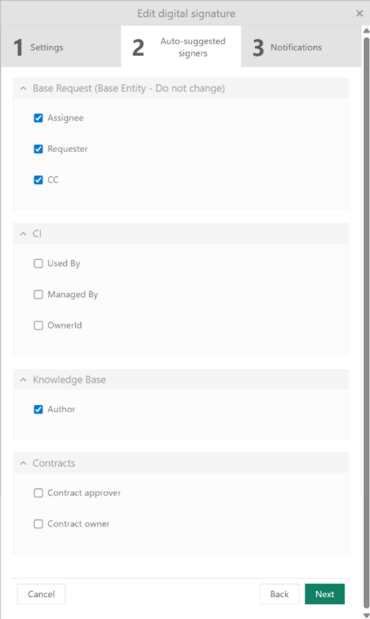
Digital signature form – tab Auto-suggested signers
Tab Notifications
In this tab, you define the templates and delivery channels for all three digital signature notifications:
•New notification request settings – triggered when a new document template is added
•User signed notification – triggered when one of the signers signs the document
•Reject notification settings – triggered when one of the signers rejects the document
For each notification type, you configure the delivery channel: Email or SMS, as well as the templates that will be sent to users.
Once you are done, click Finish.
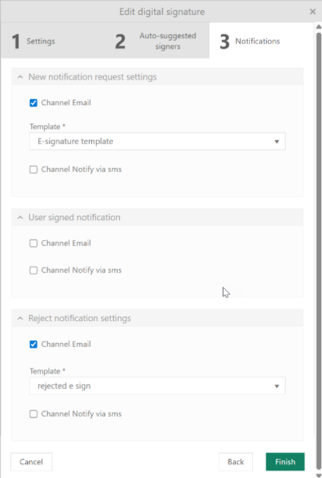
Digital signature form – tab Notifications
The digital signature can be applied to any type of document used in the NSP, or any attachment within CMDB, Contracts, Tickets, and Knowledge Base.