To access the Single Sign-On Settings: Click Configuration > Settings > Security > Authentication.
At the below part of page you find section for Single Sign-on Settings:
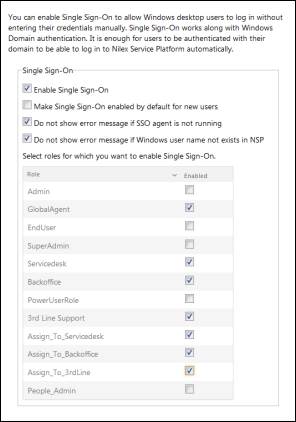
Single Sign-on Settings
•Enable Single Sign-on: Marking this checkbox allows Windows desktop users to log in without entering their credentials manually.
•Make Single Sign-On enabled by default for new users: It this checkbox is activated will new users created in NSP (manually created or imported from AD) have Single Sign-on activated in their User Profile by default.
•Do not show error message if SSO agent is not running: If activated, the user will be redirected to login page directly if SSO agent is not running on his computer. Install NSP SSO Agent.
•Do not show the error message if users cannot be found using their Windows user name: If activated, the user will be redirected to login page directly if User Name does not exist in NSP.
•Use SSO directly when opening Self Service portal URL: If activated user is logged in directly after input URL in a web browser. If not activated user must click Login button in NSP start page to initiate the login.
•Select roles for which you want to enable Single Sign-On: Role list, only visible if Single Sign-on is enabled. You have to activate the roles where SSO should be enabled.