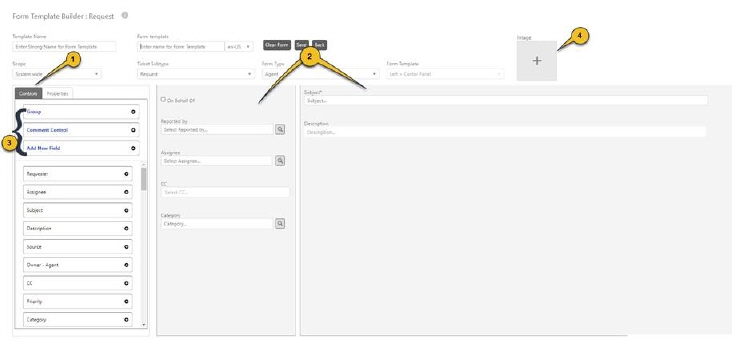
Following figure shows the Form Template Builder Form. This form is used to create or edit Form Templates.
Form Template Builder
The Form Template Builder contains various fields:
•Template Name: The unique name of the entity form which can be used as a translation key in the system.
•Template Label: Enter localized names for the entity form. You need to first select the language from the dropdown list and then enter form name for that language. Repeat for all languages in the system.
•Scope: Select scope for the form from the dropdown list. This defines users to which the form is accessible. Four options are available:
o User Specific: This option is used to select and define the users who can access the form. When you select this option, a person icon is displayed beside the dropdown list. Clicking on it opens a popup which displays a list of Agents. You can select one or more agents to whom the form should be accessible in checkboxes in front of the names.
o Group: This option is used to select and define the group(s) whose members can access the form. Similar to User Specific scope, an icon is displayed. You can select the group(s) from the available active groups.
o Organization: This option is used to select and define the organization(s) whose members can access the form. Functionality is similar to User Specific and Group scope.
o System wide: This option is used to give access permission to all Agents of the system.
•Ticket Type: Select Ticket Type for the entity form being created. Ticket types are configured from the Entity Editor. Note that this field is displayed only for the entities which base type is Base Request.
•Form Type: A dropdown list to select the type of user for which you want to generate the Form Template. The dropdown has various options; Agent, End User and Anonymous User. Based on the selected type, respective editor panel is displayed in Form Template field.
•Form Template: Based on the selection in the Form Type, respective value is displayed here. If you selected Agent, Two editor panels, Left and Center panel are displayed and Form Template field will contain Left + Center Panel value. For End User and Anonymous User, Single Panel Web is displayed. This field is disabled and you cannot change the value.
•Settings: This setting is available only if Form Type is End User.
o Allow link CI to ticket: If setting is enabled, it is possible to link CI to ticket on Self Service Portal, Submit Ticket when creating a ticket using this form.
o Enable Faciliate properties: If settings is enabled, and Faciliate integration is active, than facilitate properties will be displayed in SSP form.
o Force to disable GDPR: if this option is activated, the GDPR popup on the selected form will be turned off.
o Force reCAPTCHA on form: If you choose this option, ReCaptcha will be enabled on the selected form.
•Image: an image describing that ticket form. Displayed only on Self Service Portal.
•Controls (1): This field has a list of form controls for all the properties of the entity plus additional properties added. You can click on plus icon available just beside the Control name to add that control to the form. All the controls can be dragged to any of the panels. Along with the properties of an entity, three additional controls (3) are displayed: Group, Comment Control and Add New Field:
o Group: You can use this control to group other controls. You can create as many groups as you want by simple drag and drop. You can define the properties of a group by clicking the Edit Properties button. This will open properties section where you can define the properties for a Group; Label and Width.
o Comment Control: This control is used to add comments in an entity form. You can define its properties by clicking the Edit Properties button.
o Add New Field: You can use this control to add dynamic field in an entity form. You can create as many fields as you want by simple drag and drop. You can define the properties of a field by clicking the Edit Properties button. This will open properties section where you can define the properties for the Field: Label, Control Type, Width, Is Mandatory and Side by Side. You can also set visibility condition using the button Condition for Visibility.
•Clear Form: This button is used to clear all the added controls from the form.
•Save: After filling form, you click Save button to save the form data and create a new Form Template.
•Back: Used to cancel the creation process and go back to the previous form.
•Editor Panels (2): The Editor panel shows the area where the actual form is built. The panel has two sections; Left and Center. The controls from the Controls panel can be dragged here to design the entity form.
Each control added to the panels has an option to Remove it from the form. Each control except Address also has an option to edit the control properties like Text Type, Width etc. To edit properties of any control, click Edit Properties button for that control.