![]()
NSP Self Service portal allows End Users to submit and follow up support tickets. These tickets are submitted to the system and are assigned to agents for resolution.
In the Submit Ticket feature, different types of forms could be used based on type of ticket.
Below figure shows Home page of Self Service Portal:
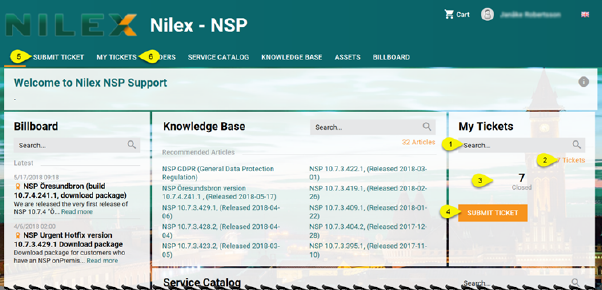
Home page SSP
The page contains search box, number of all created tickets, number of all created tickets sort by status and Submit Ticket button.
When you enter any search keyword in the search box (1), NSP search the ticket for the entered keyword and display the result on the My Tickets page (6). Search box here comes with the autocomplete feature. System searches for the keyword in following columns: Subject, Status, Id and Ticket Type. Just below the search box is a number of all ticket (2) in system requested by you. Also you can see number of your tickets filtered by status (3).
If you want to submit new ticket click on SUBMIT TICKET button (4) or go to Submit Ticket page (5).
If you want to see list of all ticket created and requested by you go to My Ticket page (6).
After clicking on Submit ticket button or Submit ticket page in main menu, there will be shown icons for choosing ticket type and knowledge base search widget on the right side.
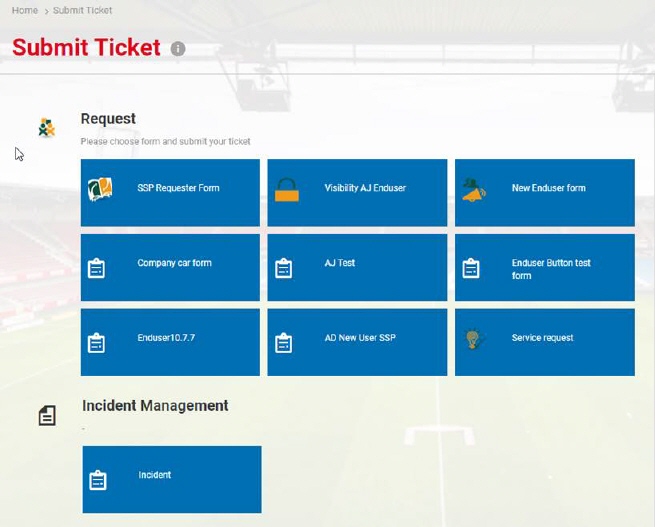
Submit Ticket
Select Ticket type icon that correspond to the issue of ticket you want to create. Selecting a type, opens corresponding form. All forms could have dynamic fields defined by administrator. Normally Ticket form contains two input fields: Subject and Description and a link to attach files. Fields which are also common in the ticket forms are: Requester, Impact, Priority, etc.
To attach a file to the ticket, click Attach file and select a file in opened file explorer popup, or drag file from file explorer and drop it in the Drag and drop files here box. Allowed file extensions are defined by system configuration. You will get an error message if you try to attach a file of not allowed type, or if file is too big.
If you create the ticket on behalf of other person in
the organization, there is a checkbox, On Behalf
Of. When you check this a field, Requester,
is displayed. Input name of person you act on behalf of (field has auto-complete
feature, start input name and names that fulfill the input is displayed in a
dropdown). Select Requester in the dropdown. Right
of field is a symbol  that
opens a form where you can search/select the correct Requester. The created ticket will get the selected user
as Requester, notifications concerning new
comments, change of status or solutions will be sent to the selected requester,
normally not to you as the reporter. To be able to create a ticket on behalf of
other user you must have got Power User
permissions.
that
opens a form where you can search/select the correct Requester. The created ticket will get the selected user
as Requester, notifications concerning new
comments, change of status or solutions will be sent to the selected requester,
normally not to you as the reporter. To be able to create a ticket on behalf of
other user you must have got Power User
permissions.
Input details in the fields and click Save button to create the ticket.
Knowledge base search
Knowledge base search is active only if function is enabled in User Profile Settings and if it is enabled by system administrator in permission settings.
If function is enabled, as soon as you type in the Subject field, a list containing search result from Knowledge base is displayed below the search box. Search functions also works when you have entered the keyword in the search box directly. Each item in the list contains article title and article type. Clicking an item title opens Article detail page. Clicking Load more... button more articles will be loaded to the list. In this way you maybe can get the solution/answer of the problem directly, and you don´t need to submit the ticket.