When you click Add new record button or Edit button for an already created Scheduled Trigger, the Scheduled Trigger Configuration page will be displayed:
Scheduled Trigger Configuration
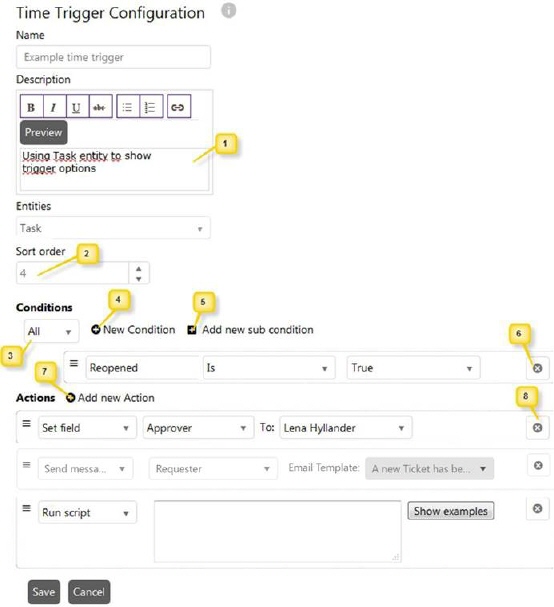
Scheduled Trigger Configuration page contains four fields: a dropdown list to select Entity (Ticket Type), numeric text box to define Sort Order, a textbox for Name and an editor for Description.
Select Ticket type from the dropdown. This dropdown list contains base ticket types. As soon as you select Ticket type, additional fields gets displayed related to the selected type.
Now, fill out the details in the form. These details contain Name, Description, Sort Order Conditions and Trigger Actions. Click Save button to save the trigger.
•Name: Enter unique name of the Scheduled Trigger.
•Description: Enter proper and valid description for the Scheduled Trigger. This is useful to identify the objective of trigger. NSP also provides different formatting options like bold, italic, underline, strikethrough, ordered lists, unordered lists, insert hyperlink etc. (1). Preview button shows the formatted text.
•Sort Order (2): This is used if there is a need to run the created Triggers in a certain order. For instance if the value of a field needs to be set (in one Trigger) in order for another trigger, with higher sort order, with conditions that become valid due to the previously executed trigger.
Trigger Properties: In this section, you define Conditions and Trigger Actions for the trigger.
Conditions: You define conditions here which are matched against the properties of a ticket. They define the criteria for executing actions. When you have selected Ticket type, then Conditions section is displayed with three fields: dropdown list to select condition type, Add New Condition button and Add New Sub Condition button:
•Condition Type (3): Two options are available here: All and Any. You can select All to require match of all the conditions and you can select Any if match any single condition from the conditions defined is enough. For example, if you need to execute action when “Priority is Critical” or “Priority is high”, then you select condition type Any. If you want to execute action when “Ticket is registered” and “Priority is Critical” then you select condition type All. Based on the selected type, ticket properties are matched with the conditions. If Any is defined then actions are executed if any single condition matches with the property of a ticket whereas in case of All, actions are executed only if all defined conditions are matched with the properties of a ticket.
•Add New Condition (4): Initially no condition is added. You click Add New Condition button to add new condition for the selected condition type. Clicking this button shows the dropdown list for field in new row. You select field from the list as per requirement. Fields are listed based on the Ticket type selected. When you select any field from the dropdown, few more inputs are displayed in the same row. You have to select or enter appropriate value in those input fields. You can add more than one condition for the trigger by repeating the process. You can remove any condition by clicking on remove button (6) provided at the end of the row. You can move the conditions by drag and drop.
•Add New Sub Condition (5): When you click this button three fields: Condition Type, Add New Condition and Add New Sub Condition button are displayed below parent conditions. The functionality of these three fields is similar to the functionality described above. This functionality is used to define sub conditions which can be matched to fulfill any single condition. For example, if you want to execute actions when “Ticket is registered” and “Priority is Critical or Priority is high” then you need to define sub conditions for the second condition of priority using Any condition type. You can remove all sub conditions by clicking on the remove button provided beside Add New Sub Condition button. Note that sub conditions can be defined only up to three levels for any condition.
Trigger Actions: You can define actions which shall be executed if the ticket matches with the criteria defined using conditions.
•Add new Action (7) - Clicking Add new Action button
shows the dropdown list where you can choose from the options below. You can add
more than one action for the trigger by repeating the process. You can remove
any action by clicking on Remove button (8).
You can change order of the
actions by drag and drop. The actions will be performed in the defined order,
from top to bottom.
o Set field - Select field from the list which is based on the Entity selected. Enter the value you want to be set. The system makes a check so the input corresponds to the field type.
o Send message to – Select a Text template and a receiver for message. If text template is email, the email message will be sent to receiver. If text template is SMS, the SMS will be sent out from the system. If you want to send Teams message, you need to select Teams as a receiver from list and select Teams text template.
o Add comment – Select if comment should be Public, Public Solution, Public workaround, Private, Private Solution or Private workaround, and select a Comment Text Template for the comment.
o Run script – An advance possibility to influence and
adapt any dynamic entity and other variables in the system. Script are created
in Microsoft Jscript and is executes within a .NET runtime.
It is a highly
advanced process to create correct script so if you have this need we recommend
that you contact Nilex support/development. Read more here.
When Run script is selected there is a button, Show examples, showing this information: