NSP provides a facility for Agent Portal Configuration.
Some of those settings are also available in User Profile for the Agent. If the setting is saved in User Profile it will override this Agent Portal setting. This setting is used only as default, for users not having saved an individual setting.
Timer:
NSP provide two different features to record time for activity in ticket page. Those features are helpful in analyzing how much time the Agents spend to solve the ticket.
•Comment Timer record time for writing comments. The time spent is displayed in ticket page.
•Work Log Timer record time the ticket form is open. You can automatically create Work Logs for time spent.
This setting is available also in User Profile.
Options provided to define settings for Timer:
•Enable Comment Timer: Enabling this option adds timer to the ticket detail page. The timer will be displayed above the comment box. The timer will be used to record time spent on comment the ticket. If Enable Automatic Comment Timer is not enabled is the timer manually controlled. The Agent starts and stops the timer using a button in the ticket form.
•Enable Automatic Comment Timer: You can enable this option to make the timer automatic. As soon as the agent enters text in the comment box in the ticket detail page the timer automatically gets started, and when he saves the comment the timer stops. Note that this can only be enabled if the timer is enabled using the first option.
•Enable Work Log Timer: This option adds other type of timer, with the purpose to measure the time an Agent handles the ticket and create a Work Log for the measured time. The timer starts automatically when the ticket form is opened (both Restricted and Edit mode). When you close the form, or when you decide to save (button Save Work Log), a Work Log connected to the ticket is created (popup form is displayed where you define and save the Work Log). Timer is using setting Worklog Timer Resolution (minutes) to step the timer, see below.
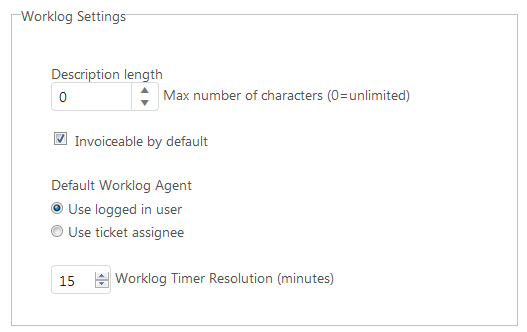
Worklog Settings

Worklog settings
•Description length: Define the maximum no of characters in a Worklog Description. This setting can be used e g if work logs should be exported to external system having a limitation in text length for description. Value=0 means that maximum no of characters is unlimited.
•Invoiceable by default: If checked, the Invoiceable checkbox will be default enabled in form for all new work logs.
•Default Worklog Agent: Specify for work log form which agent shall be pre-defined in form when a new work log is created. Select one of radio buttons Use logged in user or Use ticket assignee.
•Worklog Timer Resolution (minutes): Worklog timer steps. If value > 1 worklog timer will change only in this step. If setting is e g 15 minutes, timer will start at 15, after 15 minutes step to 30, and so on. If value is less than or equal to 1 will timer step each minute.
Requester pre-selected recipient in direct mail
Direct Mail is a mail sent from inside a ticket. When you click Mail button in ticket Comment tab a popup will be opened where the mail details should be defined. The message is also saved as a comment on the ticket. If this setting is set, the Requester of the ticket will be pre-selected as recipient of the mail (recipient and all other data could be edited in the popup). See section Ticket Comments.
•Requester pre-selected recipient in direct mail: If checked, the Requester of the ticket is pre-selected when you send a direct mail from the ticket.
Settings for Restricted Ticket Mode
Restricted Ticket Mode
(also called Simple Mode) is a feature that could
be used to minimize the opening time for a ticket. If Restricted Ticket Mode is in use only most common and
important data for the ticket will be loaded in the first step, e g basic data
for Ticket and Requester, and the Comment
stream. Comments could be added in Restricted Ticket
Mode, but if other ticket data should be edited or handled, e g Linked Tickets or CIs,
Tasks, Work Logs or
Merged Tickets, you need to select Edit,  , in Restricted
Ticket Mode form to open Edit Mode (Advanced Mode).
•Disable Restricted Ticket Mode (open ticket directly in Edit Mode): If checked, full Edit Mode will be opened directly when you click a ticket in Dashboard or a Ticket View.
Knowledge base search setting:
This setting is used to define settings for search feature provided in the ticket detail form. You can allow search in Knowledge Base and in Tickets.
You can define search settings for Subject. When user input text in ticket Subject field an automatic search will be performed. It contains three options to define the search. These options are:
•Enable Knowledge Base search: Enabling this option starts automate search in Knowledge base when you enter text in Subject field for a new ticket. The search starts directly when you enter text in the field.
•Enable Ticket search: Similar to Knowledge base, if this option is enabled search in tickets is performed. Tickets containing the search text are displayed as result as soon as you enter text in Subject field.
•Use Category filter in Ticket search: This option filters search for tickets based on matching Category. If you first select a Category in ticket form (Category field in left panel), then only tickets that belongs to the selected Category is displayed in tickets result when you enter a keyword in Subject field. Note that this option can be enabled only if Enable Ticket search is enabled using above option.
Tab Setting:
The following options are provided here to define setting for tabs in ticket forms.
•Do not Close form when Save: Enabling this option will enable Agent to update the ticket without closing it. The ticket form will not be closed when Agent saves and changes the status of a ticket.
•Open default form when clicking Add + tab: If this
setting is chosen a click on the ( ) button will immediately
open the default ticket form. If
this is not enabled then the user has to browse down in the Add + menu and
select a ticket type.
•Maximum open tabs allowed: This setting defines the maximum tabs Agent could have
open at the same time at the top of the Dashboard page (tabs beside the
 button).
Comment & Description settings:
•Add as public comment: Enabling this option set Public Reply as default reply for the comment box displayed in the ticket detail page. If this is not enabled then Internal Note will be set as default reply for the comment box.
•Incoming email as internal comment (except from Requester): If enabled email sent to ticket is registered as an internal comment. Notification will not be sent to ticket Requester. If not enabled email is registered as a public comment and ticket Requester will be notified. Exception: Emails sent by ticket Requester will always be registered as Public.
•Height of ticket description field (pixels). Specifies the size (height in pixels) of the ticket Description field (collapsed) in ticket detail form.
•Description expanded by default: If this is enabled will ticket description field be default expended when a ticket is opened. If not enabled must agent click Show more link to expand the field and display entire description if it too long to be written in the collapsed field (default height of collapsed description field is a setting, se above). The setting affects both Restricted and Edit ticket mode.
Session Timeout:
•Session Timeout: Set timeout for inactive user. Agent will be automatically logged off after this time. Time is set in minutes (minimum 20 minutes). Different times are set for Named Users and Concurrent Users.
Ticket Identifier Prefix:
•Ticket Identifier Prefix: If an incoming email concerns an already existing ticket, NSP has a function to find this ticket and redirect the email to the correct ticket. The email content will be added as a comment to the ticket. The Ticket Identifier Prefix together with Ticket Id in email subject redirects incoming email. To facilitate this function, the system automatically adds the prefix and the ticket id in the header of all outgoing emails that are sent from a ticket. Therefor if somebody replies to such an email it will contain the correct values without any manual input by the user.
Note: When this prefix once is set it is not advisable to change it.
Note: Do not use “ID” as prefix. This prefix could cause error when handling emails in MS Outlook.
Note: If the prefix is changed you must restart the Maintenance Host and do an IIS recycle to get the new prefix in use.
•Check for ticket identifier in email body (subject is always checked): If this checkbox is activated the system will search for the identifier prefix in both the email subject and body text. If not checked system search for prefix only in email subject.
Automatic mapping of End User:
•Enable automatic mapping of End User to organization: Enables matching of new End Users to correct Organization, via domain name. When End User register as new user or when anonymous, not logged in user submits a ticket using his email address (new End User is than created in NSP), the new user will automatically be member of correct Organization (if organization with same domain as in email address exists).
CT Integration Country Calling Code
This code is used to match local caller to correct NSP user. For local calls no country code is received from Telavox in calling number. The country code is to be added for the location of the Telavox server.
All telephone numbers are stored in the database with country code included, e g +4642180050. For incoming local calls (without country code) the country code in this setting is automatically added before system search for matching user.
If no country code is entered when you add a telephone number in User Profile page this code will be automatically used. If you add telephone number for a user situated abroad you must enter full telephone number with country code included.
Google Maps API Key
Here you can enter your Google Maps API key. Read more about using Google Maps in section Google Maps API Key.
Email origin colors settings
This settings allows us to set specific colors for TO, FROM, CC, BCC identifiers for tickets received via Email or sent Direct email from ticket.

Internal domains
Within the settings of the agent portal, it is possible to define email account domains, which will be treated as internal users. When the internal filtering option is enabled, only those users who have a domain from the list of domains will be displayed in the list of internal users. In the internal domains field, you can enter the values of several separate domains;
If the field is empty, all users from the same organization as the logged-in user will be considered asinternal.