 , to
open Edit Mode.
, to
open Edit Mode.Restricted Ticket Mode (also called Ticket Simple mode or View mode) is a feature that could be used to minimize the opening time for a ticket. If Restricted Ticket Mode is in use only most common and important data will be displayed, e g basic data for Ticket and Requester, and the Comment stream.
Setting for Restricted Ticket Mode (if it should be used or not) is available in Agent Portal Configuration. See Agent Portal Configuration. Restricted Ticket Mode could be enabled/disabled for agents individually in User Profile settings. If Restricted Ticket Mode is disabled, tickets will always be opened in Edit Mode.
Status can be changed, ticket properties in left panel
can be changed, comments can be added and the tabs Linked
Tickets, Relate Articles or CIs, Worklogs and Call Logs are available. If other ticket data should be
edited or handled, e g Tasks or Merged Tickets, you need to select Edit, , to
open Edit Mode.
Ticket Restricted Mode
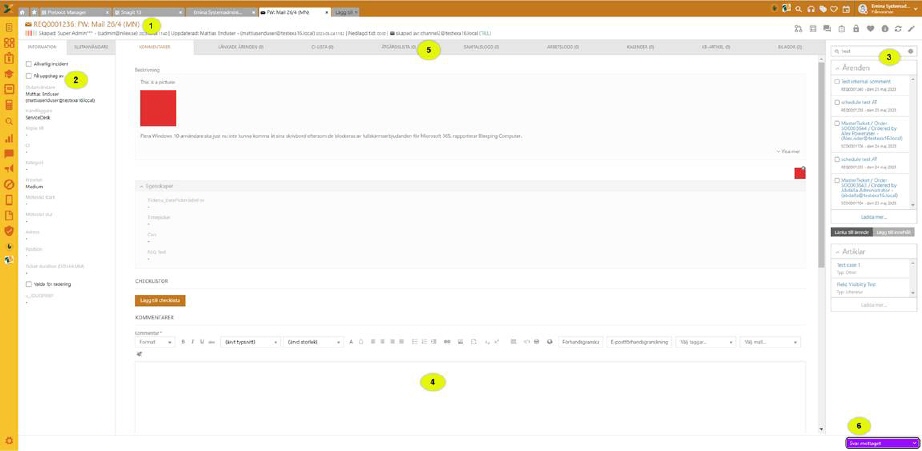
The Restricted Ticket form contains five sections (marked with numbers in the figure):
1. Top header part: Contains Source Icon, Ticket Subject and Id, Priority and time information (Created, Updated, and Time spent). If the ticket was created via email then there is information to which email address the email was sent and whether the recipient from the email is marked as TO, CC or BCC. In upper right corner six buttons are available: Document template (create a document with data from selected ticket by using a document template), Lock ticket, Favorite, Info, Refresh, Edit (opens ticket in full Edit Mode) and Ticket Status Flow (clicking on the ticket flow button opens a popup that displays the graphic status of the flow ticket, more details here). In the case of the SCO ticket type, an icon will appear in the tool palette with a link to the service order details, based on which the mentioned ticket was created.
2.
Left panel contains two tabs: Info tab displays
main properties of the ticket. The properties could be edited, behind each
property field header an edit icon,  ,
will be shown when you mouse over the field. Click icon, then a popup is opened
where you can input value for the property. Which properties that are shown in
left panel is dependent of which form is in use. For description of the
most common main properties, see Ticket -
Main properties. Requester tab displays
information of the Requester of the ticket (read
only). For description of most common Requester
information, see Ticket - Main
properties. When you click Edit, the current selection will
automatically be chosen with focus so that you can immediately write a new
value. Next to the Info label, there is an Edit icon that allows us to
edit all properties in the left panel.
,
will be shown when you mouse over the field. Click icon, then a popup is opened
where you can input value for the property. Which properties that are shown in
left panel is dependent of which form is in use. For description of the
most common main properties, see Ticket -
Main properties. Requester tab displays
information of the Requester of the ticket (read
only). For description of most common Requester
information, see Ticket - Main
properties. When you click Edit, the current selection will
automatically be chosen with focus so that you can immediately write a new
value. Next to the Info label, there is an Edit icon that allows us to
edit all properties in the left panel.
3. Right panel: Search field for search in tickets and Knowledge base. Below search field the search result is dispalyed. See Knowledge Base and Ticket Search.
4. Comment Tab: Middle part of the form contains the Description of the ticket, field to add comment, the comment stream and Timer fields (if timers are enabled in User Profile). Functions are similar to functions available in the Comment tab in Edit Mode form, see Comments.
5. Other tabs. Here you can select other tabs. Middle part is then changed to show:
6. Footer part: Ticket Status field. Status field is a dropdown where you can select new Status.