Add CI, Contract or KB Article notification
For adding new notification just click Add
Notification button above the table, and in dropdown choose which kind of
notification you want to create: Event based or Scheduled.
• Event
based notifications are sent when certain a field change is made on the
chosen entity.
• Scheduled notifications are sent in relation to a
date/time that concerns the CI, Contract or KB Article.
Creating the notification consists of 4 steps as shown
below. All steps are for the most part the same for CIs, Contracts and KB Article, Event based or Scheduled with one exception. Step 2 - Notification Condition is different between Event
based or Scheduled. Below this step is
explained under two different headers, one for each notification type.
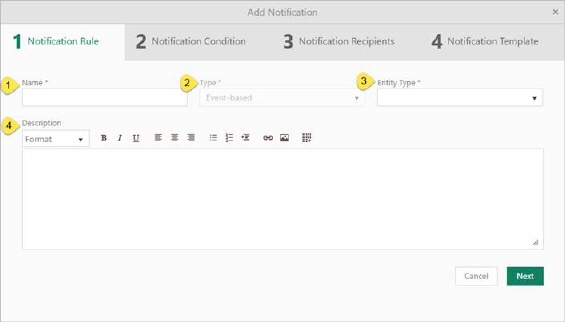
First step –
Notification Rule
CI, Contract or KB Article notification -
Notification rule
1.
Name – Choose a name that makes it easy to identify the notification in
the Notification lists.
2.
Type – This field shows what type was selected on creation and it cannot
be changed.
3.
Entity Type – Choose Entity Type from dropdown list. What is available
varies due to chosen tab and if it is an Event based notification or a
Scheduled.
Event based Notification: Both the main Entity Type and
all its sub category are available.
Scheduled Notification: you can only choose types
containing date/time field that are set to be able to trigger scheduled
notifications.
4.
Description – Write a text makes it easy for you to find the notification
you are looking for in the notification list.
Second step – Event
based Condition
In this step you
choose condition for the Event based Notification. In Notify on you have
two choices:
• Any
property change – a notification is sent every time anything is
changed on the Entity.
• Specific property change – a notification is sent when a
change is made in a specific field on the Entity. Pick this field in Select
property *.
Notification
Condition
Below the property setting you can define additional
Notification Condition that shall also be
fulfilled to the notification to be sent. Here you can delimitate so
notification is sent only for a specified product, status, group, etc.
The condition is built of a logical hierarchical
structure of Conditions and Sub conditions. The different conditions are linked by
operators All (AND operator) and Any (OR operator). You can select All to require match of all the linked conditions, or
Any if match any single condition from the linked
conditions defined is enough. The notification is sent only if the result of the
complete logic expression is true.
The section is initially displayed with one empty
condition row, Add condition and Add sub condition buttons, Delete button and operator selection All/Any.
Condition: A condition row consists of three parts, a property
selection dropdown, an operator and a value.
• Property
dropdown contains all available properties for the selected entity.
• Operator is
a dropdown where available alternatives differs due to property type. Could be e
g equal, not equal, begins with, does not begin with, contains, does not
contain, ends with, does not end with, is empty, is not empty, is null, is not
null for a text field.
• Value field is changed due to current selected
property. Could be a text field, numeric field, user combo box, status combo
box, etc.
Example:
In below example for a Contract Scheduled Notification a reminder should be sent 1 week
(7 days) before contract End Date. Three
additional conditions are defined where all have to be fulfilled. The last of
the three conditions consists of two sub conditions.
The notification is sent 7 days before End date if contract Vendor is Company and Contract owner is user John Jones and contract
Status is either Active or Active
(Renewed).
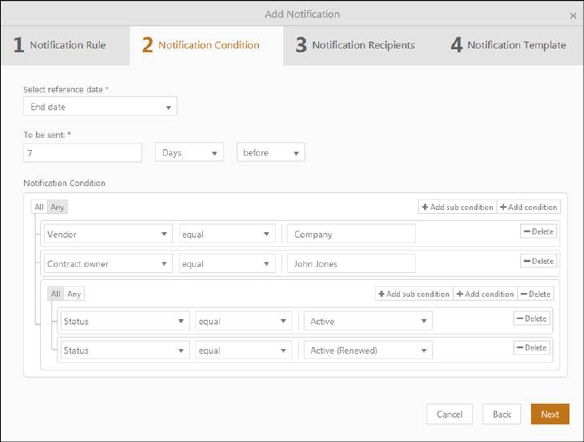
Contract Notification example
Second step –
Scheduled Condition
 CI, Contract or KB
Article notification - Notification Condition
CI, Contract or KB
Article notification - Notification Condition
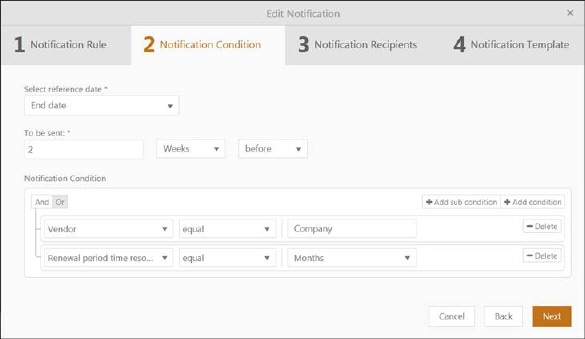
In this step you
choose Select reference date and when the notification shall be sent in
correlation to this point in time, a number of
[minutes/hours/days/weeks/month/years] [before/after]. Note! You set the time in relation to chosen date 00:00 on
the System maintenance host (ask your system admin if you need to know).
There are a specific
set of date fields available depending on what Entity type you have chosen in
step 1. You can choose all Entity types that contains at least one date/time
property.
These are the dates
for the different types in basic NSP configuration:
CI> Software: Last audit date, Installation
date, License expiry date.
CI> Assets: Last audit date, Purchase
date, Depreciation end Date.
Contract: Termination date, Start date, End date.
KB Article: -
Below the time setting you can define additional Notification Condition that shall also be fulfilled to
the notification to be sent. This condition is built similar to Event-based Condition, se above.
Third step –
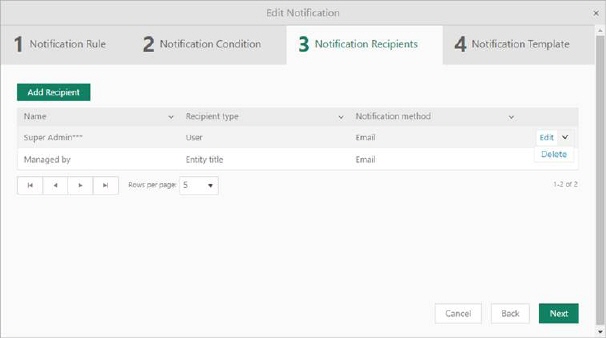
Notification Recipients
In this step you define notification recipients. This
form contains list of all added recipients, possibility to add new recipient,
edit or delete existing ones.
CI, Contract or KB Article notification -
Recipients
To add new recipient click on Add Recipient
button just above the list. Choose the Recipient type that then determime
your choices in the next field:
• User -
a individual appointed person.
• Group –
according to the alternative under Manage> People>Group.
• Role -
according to the alternative under Manage> People>Role.
• Concerned
people – persons chosen in fields on the Entity that triggers the notification.
For CIs it is Used by and Managed by. For Contracts it is Requester and Approver.
For KB Article it is Author.
Last you set Notification
method to Email.
To edit recipient and notification method choose
Edit button in action dropdown rightmost on row in the list, or choose
Delete to delete recipient.
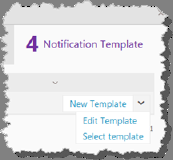
Fourth step –
Notification Template
Define what Template is to be used when the notification
is sent. It decides the text content of your notification. You can create a
New template or use an already existing (Select template). It is also possible to use an existing
template, clone it and tweak it to meet your needs.
Notification Template
When you click on Select Template following form
shows:
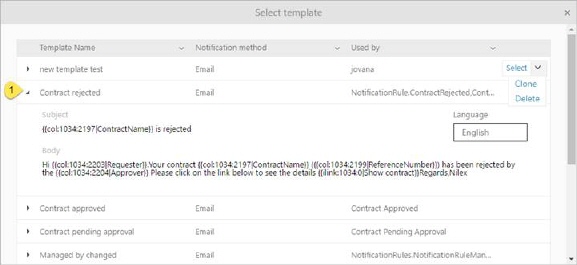
Notification Templates
This form displays a list of all existing templates. To
preview the content you expand template using the arrow to the far left (1).
Here you can also change what language to look at. To select template
choose Select button in action dropdown rightmost on row in the list. You
can also Clone template or Delete. Templates already in use in
notifications cannot be deleted.
Regardless of what choice you make, the following form
is ultimately shown.
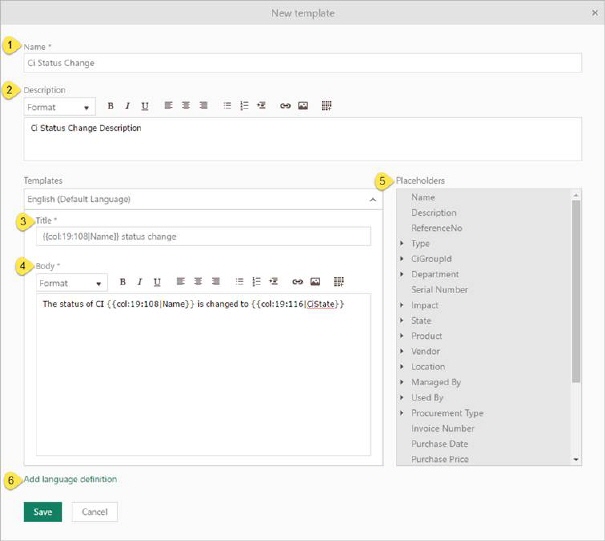
CI, Contract or KB Article notification – Edit
Notification Template
1.
Name – Be sure to give the template an explanatory
name so it is easy to find if you want to reuse it.
2.
Description – The description can be used to give
a quick idea of what the template is used for
3.
Title – Enter Header of the Email
4.
Body – this box is used to define the email body
text in HTML format. Use placeholders to add information about the specific
Entity that is the origin of the notification.
5.
Tags – consists a list of all properties referred
to chosen entity type. Double-click the placeholder to include it in the
template along with other text. These tags will be replaced with the actual
Entity value when the notification is send to the user.
6.
Add language definition – Select the language from
the list to create Template for the specific language. Define Title and Body for the
selected language in respective textbox. Repeat the procedure for every language
needed. User will receive the notification in chosen user default language.