Create entity views for other entities than ticket and tasks. For ticket and task views see here.
Entity Views are customized way to display entities. A view definition includes which property columns shall be shown and condition to filter which items shall be listed.
Within the functionality Entity Views, there is a set of system predefined views, read more about them here.
In current version this function is implemented only for CI Views.
Entity Views
Entity Views are divided into System Views and views defined by user. Views defined by user are grouped by View category.
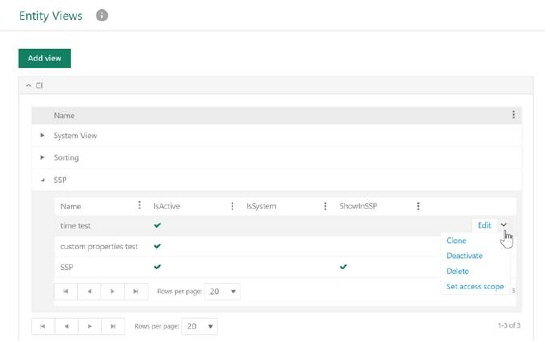
To access Views page, go to Configurations > Entity Management > Views> Entity Views
Form consists of a list of defined views, grouped by View category, showing Name and flag for Active, System and Show on SSP. In action menu on each row you can select:
•Edit: Edit the view. Opens same form as when view is created, see below.
•Activate/Deactivate: Toggling function. Only Active views are available in CMDB.
•Delete
•Clone: Make a copy of the view.
Set Access Scope: Clicking on this button opens a popup where you can adjust the permissions of who has the right to see this CI view. You can adjust the permissions on all levels.
In case you want to sort the views according to your wish, you can just drag and drop the views into the list.
Sorting, filtering, paging and column width functions are similar to other lists in NSP, see section General User Interface.
Click Add view button to open form to create a new Entity View.
Add/Edit Entity View
Add/Edit Entity View
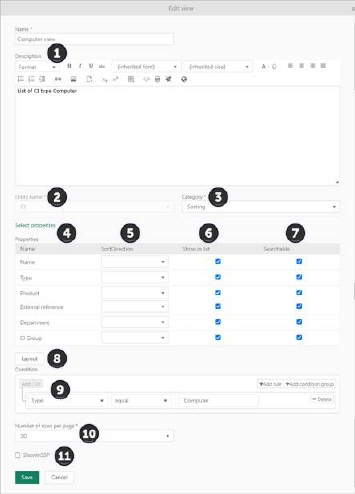
1. In top part you shall enter Name (mandatory) and Description for the view. Name and Description are saved as translatable texts. When they are first created they are always saved in NSP Standard Language.
2. Entity selection. This is a mandatory field. In current version only value in dropdown is CI. If you are going on to create a new view you have to select CI to open up Category dropdown.
3. Category selection. Here you can choose from defined CI View Categories. This is a mandatory field, if you are going on to create a new view you have to select a category to open up rest of the form.
4. Select Properties opens a form where you select which properties shall be shown as columns in the view and/or be part of the view Condition. The form has three parts. Left part is a list of Entity Types (CI Types). When you select a type here the middle part is updated to display all properties available for the selected type and its parent types. Both standard and custom properties can be selected. Select columns in the checkboxes. For reference properties checkboxes are not directly clickable. For those you have to expand the list on the arrow icon and select property on next level, e g Status Name. All properties you have enabled in the middle part are displayed in right part, the Columns list. Here you can reorder the columns by drag-and drop. Note that you shall select not only properties that shall be displayed in the view, also properties you want to use in view Condition shall be selected. When you remove an existing property the condition is reset and you have to insert it again.
5. The selected columns are shown in the list. Next step is to choose how the view shall be sorted. Select in dropdown Ascending/Descending for the column you want the view list to be sorted. You can choose only one column, if you select a new sort column the earlier selected will be removed.
6. Show in list: Checkboxes shall be enabled for all properties that shall be columns in the view. Also properties that are not part of the view can be shown here due to they are part of the view Condition.
7. Searchable: If you want to enable a search by a column, you need to check this box.
8. When clicking on the button Layout opens a popup showing the header of the table. In this popup you have the ability to adjust the width of each column.
9. In Condition part you define a condition to filter which entity items shall be included in list. Here you can define a structure of conditions and sub conditions connected with operators And or Or. Only items for which the total result is true will be shown in the view. You can use all properties you have selected in Select Properties form to define the condition. Note that condition is reset if you remove a property.
10. Last setting is Number of rows per page This is a mandatory setting where you can choose 5, 10, 15, 20, 50, 100, 150 or 200 in the dropdown.
11. Show in SSP: Mark this checkbox if you want to display this view on SSP as well. View will be listed on Assets page on SSP.