Scheduled Network Scanning
NSP besides the direct scan also provides scheduled
scan. Taking into account that the integration process for NNS, Capainstaller or
SCCM are the same, this manual will only explain the process for NNS
integration.
The function for scheduled network scanning is found at
the top of the Click Agent portal> CMDB> CI LIST BY TYPE> Scan> Schedule
The first step – Scan
jobs
This step contains a list of all scheduled scans. This
step is also use for creating new scheduled scan, edit or delete existing one.
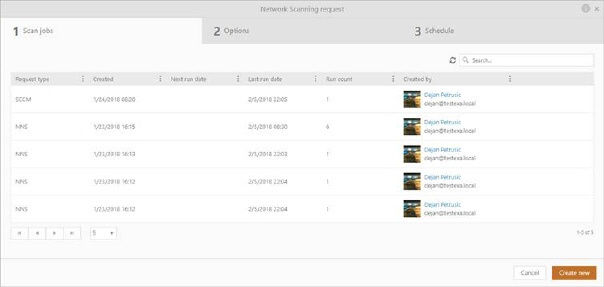
Scan jobs
• Source: What Network skanning tool was used (NNS,
SCCM, CapaInstaller).
• Created: Date when the scan job was done.
• Next run date: Time for next execution (date+time).
• Last run date: Time for latest execution (date+time).
• Run count: Number of
occurrences the scheduled scan has executed.
• Created by: Name of user
that the created scheduled scan.
This list also contains a dropdown action for each row.
Available actions are:
• Edit: Uses same form as when you create new scheduled
scan.
• Delete: Uses for delete scheduled scan.
Cancel button closes the form and return to CI List.
Use Create new button to
proceed to the next step - Options.
Above the list there are a Refresh button  .
.
Search, filtering, sorting and paging functions are
similar to other lists in NSP, see section General User
Interface.
Search function searches for the keyword in following columns: File path and Created
by.
The second step –
Choose Information
This step is the same as for standard Network Scanning.
The third step –
Schedule
In the Schedule step you define the date and
time interval the scan should be generated.
In the form you define the time schedule of
the scan generation:
Schedule: The frequency of
the scans; Once, Daily, Weekly and Monthly.
• Once: You select the date and time when the scan should
be generated.
Tip! Run
the scan during the night, not to burden the network capacity.
• Daily: Select the number of days between each execution
(value= 1 means every day) and hour during the day for the scan generation (each
half hour could be selected in the dropdown or you can enter preferred
time).
• Weekly: You can select one or more days in week for scan
execution. If you want to select all days there is a checkbox, Every day, to check all. You also define the number of
weeks between each scan generation. The hour during the day can be chosen in the
same way as for daily schedule.
• Monthly: Select one or more months (or Every Month)
in the same way as for weekly schedule. The day control means here the date
in the month and the hour during the day is selected in the same way as for the
other schedules.
For Daily, Weekly and Monthly schedule you have to select a Start date for the schedule. End date could be selected by checking one of three
different alternative checkboxes: No end
date means that the scheduling continues until it is manually
stopped. If the schedule should be time-limited you can select a date
to end the scheduling or define the number of occurrences before ending the
scheduling.
Note! The number of
occurrences means the overall total number, e g if this scan has been generated
3 times (shown in the the first tab; step 1) in the past and you want to
execute it 3 more times, you have to set the value to 6.
Use Back button to go to
the pervious step. Use Save button to scheduled
scan.