On this tab you manage CIs in Leasing contract. Tab is shown only if Contract Type is Leasing and leasing subtypes.
Three sub-tabs in form: Active shows all current active leasing, Planned shows leasing contract having start date after current date and Terminated shows leasing contract having end date before current date.
For each leasing contract there are links rightmost on row:
•View: Opens popup with form containing all leasing properties.
•Edit: Shown only for leasing contracts in Active and Planned tabs. Opens form in popup, same form as used when new leasing is added. Here you can change leasing properties e g regarding fee and leasing period. In case you select more Cis from the list, you will have the option to edit all selected items at once.
•Remove: Shown only for Planned leasing. Removes the contract before activation.
•Terminate: Shown only for Active leasing. Opens popup where you can set termination date (possible to set date from “today”). This is the way you can terminate a leasing manually before leasing end date. Checkbox Manually terminated will be enabled (checkbox is shown in View and Edit form) if leasing contract is terminated this way. In case you want to apply the same change for terminate on multiple Cis, you need to select them in the list and click the action Terminate. In case you select more leased Cis, you will have the option to multiple terminate all selected items at once.
Add/Edit leasing
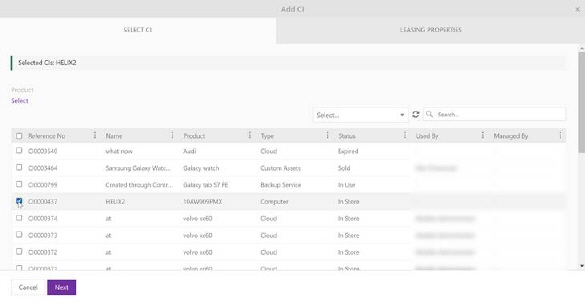
When you want to add existing CI for leasing click Add CI button. Button is available only if parent contract is Active (or Approved and waiting for activation) and Customer Account is defined for the parent contract. In popup following form containing CIs that are possible to add for leasing will appear. Features like search, refresh, sorting and paging are explained in General User Interface:
Select CI
If you want to configure the table view, showed on picture above, you can do within the system view, for more information read: System entity views.|topic=System entity views;document=Documents\Eng_Entities.docx
CIs having Status = In store are shown in the form and all Cis marked with Allow multiple leasing no matter of status. List can be sorted by CI Type in dropdown above the list.
It is possible to add multiple leasing in the same session, and depending of Product towhich included Cis belong Leasing Properties tab is slightly different.
Leasing multiple Cis with same Product
If you want to create the leasing containing multiple Cis with the same product, mark Cis with the same product from the list manually or first click the link Select below Product. In the opened popup you can select a Product, the CI list will then be updated to contain only CIs belonging to this product. If there is a product selected, there are two new links available to Change or Remove the selection
Search and mark one or more CI in the list, then click Next to go to tab Leasing Properties.
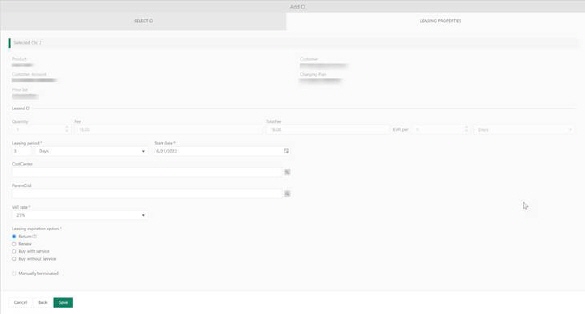
At the top of form is CI name or number of selected Cis if you select multiple.
Above that is Product, Customer and Customer Account related information (Charging Plan and Price List) shown.
In the form quantity, leasing fee, total fee, leasing period and start date for leasing shall be inserted:
•Quantity
•Fee is defined as fee per Day, Week, Month or Year.
•Total fee is calculated by multiple quantity and fee
•Leasing period is also defined as number of Days, Weeks, Months or Years.
•When Start Date is inserted system checks that complete leasing period is covered by parent contract valid dates.
•Cost Center (account that shall be receiver of the fee),
•Parent CI – choose parent CI from browse button
•VAT rate
•Manually terminated – read only field, shows if leasing manually terminated,
•Leasing expiration option, Here you can select:
o Return CI.
o Renew (only available if parent contract is automatically renewed).
o Buy with service.
o Buy without service.
This description contains the basic properties of a leasing. Other properties can have been configured in your system.
Leasing multiple Cis with different Product
Search and mark one or more CI in the list, then click Next to go to tab Leasing Properties.
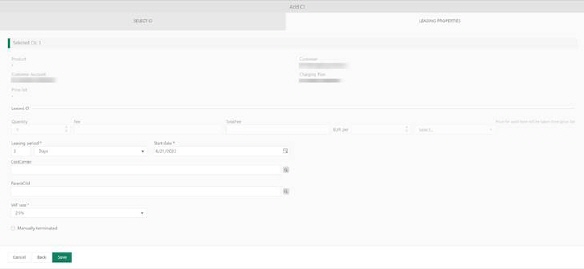
At the top of form is CI name or number of selected Cis if you select multiple.
Above that is Product, Customer and Customer Account related information (Charging Plan and Price List) shown. Product and Price list information are empty (-) because products are different and price information is connected to the product.
In the case of adding leased Cis from different products, then the possibility of adjusting the price is eliminated and the quantity, leasing fee, total fee are disabled and you can see notification Price for each item will be taken from price list.
Leasing period and start date for leasing shall be inserted:
•Leasing period is defined as number of Days, Weeks, Months or Years.
•When Start Date is inserted system checks that complete leasing period is covered by parent contract valid dates.
•Cost Center (account that shall be receiver of the fee),
•Parent CI – choose parent CI from browse button
•VAT rate
•Manually terminated – read only field, shows if leasing manually terminated,
•Leasing expiration option, Here you can select:
o Return CI.
o Renew (only available if parent contract is automatically renewed).
o Buy with service.
o Buy without service.
This description contains the basic properties of a leasing. Other properties can have been configured in your system.
When leasing is saved it is shown in one of the lists Active, Planned or Terminated depending of the leasing period. For Active leasing invoices are created regarding to the current Customer Account Charging Plan (if invoicing is enabled in the system).
If multiple CIs were included in the leasing there is one row per CI in the list. You can edit the included leasings separately.
CI Status for leased CI
For leased CI there are added statuses that are not shown in lifecycle view, Leased, Leasing expired and Sold. Status Leased is automatically set when a leasing contract starts for the CI. This status cannot be manually changed, only way to change it is to terminate the leasing. When leasing period ends status is changed to Leasing expired or Sold due to the leasing expiration option. From Leasing expired you can manually change to e g In Use or Disposed. From Sold status no other status can be selected.