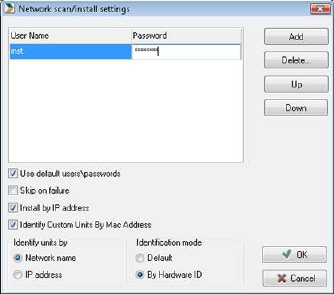
To set up how NNS Service identifies and connects to network units, and also with which permissions to access, select menu NNS Service > Network Scan/Install Settings (Ctrl + P). The following dialog is shown:

When an agent is installed on a computer via NNS service, sometimes a username and password is needed for access. Here you can state a list of accounts with which the service will try to authenticate if necessary.
To add an account, click Add. A new blank row is added to the list. Then you can fill in the username and password.
NNS service will try to authenticate with accounts one at the time. If you want to change the order of the access account, select a row and move with keys Up or Down.
If the agent installation did not work it may be due to network access failure, or too low rights for the authentication. View all conditions required to install the agent in the installation manual in the chapter Technical information about agent installation.
Use default users\passwords decides if NNS Service should try to authenticate using the permissions of user running administration tool.
Skip on failure, if checked, will mean that if authentication fails, no dialog about request for user account and password is shown. Instead a message of failed installation is shown.
Install by IP-address decides if network access of unit at installation is done by IP-address or computer name. If no DNS exist in network, this option needs to be turned on.
Identify units by - Network name / IP address decides if access to scanning is to be done with IP-address or computer name. If no DNS exist in the network, IP-address must be selected.
Identification mode determines if the agents at installation will receive an ID based on the computer’s hardware or not. If Hardware-ID is selected, it will be generated from Bios serial number, which will mean better identification once the computer have its software or OS cleared.
Identify Custom units by MAC address makes the service try to identify SNMP units through their MAC address.