In the Schedule function you define the times and time interval the report should be generated and sent by email to selectable receivers.
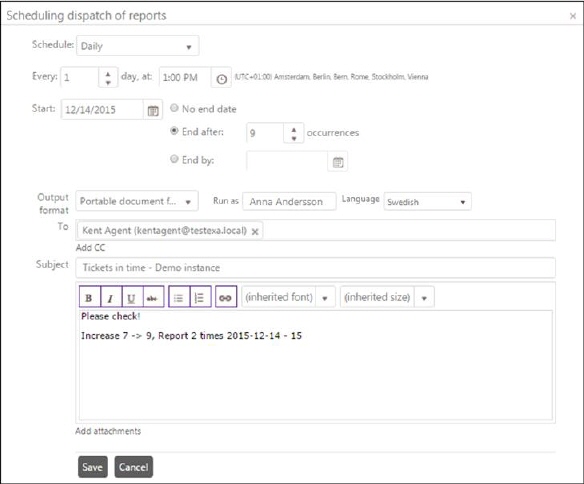
Scheduling dispatch of reports
In the upper part of the form you define the time schedule of the report generation:
•Schedule: Type of schedule, selectable values in the dropdown are None, Daily, Weekly, Monthly and Generate once.
o None: No schedule can be added.
o Daily: For daily schedule you can select the number of days between each execution (value= 1 means every day) and hour during the day for the report generation (each half hour could be selected in the dropdown).
o Weekly: When weekly schedule is selected a checkbox for each weekday is displayed. You can select one or more days in week for report execution. If you want to select all days there is a checkbox, Every, to check all. You also define the number of weeks between each report generation. The hour during the day can be chosen in the same way as for daily schedule.
o Monthly: For monthly schedule a checkboxes for each month is displayed and you can select one or more month (or Every Month) in the same way as for weekly schedule. The day control means here the date in the month and the hour during the day is selected in the same way as for the other schedules.
o Generate once: For this schedule a date and time picker is displayed where you select the time the report should be selected.
•For daily, weekly and monthly schedule you have to select a start date for the schedule. End date could be selected by checking one of three different alternative checkboxes. No end date means that the scheduling continues until it is manually stopped. If the schedule should be time-limited you can select a date to end the scheduling or define the number of occurrences before ending the scheduling. NB: The number of occurrences means the overall total number, e g if this report has been generated 3 times in the past and you want to execute it 3 more times, you have to set the value to 6.
In the lower part of the form you define the format and the receiver of the report.
•Output format: Dropdown with alternatives Comma separated values (CSV), Portable document format (PDF) and Excel spreadsheet (XLS).
•Run as: Name of user that created the schedule. User permissions for this user control the report content. Only tickets that the user has permission to reed could be part of the report.
•Language: Select language for the outgoing report. If you select User´s language the report will be created in language the user in Run as currently has selected.
•To, CC, BCC: In these fields you choose the receiver of the report (Email receivers). When you click in the fields a dropdown is opened containing the users defined in NSP. Select user by clicking the name, and repeat for all receivers. Remove a receiver by clicking the X symbol for the user.
•Subject: Subject of the email to be sent.
•Text box: Containing the body text of the email.
•Attachments: Here you can select files to be attached to the email. Click the attach symbol and select a file. Repeat for all files needed. Remove a file by clicking the X symbol for the file.
When you finished input or edit, click Save to save the schedule. The scheduled report should now be displayed in the Scheduled Events list.