There are different kinds of ways to log in to the system. Each type of user has a specific role assigned, and based on this you get features specified for this role, create and follow up service tickets and access the Knowledge base. This can be done with one of following alternatives; NSP account, Windows credentials (AD) or other external login provider.
Each user has roles assigned, and based on this you get features specified for this roles.
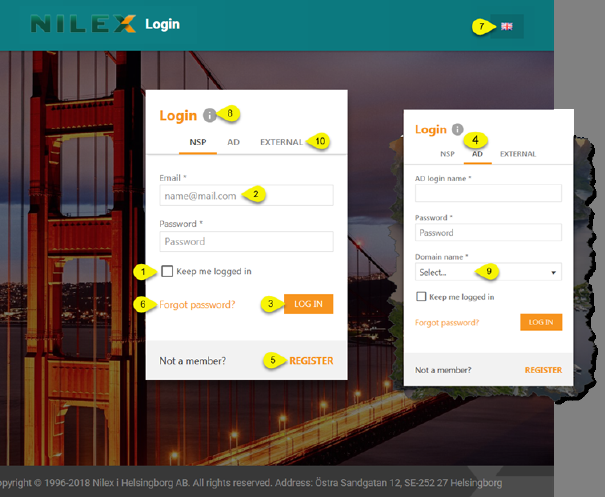
The figure below shows the Login form:
NSP Login page
The form is same for user types. There are three ways of logging in to the system:
•NSP username (an Email address) and password: In this case you must see to it that you have an account as described in the Register section. This alternative is always available. For this alternative the login form with the fields (2): Email Address and Password is used. After entering the values, click Login button (3).
•AD: Use your Windows credentials to log in (4). This function must be enabled and set up by the administrator. If there is multiple domains used in your network, you must choose the one to log on to (9).
•External: You can use an external login provider if this has been enabled and set up by the administrator. See section External login methods.
If you mark the check box Keep me logged in (1) you can, after you have logged in, close the browser or change to another site and when you open the NSP site next time you will directly be logged in. This applies if you keep using the same browser.
Help button (8) opens a popup showing help text for login function.
Choose what language to use (7).
If you are a new user and want to register a new NSP account, use link Register (5), see section Register.
If you have an NSP account, but you have forgotten your password, click the link Forgot Password? (6). This link opens a popup form where you have to enter Your Email Address (username of the NSP account). After Submit you will get an email with a link to a form where you can enter a new password.
If Force Two factor authentication is enabled, and you did not have configured 2FA methods, after successfully login, you will be redirect to the following page to configure 2FA methods.
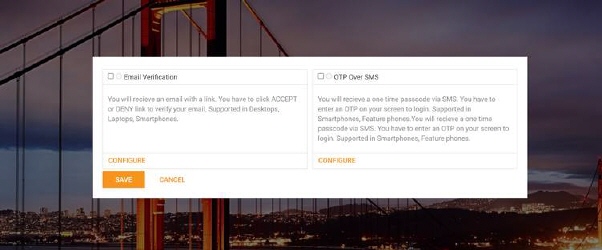
Configure 2FA methods page
Each 2FA methods contains checkbox for activating method and radio button for setting method as default. Only one method can be default at time.
Each method contains CONFIGURE action. Use this action to set up 2FA method.

1. Enter your Email/Phone number to which you want to receive passcode
2. Click on Send passcode
3. When you receive code insert it in One-time passcode field
4. Click on Validate
5. Use Cancel button to cancelled all process.
After successfully 2FA configuration click on SAVE button, and you will be redirect to Dashboard page, in other case use CANCEL button to cancel configuration and logout from the application.
If Two factor authentication (2FA) is enabled, after successfully login you will be redirect to the following page to verify your identity.
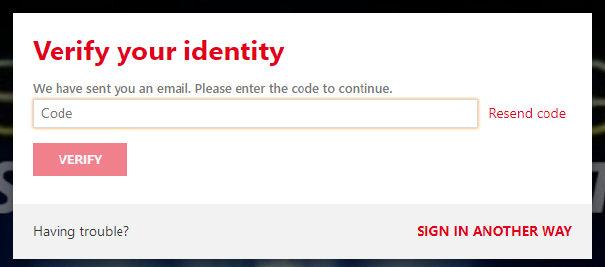
Based on 2FA configuration you will receive passcode on your email or phone no.
Enter the received code and press VERIFY.
If you did not get a code, click on Resend code action.
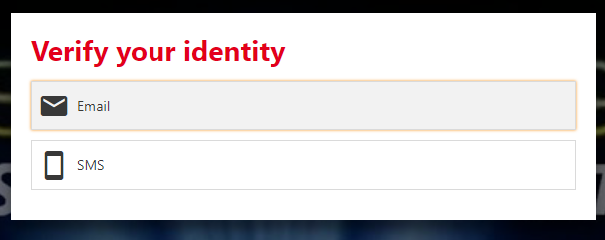
If you having trouble and want to change verification method, click on SING IN ANOTHER WAY button, and list of all available 2FA methods will be displayed. Choose prefered method and passcode will be sent again to you.
After successuly verifiaction you will be redirect to Dashboard page.