 or Edit
  button following form will
appear:
button following form will
appear:After click on Add new
record  or Edit
  button following form will
appear:

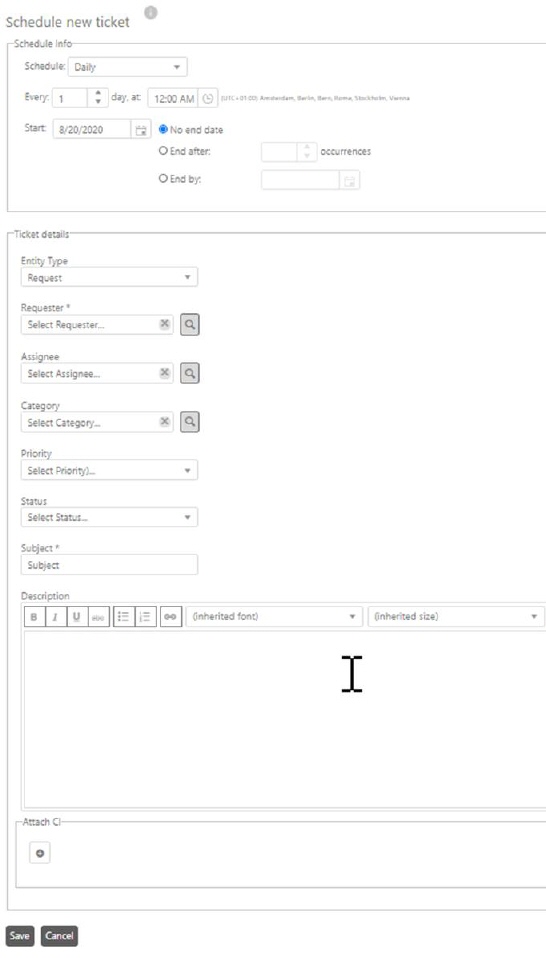
Schedule new ticket
In the upper part of the form, Schedule Info, you define the time schedule of the ticket generation. Settings are similar to time settings when scheduling reports. The different possibilities are described in Schedule Reports.
In the lower part of the form you need to insert Ticket Details:
•Entity Type: Select the type for the new scheduled ticket. Dropdown contains all available ticket types.
•Requester: Name of the user who requested the ticket. Mandatory and autocomplete field. You can search for every User defined in NSP. Also this field contains browse button for ease of reference. In this form you can search for user.
•Assignee: Name of the user or group to whom the ticket is assigned. Autocomplete field. You can search for every Agent defined in NSP. Also this field contains browse button for ease of reference. In this form you can search for agent.
•Category: category of the ticket. Dropdown field. You can search for every category defined in NSP.
•Priority: Priority of the ticket. Dropdown field. Default priority values are: High, Medium and Low.
•Entity Status: Status of the ticket. Mandatory and dropdown field. Default status values are: Assigned, In Progress, Closed, Registered.
•Subject: Subject of the ticket. Mandatory field.
•Description: Description of the ticket.
•Link CIs to ticket: Select CI to be linked to ticket.
Click  button to open a
popup where you can search for CI to link.
When you finished input or edit Schedule Info and Ticket Details, click Save to save the schedule ticket. The new scheduled ticket is now visible in Scheduled Events.