Add new Service Catalog item
For adding new service item just click on Add Service
item button above the table. Adding new service item is done in six steps.
Same steps is used when you edit the Service item (except the first step,
it is in use only when you add a new item).
First step –
Start
Service Item can be created in two ways. Using new,
empty template or based on a copy of an existing SCI.
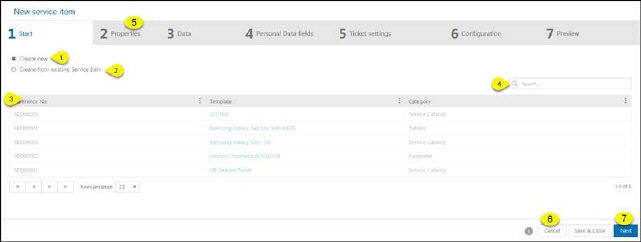
Step 1 - Start
1.
Create new – Select this radio button in case you want to create new
service item and click Next (7) button or
Properties (5) tab to proceed to the next step.
2.
Create from existing Service Item – Select this radio button in case you
want to create service item from existing items. When you select this button
list of all existing service items (3) enables and you can search list using
search box (4).
3.
List of all existing service items – Initially this list is disabled, but
in case you select Create from existing Service Item this list is
enabled and you can search service item which you want to use for
creating new one.
4.
Search – search feature in this section allows you to search existing
Service Item from the list if you select Create from existing Service
Item. You enter keyword related to the Service Item that you want to find.
System searches for the keyword in following columns: Id, name, category,
currency, status.
Use Cancel (6) button if
you want to cancel adding new service item.
Use Next (7) button to
proceed to the next step.
Second step –
Properties
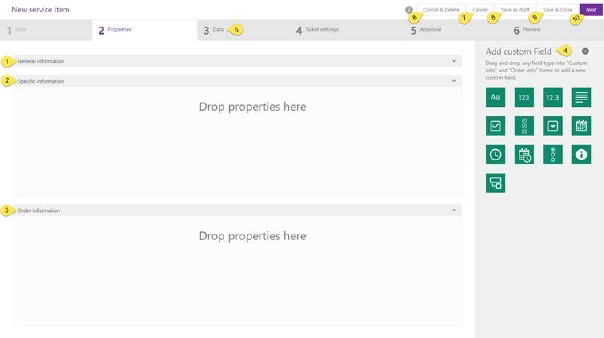
In this step you
define all SCI properties. There is a set of default properties that are same
for all SCI, those could not be changed, and two segment for adding custom
fields (Specific information and Order information).
Service item properties
1.
General information: List of default properties
that each SI has and which are same for all SI categories. In this step this
list is disabled, you edit the information in the next step, Data (5).
2.
Specific information: List of fields that will
additionally describe the service item. You define property field types and
field headers. Data will be filled by the SCI creator later in the next step,
Data (5), of the creation of the SCI.
3.
Order information: List of custom fields the end
user must fill in order to make a valid Service Order. You define property field
types and field headers.
Adding specific and
order information are done in the same way. Add fields here working with drag
and drop principle and are similar to add fields or properties to other
entities, see Custom Entity forms /
Property editor.
When you create property fields you can create field
headers in different languages.
All custom fields, respectively properties can be
deleted. Click the field and select Delete in
popup.
When all fields are created, use
Next (10) button or click on Data (5) tab to
proceed next step.
Use Save as draft (8) button to
save service item as draft. Form stays open and service item will be saved with
Draft status and all properties and values you set
in this steps will be saved. In case that the service item has status different
from Draft, Save as draft button is called Save.
Use Save & Close (9) button to
save service item and close form. Form closed and service item will be saved
with current status and all properties and values
you set in this steps will be saved.
Use Cancel (7) button for
canceling form. Form will be closed and service item will be saved with current
status but properties and values will not be saved.
Use Cancel & Delete
(6) button to cancel form and delete
service item.
Third step – Data
In this step you fill General and Specific information
of the Service Catalog Item. Data shall compose a
complete description of the Service Catalog Item
that is offered to customers.
Managing languages
When you input data in fields that are defined as
multilingual (Name, Short
description, Long description and fields in
Specific information fields defined as
translatable) following rules are in use:
When SCI is saved first time (create SCI from new empty
template) all data values are saved in NSP Standard Language. If Agent has not selected the standard language when
creating the Service Catalog Item a symbol  is displayed at the top of
form to warn/inform user that data will be saved in other language than Agent has currently selected.
is displayed at the top of
form to warn/inform user that data will be saved in other language than Agent has currently selected.
When Agent edit a Service Catalog
Item all data are saved in language that Agent has currently selected.
Correct working process to create a SCI in several languages is:
1.
Select NSP Standard Language in your user profile
Settings.
2.
Create the Service Catalog Item in NSP Standard Language (all steps and Save).
3.
Change language to language 2.
4.
Edit Service Catalog Item in language 2.
5.
Repeat 3-4 for all other languages in use.
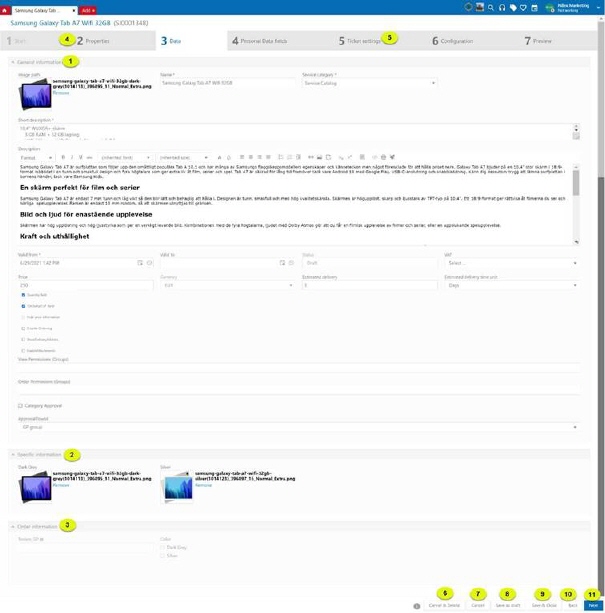
General information
contains list of all default properties that each SCI has and which are same for
all categories.
In following table you can find list of default SCI
properties:
|
Field |
Description |
|
Image path |
Upload image which
will represent SCI. |
|
Name |
Text field. Name of
SCI. Saved as a user defined language dependent value, could have
different value for different languages. |
|
Service category |
Dropdown field. You
can choose from categories defined in Service Catalog. |
|
Short description |
Text field.
Name
and Short description are displayed on Service Catalog
home page. Saved as a user defined language dependent value, could have
different value for different languages. |
|
Description |
Text area field.
There are formatting tools to format text, and you can add images and
links. Saved as a user defined language dependent value, could have
different value for different languages. |
|
Order confirmation message |
Text field. Use it
to add a confirmation message to the service item, that will be shown to
the end-user upon ordering. Formatting tools are available same as for the
Description field. |
|
Valid from |
Date and time
field. Choose date from which SCI should be valid (Published). Time is
set to current time as default when you create a new SCI. |
|
Valid to |
Date and time
field. Choose date which SCI shall no longer be valid (Archived). You
don´t have to define this time. If it is not set the SCI will be valid
until it is manually archived. |
|
Status |
Current status of SCI. Default value for a new
item is normally Draft. More information,
see Service
Item default lifecycle. |
|
VAT |
Dropdown field. You
can choose from VATs defined in NSP. Must not be defined, if not selected
no VAT is added to the Price. |
|
Price |
Decimal field. Insert SCI price in selected Currency. |
|
Currency |
This field defined standard currency and cannot be
edited. SCI Price shall be defined in this
currency. |
|
Estimated delivery |
Number field. Insert number, forms together with
Estimated delivery time unit estimated delivery time. |
|
Estimated delivery time unit |
Dropdown field. You can choose Minutes, Hours,
Days, Month and Years. Forms together with numeric value Estimated
delivery estimated delivery time. |
|
Quantity field |
Checkbox field. Select this field if you want to
allow ordering larger quantities (>1) of this item. A field for
quantity is added in Service Catalog where
Requester must input number when ordering
SCI. |
|
“On behalf of” field |
Checkbox field. Select this field if you want to
allow “On behalf of” ordering for this item.
Person creating the order and the Requester
can then be different users. |
|
Hide price information |
Checkbox field. Enable this field if provided
service is free of charge for the requester. No information concerning
price, tax or currency is displayed for the service item. |
|
Disable Ordering |
Checkbox field, if enabled
order of service item is not available on Self Service Portal. Buttons for
Order and
Add to Chart
are hided for this item in SSP. Purpose of this setting is e g when
ordering shall be temporarily disabled without changing other
settings. |
|
Show delivery address |
The Show delivery address
option allows us to control the possibility of entering the delivery
address data or not when ordering items from the service
catalog. |
|
Show Order Information |
The Show order information
option allows us to control displaying of order information In order
confirmation window when ordering items from the service
catalog. |
|
View Permissions
(Groups) |
Select groups for which the service item should be
visible. Start typing name of group, matching groups will be displayed in
dropdown. You can select one or more groups. Select in dropdown or hit
Enter after each group. Click x to remove.
If you don´t select a group (field is left empty)
the service item will be visible to all groups. |
|
Order Permissions
(Groups) |
Select groups for which the service item should be
possible to order. Start typing name of group, matching groups will be
displayed in dropdown. You can select one or more groups. Select in
dropdown or hit Enter after each group. Click x to remove.
If you don´t select a group (field is left empty)
the service item will be available for all groups. |
|
Approval flow |
If the option “Category Approval” is selected on
the service item, then the user does not have the option to select a
specific approval flow for the selected service item, but the approval
flow set on the category will be applied. (for more info how you can set
the approval flow to the category, click here). In case the category approval flow option is
not selected, then the approval flow field is displayed on the form. Then
you can set which Approval flow that shall
be in use when this service item is ordered. Select from dropdown
containing available configured Approval
flows. In case this value is empty, the default system approval
flow is applied. |
|
Enable
attachments |
If this option is activated, than you have
possibility to attach files within ordering process on Self Service
Portal. |
|
Order Separately
only |
If this option is activated, then this service
item can be ordered only separately, without other items and without
dependent items |
|
Verify
Account |
If this option is enabled, then when ordering, the
user must verify his account. |
|
Show order
information |
If this checkmark is marked, then the ordering
popup on the Self Service portal will display a box for entering values
for order information fields (for example cost center, manager, contact
name, email, your order no, note etc). |
|
Featured |
If this option is selected,
following service catalog item will be displayed inside the widget on
SSP. |
|
Service type |
There are two values for service type – regular
service and CI Report by Faciliate and Financial. For all standards
services use alternative Regular service while varijant CI
report by Faciliate and Financial is only available if it is activated
Facility integration for generating reports for
controllers. |
In this step you also fill values for Specific information (2) which you defined in previous
step.
Ordering information (3)
shows properties for ordering which you defined in previous step, but you cannot
edit. Ordering segment in this step is disabled, data should be input by Requester when ordering SCI.
Use Next (11) button or click
Personal Data Fields tab to proceed the next step.
Use Back (10) button or
click Properties (4) tab to go to previous
step.
Use Save as draft (8) button to
save service item as draft. Form stays open and service item will be saved with
Draft status and all properties and values you set
in this and previous steps will be saved. In case that the service item has
status different from Draft, Save as draft button
is called Save.
Use Save & Close (9) button to
save service item and close form. Form closed and service item will be saved
with current status and all properties and values
you set in this steps will be saved.
Use Cancel (7) button for
canceling form. Form closed and service item will be saved with current status
and all properties from previous step will be saved but properties and values
from this step will not be saved.
Use Cancel & Delete
(6) button to cancel form and delete
service item.
Fourth step – Personal
Data Fields
This is settings for the General Data Protection
Regulation (GDPR). See section GDPR -
Personal data fields.
Fifth step – Ticket
settings
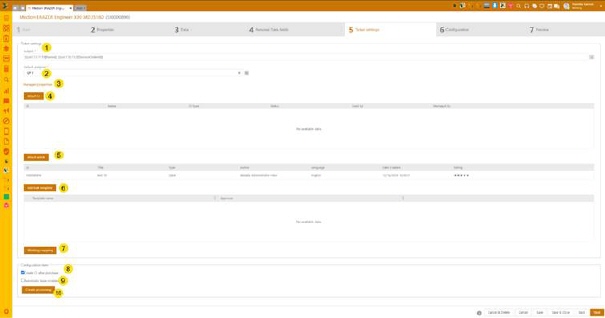
In this step you define ticket settings for Service
Order ticket and Configuration item settings. After ordering and approve, if
specified, a ticket and CI is created for handling the delivery.
Ticket settings and Configuration item
1.
Subject: Define ticket subject, explained below.
2.
Default assignee: Define assignee of created ticket. This field
has auto-complete feature, start input name of group or agent, dropdown is shown
with search result. Select assignee in dropdown. If you click the  symbol a browse form is opened. You
can search for a Group or
an Agent in NSP which will be
assignee of the created ticket.
symbol a browse form is opened. You
can search for a Group or
an Agent in NSP which will be
assignee of the created ticket.
3. Managed properties: this function allows
that values from certain fields from the service item transfer as same values in
fields in the service order ticket. Values can be mapped from the ordered
service item or they can be set as fixed values. Clicking on Managed properties
opens a popup with settings:

Ticket
mapping popup
The first column
shows the fields in the ticket, while the second column shows two options for
defining values - mapping or fixed value. A fixed value is available in all
fields and a mapped value is only available for fields that are same type and
found in both entities. The third column refers to the selection of values
(selection of the field from which is mapping going to be performed or entering
a specific value for the option default).
4.
Attach CI: This function allows
you to link specific CI to service order ticket which is made after ordering
some service item. Clicking on this button opens a popup with a list of active
CIs that can be linked to a ticket. One or more CIs can be selected. Attached
Cis can be removed using Remove link action rightmost on the
row.

Attach CI
popup
5.
Attach article: This function allows you to link specific KB articles to
service order tickets made after ordering some service item. Clicking on this
button opens a popup with a list of published articles that can be linked to a
ticket. One or more articles can be selected. The attached articles can be
removed using the Remove link action rightmost on the row. Associated Service
items are shown in the KB article tab.
 Attach
article
Attach
article
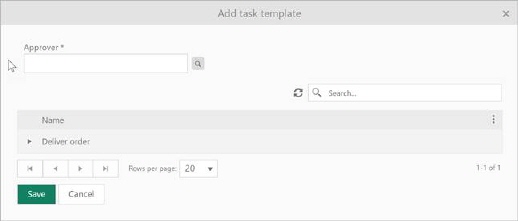
6. Add task template:
This function allows you to add
specific task template to service order ticket which is made after ordering some
service item. Clicking on this button opens a popup with a list of existing task
templates that can be added to a ticket. You can add one or more task templates
and you need to insert Assignee for each of them. Linked task templates
can be removed using Delete action rightmost on the row.
Add task template
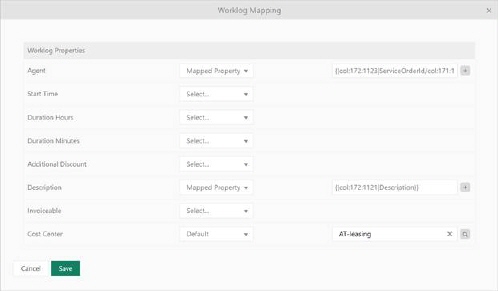
7. Worklog mapping - this function allows that values from certain fields from
the service item transfer as same values in fields in the worklog form in
created service order ticket. Values can be mapped from the ordered service item
or they can be set as fixed values. Clicking on worklog mapping button opens a
popup with settings:
Worklog
Mapping
The first column
shows the fields in the worklog forms, while the second column shows two options
for defining values - mapping or fixed value. A fixed value is available in all
fields and a mapped value is only available for fields that are same type and
found in both entities. The third column refers to the selection of values
(selection of the field from which is mapping going to be performed or entering
a specific value for the option default).
8. Create CI after purchase: By marking this
checkbox, this purchased service item will be saved as CI.
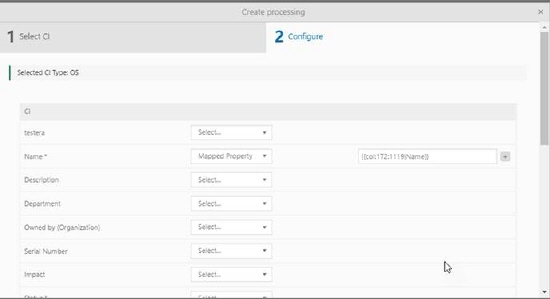
9.
Create processing: By clicking this button,
a popup is opened where the type of the new CI should be selected first and then
the field values for that type. Values can be predefined (fixed) or can be
mapped with field values from the purchased service item.

Create processing popup
10.
Automatic lease enabled: By marking this checkbox, the saved CI will be
automatically leased in the last active leasing contract related to customer
account which is used in order. If active contract with that customer account
does not exist, CI will not be leased.
In service
order ticket that is created after successfully order, new comment with all
leasing information (successfully or not) will be created.
Comment
Example when active contract with requested customer account exist:

Comment
Example when active contract with requested customer account does not
exist:

NOTE: This
setting is allowed only when setting Create CI
after purchase is active.
Use Next button or click
on Configuration tab to proceed the next step.
Use Back button or click
on Personal Data Fields tab to go to previous
step.
Use Save as draft button
to save service item as draft. Form stays open and service item will be saved
with Draft status and all properties and values you set in this
and previous steps will be saved. In case that the service item has status
different from Draft, Save as draft button
is called Save.
Use Save & Close button to save
service item and close form. Form closed and service item will be saved
with current status and all properties and values you set in
this steps will be saved.
Use Cancel button for canceling form.
Form closed and service item will be saved with current status
and all properties from previous step will be saved but properties and values
from this step will not be saved.
Ticket Subject
For Ticket Subject
customization a template form is used. Click on  button and following form appears:
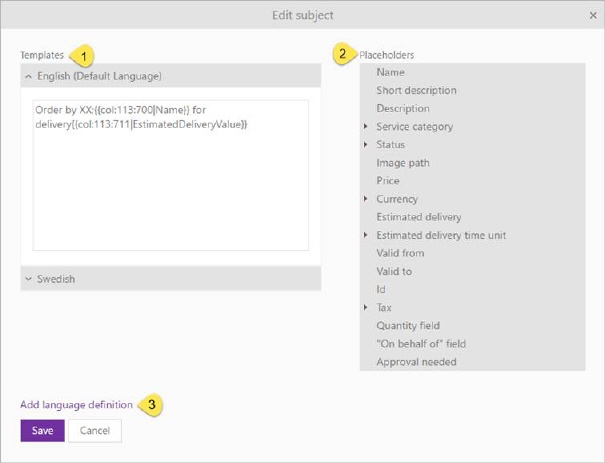
Edit Ticket Subject
Fields in Edit Subject form:
1.
Templates: This box is used to define the Ticket Subject text. Text is built of a combination of
plain text and Placeholder values (variables
collected from the SCI data).
2.
Placeholders: Consists a list of all properties
referred to Service Catalog Item (properties from General information Product,
Product-Category and Order information). You can click the placeholder to
include it in the template along with other text. These placeholders will be
replaced with the actual value when the ticket is created.
3.
Add language definition: Select the language from
the list to create Template for the specific language. You can select different
language and then define Template for the selected language in respective
textbox. Repeat the procedure for next language needed, and so on. Ticket will
be created in end user (Requester) default
language.
Sixth step –
Configuration
Association configurations.
Used to configure association to a Cost Center for the service item, the receiving
account when service order is invoiced.
Form contains links to Set
or Change (select Cost
Center in popup) and Remove.
Use Next button or click on
Preview tab to proceed the next step.
Use Back button or click
on Ticket settings tab to go to previous step.
Use Save as draft button
to save service item as draft. Form stays open and service item will be saved
with Draft status and all properties and values
you set in this and previous steps will be saved. In case that the service item
has status different from Draft, Save as draft
button is called Save.
Use Save & Close
button to save service item and close form. Form closed and service item
will be saved with current status and all
properties and values you set in this steps will be saved.
Use Cancel button for
canceling form. Form closed and service item will be saved with current status and all properties from previous step
will be saved but properties and values from this step will not be saved.
Use Cancel & Delete
button to cancel form and delete service item.
Seventh step –
Preview
This step is used for final preview of the Service
Catalog Item. All information you customize in previous steps will be appear
here. If you are satisfied with service item preview click Save as Pending Published and service item will be saved
with Pending Publish status. Status will
automatically be changed to Published when time
for Valid from has been reached.
In case that the service item has status different from
Draft, Save as Pending Published button is called
Save and service item will be saved in current status.
In case you want to continue editing service item use
Back button or click on previous tab to back to previous step to change and
adapt desired information.
Use Cancel button for
canceling form. Form closed and service item will be saved with current status and all properties from previous step
will be saved but properties and values from this step will not be saved.
Use Cancel & Delete
button to cancel form and delete service item.