When creating an Entity (CI, Contract, Knowledge base article, Products, etc) a form is opened where you add the data properties. As Administrator you have much freedom to customize these forms using the form builder.
When adding some types of fields to the form what you in fact are doing is deciding the properties of the Entity. Using the “Hidden” trait on a field you can also add properties that not are visible for the user, but only used for instance in Trigger scripts.
Note: After adding new property to an entity you need to do a restart of NSP Maintenance Host to make new fields work properly.
Form builder
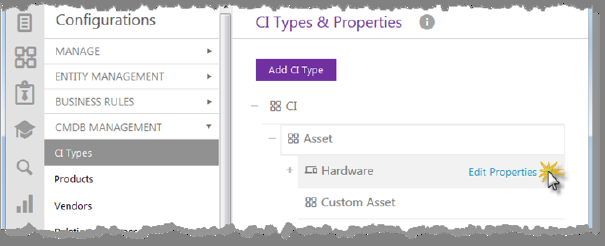
For each type of Entity you find the form builder if you go to (replace “Entity” with the desired type; CI, Contract, Knowledge base article):
Configuration> “Entity” Management> “Entity” Type > Add “Entity” type or mark row of Entity type and click Edit properties.
To add a field to the main form use drag and drop. You can place fields side by side if the field width allows it.
Different fields have different sets of attributes and behavior options. Mark the field on the form on the left hand side and the field traits will show. Here is a description of the traits:
Available on all field except the Text area. When this checkbox is marked the user cannot submit the Entity without entering data or choosing a value to this field.
Available on all field types. When this checkbox is marked the fields became read-only in the forms, and value cannot be entered.
In the case of selecting Info fields, the Hide label option is enabled. By marking this checkmark on the form, the label of this property will not be displayed, but only the info field value.
Available only for Text, Number and Decimal Number fields and only for CI Types. Value in field must be unique for each instance in the database. If you try to save a CI with value that exist for other CI you get an error message and CI cannot be saved.
All fields have this. The system gives all fields a default name “Untitle nn” so you always need to enter a caption of your own. To handle any translation to multiple languages a separate form is opened when adding field name.
All fields have this. You can choose the width of the field in percent of the width of the form. The default value is 25%. If the collective width of fields placed side by side exceeds the form width, the field to the far right will be moved to a row of its own.
Available only for Text area field. You can choose default field height in pixels, value between 150 and 2000 pixels. This setting is the default height of field. When the object is created the field is resizable in the manner that with arrow in lower right corner height can be changed.
Available on all field except the Text area field. The fields does not show when the form is presented for the User. We recommend this for old properties that is no longer in use as deleting a property will make the statistics invalid. This can also be used for properties that not are of interest for the user but used in Trigger scripts “in the background”.
All fields have this. If this checkbox is marked the field will be added to the left hand panel when creating or editing Entities. The order in the left panel from the top down corresponds to the order in the main form, row by row from the left to the right.
All fields except Info have this, but it is only available for CI Types and KB Article Types properties. If this checkbox is not marked the field will be hided in forms on Self Service Portal.
Available on all field types. Depends on Show in SSP checkbox. If Show in SSP is not enabled this field will be disabled and cannot be able to change it value. If Show in SSP is enabled, than you can change value of Edit in SSP field. By enabling Edit in SSP checkbox, field became editable in SSP forms for CI and Contracts.
If you check this option on the form, when displaying this property, the copy icon will appear on the right side of the field, clicking on the icon will automatically copy the field content to the clipboard. This option is available only for input type fields, like text or number.
This attribute is valid for the Text field and the Text area. Read more here.
Write a text that inform the user how to use the field or what it contains. The text is shown on the Entity in edit mode. Either as plain text under the field or as a tool tip that pop-ups when you hold the mouse over the (i) by the field name.
Opens popup to insert default value for the field, a value that is pre-filled when an entity is created. Note that the field must be saved and property type must be saved/updated for possibility to enter a default value. Button is disabled until property is saved. Save field and property type first and then select Edit Properties again now you can enter default value. If property has a default value defined an information button is shown on property field:
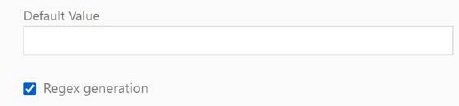
In the case of a text field, it is possible to choose automatic value generation based on a Regex expression. In the default value field, in that case, you can enter a regex, for example two random numbers and two letters:
[0-9]{2}[A-Z]{2}
When opening the form, the generated value will be displayed on the screen every time.
Default value cannot be used for translatable fields. If Translatable checkbox is enabled will Edit default value button be disabled.
Button Calculated value is available only for Text filed type.
Click the button Calculated value and in opened popup select Enable calculated value checkbox to enable Formula input.

Formula is a mandatory field and in this field you enter the parameters based on which you want to perform the calculation. You can insert specific Parameters from the list or predefined Utils.
Note: If Calculated value is enabled, Default value and Set up expression should be disabled and this field will be read-only in entity forms.
Click the button Visibility condition and create a condition that needs to be fulfilled in order for the field in form to be shown. You can create conditions with other fields that reside on the same Entity that you are currently editing.
The condition is built of a logical hierarchical structure of Conditions and Sub conditions. The different conditions are linked by operators And (AND operator) and Or (OR operator). You can select And to require match of all the linked conditions, or Or if match any single condition from the linked conditions defined is enough. The order is approved only if the result of the complete logic expression is true.
The section is initially displayed with one empty condition row, Add condition and Add sub condition buttons, Delete button and operator selection And/Or.
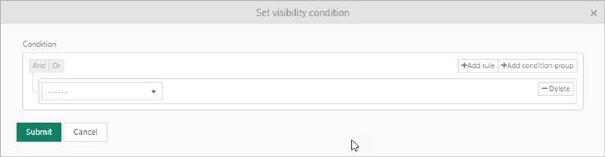
•You can create conditions on all field types except Image and Empty space.
•It is not possible to create visibility conditions on mandatory system standard fields like Name and ID.
Button Condition is available only for Reference filed type.
Click the button Condition and set a condition which will be used as a field filter. You can create condition (filter) based on field properties.
Example: Reference field: Base User, Condition: Organisation equal Nilex. Results: Filed will be listed only user which belongs to Nilex organization.
Besides reference field properties there are additional conditions based on which you can filter field results.
User reference:
•User is exist in AD – Returns all user which have windowsusername
•User in the same customer account as logged user – Returns all users which belongs to the same customer account as logged user
•Logged user as AD manger -Returns all users to whom AD manager is logged user
•Is external user - Return only users from currently logged in user’s organization and users with the same e-mail domain
•Is internal user - Return only users which are NOT belong to currently logged in user’s organization and users with the different e-mail domain
CI reference:
•Product type - Returns all Cis which belongs to selected Product type
•Product category – Returns all Cis which belongs to selected Product category
•Used by logged user – Returns all CI to whom Used by is logged user
The condition is built of a logical hierarchical structure of Conditions and Sub conditions. The different conditions are linked by operators And (AND operator) and Or (OR operator). You can select And to require match of all the linked conditions, or Or if match any single condition from the linked conditions defined is enough. The order is approved only if the result of the complete logic expression is true.
The section is initially displayed with one empty condition row, Add condition and Add sub condition buttons, Delete button and operator selection And/Or.

If you want to set the regex validator to a certain text, number or decimal number field type, it can be done by clicking the set up expression button, after which a popup will open where you can enter the regex values. It is necessary to select expression type. If you want to enter your manually defined regex, select a custom type, or for already predefined expressions from the system select from the list. In the case of a custom expression, you need to enter a regex value for the validator. Also, you can set a placeholder text on the field. You can also set messages for the user, in case of invalid data entry on the form.
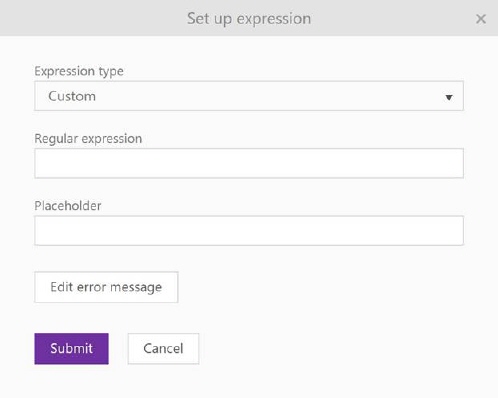
Set up REGEX
If you use several languages in your system you must see to it to all field names, any choices and field content have proper translations.
For the fields where the Translatable attribute is set, language keys will be created for all installed languages for the content of this field. When an object is created using any Entity Type (form), the text you write in the field will always be stored in the tag of the NSP Standard language. Go to the Translation manager|topic=Edit Translation keys and use the value entered in the Standard language to find the other languages.
Here is how you handle the translation:
1. Create the Entity
2. Enter text in the field that is marked as
Translatable. Make a note of it.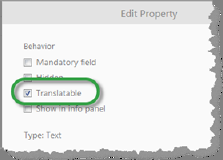
3. Goto AP> Configuration> Manage> Language & Translation> Translation management.
4. Select the language you want to make a translation for in the field Translation language.
5. Mark the Search field and write the text from 2.
6. Click edit on the tag and enter the translation.
You can also search using the GUI-tags Translation keys names. This is however a little trickier. The keys are named in the following manner, where “XXX” is a random number and “fieldvalue” is a merge (without spaces) of the text written when the Entity is created.:
•Service items - ServiceItemProperties.XXX.fieldvalue
•KB Articles - ArticlePropertyValues.XXX.fieldvalue
•Contracts - ContractPropertyValues.XXX.fieldvalue
•CIs - CiPropertyValues.XXX.fieldvalue
Translation of field name and multiple choice items
When clicking on either the field for the component name or when adding choices to choice components (Checkbox group, Dropdown, Radio Button Group) the translation form opens. Here all active languages are listed. The NSP Standard language is marked with bold.
|
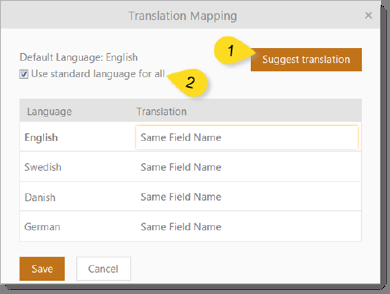
|
If you write a value in the field for the standard language (English in the picture above) and then click Suggest translation (1) the system searches the database and if the same value has been used before, suggest translations. If no prior translation is found the translation key name is shown. You can also transfer the value added for the Standard language by marking (2). The Standard languge is written with bold text in the list. |
Translatable – When an Entity is created using any Type (form) it will always be created in the in the NSP Standard language. But for the fields that have the Translatable setting marked, language keys will be created for all installed languages for this field. Go to the Translation manager and use the value entered in the Standard language to find the keys in the other languages.
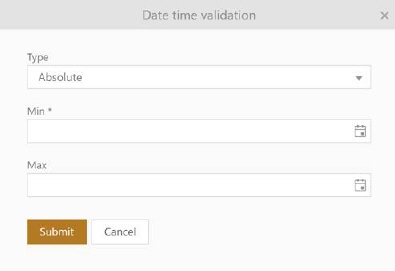
In case you have a date and time property, the Date time validation action will appear in the settings. Clicking on the button will open a popup where you can set absolute or relative min and max values. In the case of absolute values, you can choose the dates that will be set for the min and max values. In the case of relative, you can use standard tags such as @Today, @Now, @UtcNow. By combining these tags and values, you can dynamically calculate the date, for example @Today-5d. This value will mean from the current date minus five days.
|
Button |
Field |
Standard traits |
Special traits/ Comments |
|
|
Text |
M, U, L, W, H, P, SSP, D, S, T, V |
Default – Write a text that is there already when the Entity is created. |
|
|
Number |
M, U, L, W, H, P, SSP, D, S, V |
Default – Write a text that is there already when the Entity is created. This property is int32 and you can enter max 10 characters. |
|
|
Decimal number |
M, U, L, W, H, P, SSP, D, S, V |
Nof Decimals – Decide how many decimals are to be shown. If the field is set from an external source and this number has more decimals than the set number it will be truncated. |
|
|
Text area |
M, L, W, F, H, P, SSP, D, S, T, V |
When the object is created this field is resizable in the manner that with arrow in lower right corner height can be changed. Default height is defined by Field Height setting. For Text area fields there are Additional tools available (checkboxes): •Video upload: Possibility to upload local video to the field. •Youtube Video Import: Possibility to upload Youtube video to the field. •Import/Export: Possibility to import/export field content from/to document (file types: docx, rtf, pdf, Html, Plain text). |
|
|
Checkbox |
M, L, W, H, P, SSP, D, S, V |
|
|
|
Checkbox group |
M, L, W, H, P, SSP, D, V |
Choices (Add choice) – For every item you add a new check box is created in the group. All items are independent and several items can be checked by user. The items can be translated. It is possible to change the order of the items in the list. In checkboxes in front of each choice you can mark choices to be enabled as default. |
|
|
Dropdown |
M, L, W, H, P, SSP, D, S, V |
Choices (Add dropdown choice) – For every item you add a choice is added to the list. The items can be translated. It is possible to change the order of the items in the list. |
|
|
Date Picker |
M, L, W, H, P, SSP, D, S, V |
The system automatically sets the date format according to the language chosen by the User. |
|
|
Time Picker |
M, L, W, H, P, SSP, D, S, V |
The format is determined by the setting done in Account management> Date and Time Settings. |
|
|
Date and Time Picker |
M, L, W, H, P, SSP, D, S, V |
The system automatically sets the date format according to the language chosen by the User. |
|
|
Radio Button Group |
M, L, W, H, P, SSP, D, V |
Choices (Add choice) - or every item you add a new button in the group. All items are dependent and only one choice can be made at any given time. The items can be translated. In checkboxes in front of each choice you can mark choice to be enabled as default. It is possible to change the order of the items in the list. |
|
|
Info |
L, W, V |
Note that this field type only has a Label and Width trait. You write the text content but it is not translatable. |
|
|
Reference |
M, L, W, H, P, SSP, D, S, V |
Entity – Choose in the list of Entities and Types. For some entities you can create Dependent field, see below. Field type – You can choose in what way the existing Entities shall be displayed: Drop down – Shows a list of all created posts of the chosen type. Auto complete – User starts to write the Entity name after which the system fills in the rest. Combo box – Here user both can choose from a list or write a search string. Load meta data - If this checkbox is marked, all meta data (facilitate and financial) from CI will be copied to the order confirmation popup. This is valid only for CI reference entity and applies only on the service catalog. |
|
|
Image picker |
M, L, W, H, P, SSP, D, S |
|
|
|
Empty space |
W |
This component is used when you want to create a specific layout of the other fields. |
|
|
Location |
M, L, W, H, P, SSP, D, S, V |
|
|
|
Rating |
M, L, W, H, P, SSP, D, S, V |
|
|
|
Like/Dis-like |
M, L, W, H, P, SSP, D, S, V |
|
Note! Even if all custom fields can be deleted we strongly advice against this as it will make the statistics invalid and hinder you from comparing reports. Use the Hidden trait instead.