Worklog form:

Worklog add form
To add a new worklog form can be opened different ways:
•If Worklog Timer is activated by clicking Save Worklog in ticket form (button above the comment field).
•By clicking Add Worklog button in the Worklog tab.
First step is to select Worklog Type in a popup. The available types has been configured by the system administrator. Just click a type in list to continue.
In next step you have to select Customer Account to be charged. If there is only one account connected to the ticket Requester this account will be pre-set and no popup is shown. The popup is shown only when the first worklog in ticket is created. If there is already at least one worklog saved in no popup is shown. Same account selected for existing worklogs is pre-set for the new one. If you have selected wrong account from the beginning you have to first revoke all existing worklogs. If there is no active worklog the popup for account selection is shown.
After defining Worklog Type and Customer Account worklog form is opened. The worklog form description below handles a worklog type containing only basic properties. For other Worklog Types additional properties can have been defined, if so they will be shown in form below the basic properties.
Charging work can be done either Per Hour or Per Ticket. Which method that is used for a specific ticket is due to the customer (which Customer Account the Ticket Requester is member of). System administrator has configured how charging shall be done for each Customer Account.
If Ticket Requester is not member of a Customer Account it is still possible to create a worklog. In worklog form there is then no rates available, you have to add Agent Cost manually.
The worklog form consists of two tabs. In first tab, Properties, you enter all properties connected to the spent time and in the second tab, Other costs, you add all other additional cost and spare parts that shall be charged. The second tab is shown only if system has been configured to allow charging of extra costs and/or spare parts for the Customer Account. You can move to the other tab with Back and Next buttons at the bottom of form.
Tab Properties
Worklog add form
In form header you can see if worklog is Per Hour or Per Ticket charged. The image above shows Per Hour worklog form. Some of the fields are missing if customer shall be charged Per Ticket. For this type the same sum will be charged for each ticket independent of spend time.
All fields marked with * are mandatory.
•Agent: Mandatory field. Suggested pre-set value
is Ticket Assignee or Logged in User (which value shall be used is a system
setting done by the administrator). Dropdown has auto-complete function, you can
search for a user by start typing a name. Other way to select agent is the
browse button  . The popup contains a
list of available agents. Which agents that are available in dropdown or in
browse list is defined by system administrator setting (all agents or only
agents belonging to same group as ticket assignee).
. The popup contains a
list of available agents. Which agents that are available in dropdown or in
browse list is defined by system administrator setting (all agents or only
agents belonging to same group as ticket assignee).
•Worklog Type: Selected during creation, cannot be changed in form.
•Start time: Mandatory field. When the activity
starts. If worklog is added from Worklog Timer the
date and time is preset to current time. Adjust the time with pick buttons 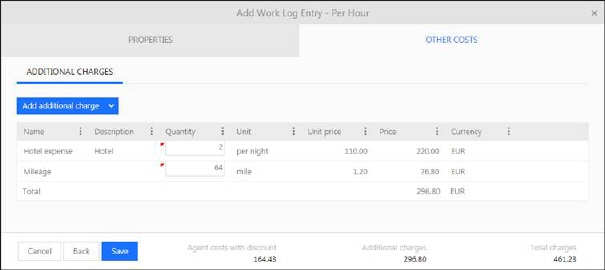 .
.
•Duration: Mandatory fields. How much time you spent on the activity. Hours + Minutes.
•Work Rate type: Mandatory field. This field is shown only for Per Hour charging. The choice made here defines what hourly rate is going to be charged. Choose the type that correspond to the type of activity that is made. Standard Work Rate Type defined for the current customer will be pre-selected in the form, and you have to change it only if other rate type than default should be used. Available rate types in dropdown is due to which are define for the Customer Account. If Ticket Requester is not member of any Customer Account you can still create worklogs on ticket. If so this field is not shown and you have to enter the Agent hourly rate manually.
•Agent hourly rate: This field is shown only for Per Hour charging. Value due to the chosen Work Rate Type, and can’t be edited. If Ticket Requester is not member of any Customer Account this field is editable and you have to enter the rate manually.
•Currency: This field is shown only for Per Hour charging. Value cannot be changed here, it is always set to System Default Currency. All work is charged in the default currency. If customer uses other currency it will be converted in the invoice.
•Agent cost: This field is shown only for Per Hour charging. Generated value due to the chosen Duration and Agent hourly rate.
•Discount Percent: This field is shown only for Per Hour charging. General discount in percent set by administrator during Customer Account configuration. Value cannot be changed here.
•Additional Discount: This field is shown only for Per Hour charging. Amount deducted from sum to form Total Charges. Reason for discount can be described in Description field.
•Description: Here you can write information on the log post as well as define what other charges comprises of and reasons for discount. There is a setting in system to define the maximum no of characters in the description. A text length limitation could have been set by the administrator, if this limitation is activated you will get a message when you have inserted max no of characters and you have to remove characters to be allowed to save the worklog.
•Invoiceable: Checkbox used to mark the worklog
for invoice. If enabled it is marked as  in the list on worklog tab. A
system setting defines if this checkbox should be initially default enabled for
all new worklogs.
in the list on worklog tab. A
system setting defines if this checkbox should be initially default enabled for
all new worklogs.
•Cost Center: Select cost center that shall receive
worklog charging. Dropdown has auto-complete function, you can search for a cost
center by start typing a name. Other way to select is the browse button  . The popup contains a list of available
cost centers.
. The popup contains a list of available
cost centers.
•Customer Account: Selection of account is done before you open the form, cannot be changed here.
•Agent cost with discount: This field is shown only for Per Hour charging. Generated value due to the chosen Agent cost, Discount Percent and Additional Discount.
•Additional charges: Sum of extra costs added on Other costs tab.
•Total charges: Total sum to be charged for this worklog.
Tab Other costs
On this tab you enter all additional costs and spare parts connected to the worklog that shall be charged the customer.
Click Add additional charge. This button is a dropdown where you can select New or Existing.
Existing additional charges can have been defined by system administrator. When you select to add an existing charge you just have to enter Quantity (and VAT rate if applicable). This could be e g mileage allowance per mile. Select the charge, click Save, and then enter Quantity (number of miles) and select a VAT rate in the list. System will then calculate sum to charge.
In the Existing charge form you can also create a new charge and save to database so it can be reused next time you select Existing. Click Add additional charge, create the charge by enter Name, Price, Unit and optionally a Description.
If you select New you have to create the charge by enter Name, Price, Unit and optionally a Description. Insert data, click OK, and then enter Quantity in the list. This charge will not be saved in database, it is used only in this worklog.
Additional charges form:
Additional charges
Add spare part popup
Click Add spare part. Popup contains two tabs: ALL and PLANNED.
Tab ALL
Tab All contains a list of all Products existing in the system. You can select one or more product in checkboxes to left in list. Click Save. Selected products are now shown in list, one per row. For each row you can enter Quantity and VAT rate. For each row also menu is shown rightmost on row with items View, Remove and Link CI.
Link CI is mandatory and used to link an existing CI in CMDB to the specific spare part. In popup you search for and select correct CI.
Tab PLANNED
Tab PLANNED contains list of Cis which are linked to the ticket with all maintenance plans added to that CI.
You can select one or more product in checkboxes to left in list. Click Save. Selected products are now shown in list, one per row. For each row you can enter Quantity and VAT rate. For each row also menu is shown rightmost on row with items View, Remove and Link CI.
Related CI will be automatically linked to spare part.