News in NSP 12.2.
Release May 2026
Configuration
Integrations -
Navet
Navet is Skatteverket’s (Swedish Tax Agency)
population register service. This integration lets NSP users search for Swedish
residents from person management forms. Two search modes exist:
• Personpost:
Look up a person by 12-digit personnummer (Swedish personal identity
number). Returns name, address, birth date, civil status, and
citizenship.
• Namnsokning:
Search by name, address, city, postal code, birth date, or gender. Returns up to
100 matching results.
Select a person from search results to auto-fill NSP
form fields (name, address, birth date, SwedishPersonalNumber).
• Before you
begin, confirm you have:
• Admin access
to NSP Admin Portal.
• A client
certificate (.p12 file) for your organization. For test environments, this
is Kommun A certificate from Expisoft.
• PIN code or
password for your certificate.
• Your
Organization Number (OrgNr) and Order ID (BestallningsId)
from Skatteverket.
• Access to
your server running NSP (for certificate installation).
Read more: Navet integration
Integrations -
Vscope
vScope integration imports hardware inventory data
from vScope into Nilex Service Platform (NSP). It connects
to a vScope instance via REST API, downloads device data in CSV format
from a table preset, and creates or updates Computer CI (Configuration
Item) records in NSP.
You configure column mappings
between vScope attributes and NSP CI fields. NSP supports automatic
mapping suggestions, custom field matching for duplicate detection, and
scheduled recurring imports.
Prerequisites:
• Admin access
to NSP Admin Portal
• A
running vScope instance accessible from NSP server
•
A vScope API Key for authentication
• At least one
table preset configured in vScope that includes a UUID
column.
Generating a vScope API
Key
You need an API Key from vScope to
authenticate. Follow these steps to generate one:
1. Open your vScope web interface in
a browser (e.g., http://vscope-vm:80).
2. Log in with an admin account.
3. Navigate to Settings > API Access
Tokens.
4. Click Create token.
5. Copy and save your token key. You
will enter this value in NSP.
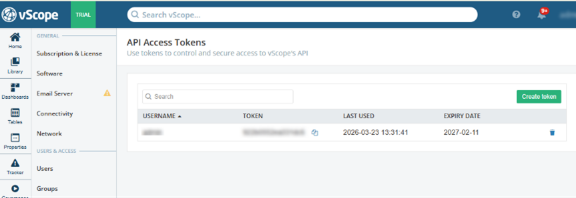
vScope API Key generation
Read more: vScope integration
Integrations -
Intune
Intune integration imports device inventory data from
Microsoft Intune into Nilex Service Platform (NSP). It connects to
Microsoft Graph API using Azure AD authentication, retrieves managed device
reports, and creates or updates Computer CI (Configuration Item) records in
NSP.
You configure column mappings between Intune device
attributes and NSP CI fields. NSP enriches each device record with Azure AD user
profile data (department, job title, phone, manager). Import supports automatic
mapping suggestions, custom field matching, and scheduled recurring
imports.
Prerequisites
• Admin access
to NSP Admin Portal.
•
An Azure AD tenant with Microsoft Intune license.
• Managed
devices enrolled in Intune.
• An Azure AD
App Registration with required permissions (see Section 3).
• Tenant ID,
Application (Client) ID, and Client Secret from App Registration.
Azure AD App Registration
Intune integration authenticates via OAuth2 client
credentials. You need an App Registration in Azure AD with specific API
permissions.
Creating an App Registration
1. Open Azure Portal
(https://portal.azure.com).
2. Navigate to Azure Active Directory > App
registrations.
3. Click New registration.
4. Enter a name (e.g., NSP Intune
Integration).
5. Select Accounts in this organizational
directory only as supported account type.
6. Leave Redirect URI empty. Click
Register.
7. After registration, note these two values
from Overview page:
|
Value |
Where to Find |
|
Application (Client) ID |
App Registration > Overview page. A GUID
value. |
|
Directory (Tenant) ID |
App Registration > Overview page. A GUID
value. |
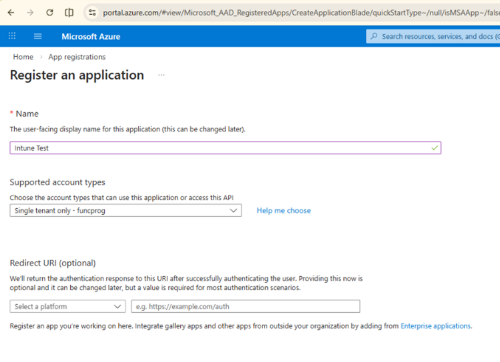
Azure Portal: App registrations
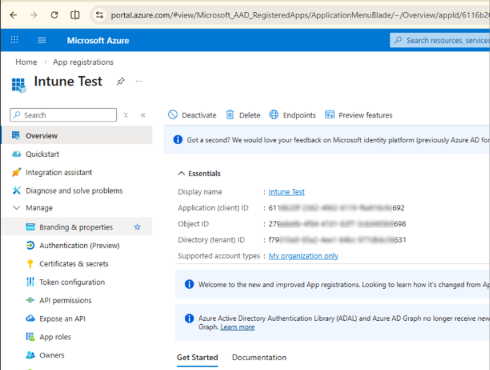
Azure App Registration Overview
page
Read more: Intune integration
Integrations - AI
NSP includes AI in several practical places across the
platform, and each location supports a different part of the support
process:
•
In AI Settings, administrators enable and configure the AI
providers.
•
In Advanced Ticket View, agents receive summaries, writing
help, solution suggestions, and text refinement tools.
• In
the tickets AI tab, agents see related tickets, relevant
knowledge articles, and suggested actions.
•
In SSP Submit Ticket, end users receive immediate AI guidance
and related article recommendations before submitting a
ticket.
• In
the SSP Knowledge Base, users are guided toward related content
through Similar Articles.
Together, these features make NSP faster to use, more
informative, and more supportive for both agents and end users.
Enabling AI in NSP
Before users can work with AI summaries, AI writing
tools, article suggestions, or AI-generated solutions, AI must be enabled
from Configuration > Settings > AI Settings.
Starting point: If AI is not enabled and
saved on this page, the AI elements described in the rest of this manual will
not be available to users.
NSP supports three AI modules. Ollama is the
free internal NSP module. OpenAI and Azure OpenAI are commercial integrations.
Each module can be enabled separately, which allows the organization to decide
which provider should be available in the system.
|
Provider |
Type |
Purpose
in NSP |
|
Ollama |
Free
/ internal |
Internal
NSP AI module for organizations that want an internal AI
option. |
|
OpenAI |
Commercial |
External
commercial integration that uses an API key, model, and embedding
settings. |
|
Azure
OpenAI |
Commercial |
Commercial
Azure-based integration that uses Azure endpoint and credential
settings. |
At the top of the page, the main Enable option activates
AI for the system. Below it, each provider has its own Enable option and
its own configuration fields. Ollama is configured through its service
URL. OpenAI is configured with an API key, model, embedding model, and
dimension. Azure OpenAI is configured with its URL, tenant information, client
credentials, model details, embedding settings, and API versions.
The Default Integration field determines which
provider NSP should use by default. The AI Search Entities section controls
which NSP data can be used in AI searches and suggestions. In the provided
screen, these entities are Tickets, Knowledge Base, and Users.
After the settings are completed, click Save to store
the configuration. The Sync action should then be used so that
NSP can synchronize the searchable AI data and apply the latest
settings.
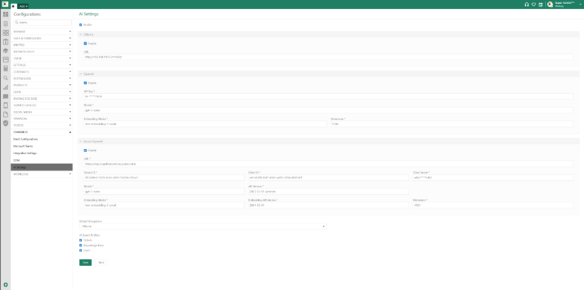
Configuration: AI Settings
Read more: AI in
NSP
NSP Insights
Insights in NSP provides a configurable
dashboard area where organizations can present key figures, charts, and other
report elements to users. The feature is available from Configuration
> Manage > Insights, and it is intended for administrators who want to
design and publish dashboards based on NSP data.
1.
Insights Settings - Manage available Insights dashboards,
default selection, and direct access options.
2.
Design Reports - Build or edit the report template that will be used
as the dashboard layout.
3.
Settings - Manage the token and restore the default template
and datasource files.
Before creating a dashboard, it is important to
make sure that the required report template and datasource files are
available and that a valid token exists on the Settings tab.
The token is used when configuring report data sources.
Starting point: A practical sequence is to
first verify the token and default files on the Settings tab, then prepare
the datasource in Design Reports, and finally create or edit the
Insight entry in Insights Settings.
|
Tab |
Purpose |
Typical actions |
|
Insights Settings |
Create and maintain dashboard entries
visible in NSP. |
Add new, edit existing entries, delete, set
default, enable direct access. |
|
Design Reports |
Design the report layout and bind it to
shared datasources. |
Create a blank report,
create from template, assign data source, set item
properties, preview. |
|
Settings |
Manage the technical prerequisites used by
report datasources. |
Copy the token, create a new token, override files
with the default template
and datasource. |
Insights Settings
The Insights Settings tab lists all
configured dashboards. From this page, the administrator can add new entries,
mark one dashboard as default, and enable direct access for dashboards that
should be published through a shareable URL.
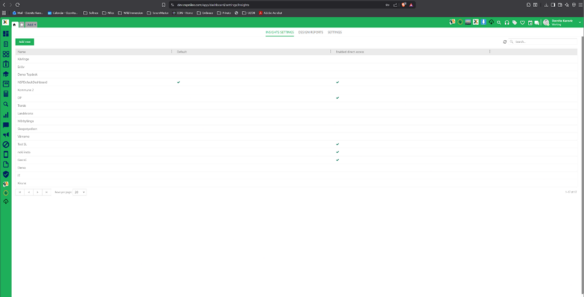
Configuration: Insights Settings
Add new and edit an Insight
Use Add new to create a new dashboard
entry, or use Edit from the row actions to update an
existing one. The form contains the following fields:
•
Name: the display name of the Insight in NSP.
• Design
template name: the report template file that will be used for the
dashboard.
•
Description: an optional description for administrators or
users.
•
Show toolbar: displays the report viewer toolbar in the
dashboard view.
• Enable
auto update: allows the dashboard to refresh automatically when
supported by the setup.
After the fields are completed,
click Next and continue with the remaining configuration steps
until the Insight is saved.
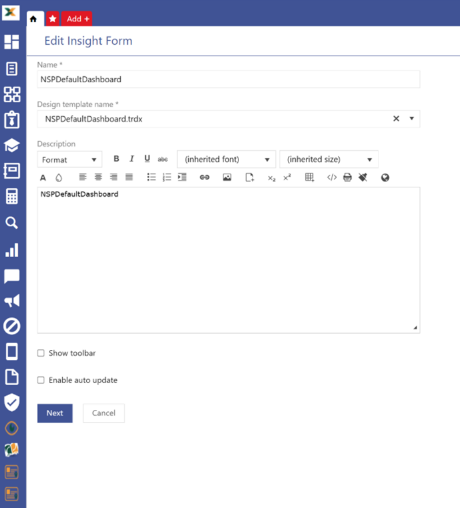
Insights Settings: Edit Insight Form
Read more: NSP Insights
Global function settings
A new option in standard reports has been added -
Hide assignee in standard reports. By selecting this option Assignee
dropdown will be hidden from all standard reports related to tickets.
Global function
settings
A new setting is available in Global Function
Settings/Service items - Use order total for approval limits.
If this setting is enabled, the approval flow limit
applies to the entire order. If the limit is exceeded, each service item within
the order must be approved individually.
If this setting is disabled, the approval flow limit
applies to each individual item.
Document
templates
New placeholder property added. Ticket Form
Properties takes all properties from both form regions and lists them in
that order inside Document Template.
Document
templates
A new option has been added for documents templates -
Set as default: This setting marks a document template as the default for
its entity, and only one template per entity can be set as default. The Download
button on the Ticket page appears only when a default template exists.
Triggers
Triggers can be set for other entities, like CI,
Contracts, Products, KB, etc. The list is available in the Entities dropdown.
See more at: Add Event
Trigger
SSP Configuration
Dashboard tab: New settings have been added to the
Service Catalog widget, allowing the agent to choose which popular services are
displayed: All, or those from the last 24, 12, 6, 3, or 1 months.
Settings - custom
links
Custom links can now be opened in 3 ways: 1. Open in
Current tab, 2. Open in new tab, 3. Open in popup. Settings are available in
Custom link/Actions (1st tab)
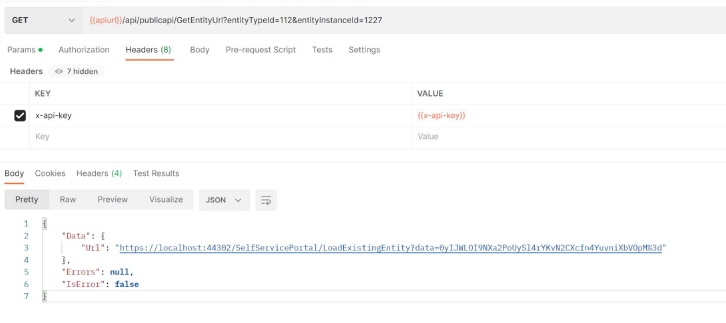
Rest API
Added GetEntityUrl endpoint to API that takes
entityTypeId and entityInstanceId and returns the correct encrypted URL.
Ticket forms
Show user data on form: If this option is enabled,
logged-in user data will be shown in the bottom of the selected end-user ticket
form to ensure the user to clearly see which account is being used before
submitting a ticket.
Ticket forms
A new option has been added on CI reference fields on
ticket - Show CIs on specific status field allows you to filter CI
reference values by status. Only CIs with the selected status (e.g., In Use,
Leased) will be displayed in the list. This setting applies only to CI reference
properties.
Example:
UI improvements -
rolls and permissions
The Export option is now available in Permissions
scope/Users tabs. This enhancement allows users to export the data currently
displayed in the selected tab in Excel or PDF format, and generate simple
reports for reporting, sharing, and record-keeping purposes.
UI improvements -
entity types
The order of entities is now configured in the entity
editor using the drag-and-drop option. The order of entities defined there will
also be applied in the views.
Kanban view -
tasks
The Kanban view can now also be configured for tasks.
Agent portal
UI improvements -
ticket kanban view
When a ticket is closed from the Kanban view, the
behavior is consistent with changing the ticket status from the ticket view. The
Close Ticket Comment popup is displayed based on the configured system
settings.
UI improvement view
ticket
The Direct Mail popup in the ticket form includes an
optional BCC field. This field allows the user to send a copy of the message to
an additional recipient without making the primary recipient aware. The BCC
field is visible and editable only while composing the email, and it should be
used when a hidden copy of the message needs to be sent to another
recipient.
After the message is sent, the system records that the
BCC option was used in the email comments section. A color-coded BCC tag is
displayed to help agents quickly identify messages sent with BCC. The tag color
can be configured in Agent Portal Configuration to match the existing UI
theme.
Ui improvements view
ticket
When you click the ticket number, the ticket URL is
automatically copied to your clipboard. You can then paste the ticket link
wherever you need it.
UI improvements view
ticket
The interface of the subject field in the ticket view
has been improved with a pointer when editing.
UI improvement -
article view
Counters on all tabs have been added within Article
view.
UI improvements -
contract view
Counters on all tabs have been added within Contract
view.
UI improvement - task
view
Task Description can be edited (this option is
controlled by system permission). If you have permission to edit the description
there is an Edit link in lower right corner. This link opens a popup with a text
box containing the current task description.
Service catalog - ci
leasing settings
A new option has been added in the CI leasing settings
on service item - Maximum number of leased items per customer account: This
setting lets the agent limit the number of units of the selected service item a
customer account can lease at the same time. If the limit is exceeded, the
customer will receive an error message when attempting to place an order.
Self Service Portal
UI improvements -
mobile view
In case of using SSP on mobile, improvement has been
made in layout. Two column layout implemented on NSP mobile for SSP Navigation
Links.