NSP administrators enable LDAP server integration to the
NSP users from their company’s Active Directory. Using this server NSP can also
fetch and sync the user details from the organization’s Active Directory. The
LDAP server provides two types of sync mechanisms in NSP and they are: Offline
Batch and Online. Offline Batch performs schedule based data sync from the LDAP
directory replicating the data in the NSP database and only uses the LDAP server
for user authentication. The Online mode gets the data in real time from the
LDAP server based on user query requirements.
To make LDAP settings go to
Configuration> Settings> Account
management> LDAP Connections.
Step by step overview on how
you set up and run AD-synchronization:
1. Create connection to LDAP Server.
2. Define settings for how to handle inactive users
(Optional).
3. Test connection.
4. Create one or more LDAP server jobs; sync set-ups.
5. Add the following to created LDAP server
jobs
a. Group mappings; example.
b. Attribute mappings if you want other than standard mappings
(Optional).
c. Set if any
attributes always are to be excluded when
synchronizing (Optional).
6. Run sync- manually or via schedule
7. If option Auto approved sync not is
chosen you manually choose which users to sync.
8. After sync, look at outcome in Sync log.
LDAP Connections tab contains
the list of servers already added. The list in this page contains active servers
followed by inactive ones. Each row in the list includes Name of the LDAP server, Company
Name, and Actions buttons:
|

|
Activate: Used to activate or deactivate the
configured LDAP server. NSP allows users of the active LDAP server to
login to the system. Users of the inactive server cannot access the
system. |
|

|
Clone: Used to clone existing server for creating
new server. |
|

|
Delete: button deletes selected
server. |
|

|
Edit: Used to edit the existing server details.
|
To add new LDAP server,
click on Add new record button. When you click
that button, LDAP Sync settings form will be
opened. The same form is used to Edit details in
an existing LDAP Server. The form is divided into two parts, Sync Settings and Settings for
Inactive Users. You can switch to respective part by clicking the header
line.
LDAP Sync Settings
LDAP Settings for Inactive Users
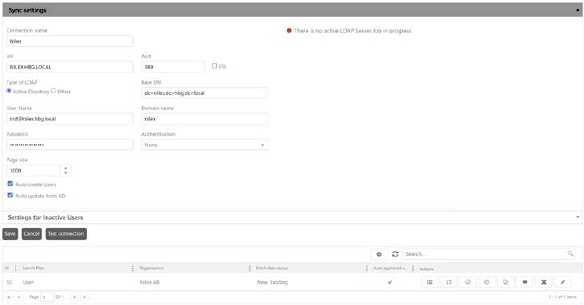
Fields in Sync Settings
form:
• Connection Name: Enter a unique and valid LDAP server
name which will be used by NSP to identify the server.
• Url: Add URL used to connect to the LDAP server. The
LDAP service provider uses a URL to configure the connection to the directory
server. To generate the LDAP connection URL, you must specify the LDAP host and
root.
• Port: Port used of Url,
(default port=389).
• SSL: Use SSL connection (Secure Sockets Layer),
(default port=636).
• Type of LDAP: Select LDAP server type from the
given server types. Currently two types are supported: Active Directory and Other.
• Username: Enter username to access domain of the
organization. Shall be inserted as domain\username, like e g NILEX\inst. You
find the user logon name in Active Directory, pre-Windows 2000:
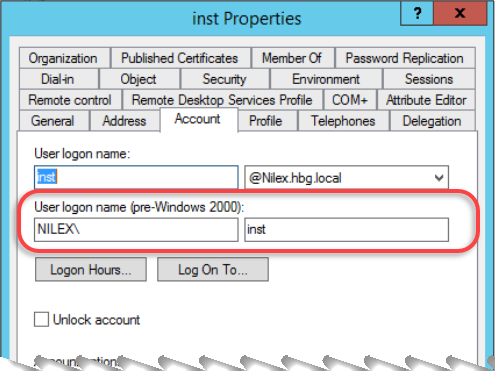
Active
Directory
• Password: Enter user´s password to access domain
of the organization.
•
Authentification: In the drop-down list, it is necessary to select
the method of authentication to the server. In the case of 389 port, here you
should select in most cases None, while in the case of 636 port it should be
SecureSocketsLayer.
Accepted
Values: None, Secure, Encryption, SecureSocketsLayer, ReadOnlyServer,
Anonymous, FastBind, Signing, Sealing, Delegation, ServerBind
• Base DN: Enter domain name components here. For a
single domain Active Directory Domain Service, this is the text box for the
Distinguished Name (DN) of the starting point for directory server searches. For
example, the domain is corp.nilex.se then domain
components should be dc=corp,dc=nilex,dc=se. The Connector starts from this DN
to create master lists from which you can later filter out individual users and
groups.
• Domain Name: Enter a domain name for the server.
This should be live domain of the organization.
• Page Size: Define Maximum Page Size. Total number
of records fetched from the server in a single search is based on defined page
size. For example, if Pages Size is ‘1000’ then 1000 records will be fetched
from LDAP in a single search to import in NSP. Note that 1000 records will be
fetched by default if nothing is defined in PageSize field.
• Auto Create Users: If enabled, this option
enables system to sync all the users directly from the Active Directory to NSP
database. When it is off, you have provision to select users manually that you
want to add in Active Directory. To select users manually, you need to click on
Sync Now button. This opens a popup window
containing users list fetched from the Active Directory having an option to
select multiple users. You can select multiple users in this and can add them in
the NSP software.
• Auto update from AD: Enable this option to
configure the LDAP server for live syncing feature. If this option is enabled,
any user of the configured LDAP directory can login in to the system and can
access the features even if he is not added from the LDAP directory to NSP. The
user is authenticated on the live domain. If it is not enabled, user cannot
access the system.
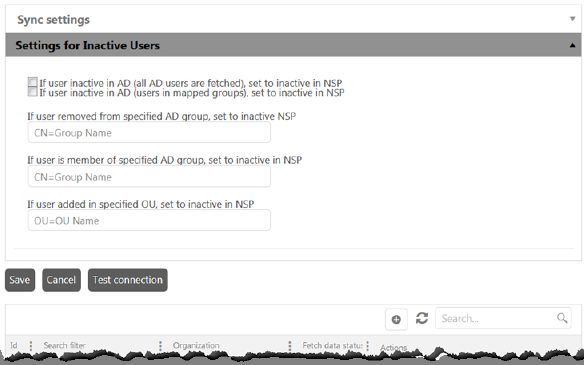
Click Settings for Inactive Users to show options for this.
Note that these settings are optional:
• If user inactive in AD (all AD users are fetched), set to
inactive in NSP: Check this option if inactive users in AD should be set
to inactive in NSP. When LDAP job is running all AD users (in all AD groups)
will be fetched and set to inactive (if inactive in AD).
• If user inactive in AD (users in mapped groups), set to
inactive in NSP: Check this option if inactive users in AD should be set
to inactive in NSP. When LDAP job is running, only users in mapped groups will
be fetched and set to inactive (if inactive in AD).
• If user removed from specified AD group, set to inactive
NSP: Specify an AD Group. If the user was a member of the specified
group, and has been removed from the group, the user will be set to inactive in
NSP. Example: CN=Sales.
• If user is member of specified AD group, set to inactive in
NSP: Specify an AD Group. If the user is a member of the specified group,
the user will be set to inactive in NSP. Example: CN=Sales.
• If user added in specified OU, set to inactive in NSP:
Specify an OU, Organization unit. If user exist in the specified OU in AD, the
user will be set to inactive in NSP. Example: OU=Nilex.
When both Sync Settings
and Settings for Inactive Users are defined, click
Save button to save the LDAP Server settings.
Test connection button will test connection to
the configured LDAP server (if successful - green info box with message The specified domain connected successfully will appear,
if not - the red info box with message The specified
domain does not exist or cannot be contracted will appear).