 Click this button at the top
of page (above the list) to Create a new Report
Template.
Click this button at the top
of page (above the list) to Create a new Report
Template.Go to Configurations > Manage > Report Templates.
Click this button at the top
of page (above the list) to Create a new Report
Template.
 To Edit an existing Report Template, find the report in the
list (use Search feature if necessary) and click
this button (a pen) for the selected report.
To Edit an existing Report Template, find the report in the
list (use Search feature if necessary) and click
this button (a pen) for the selected report.
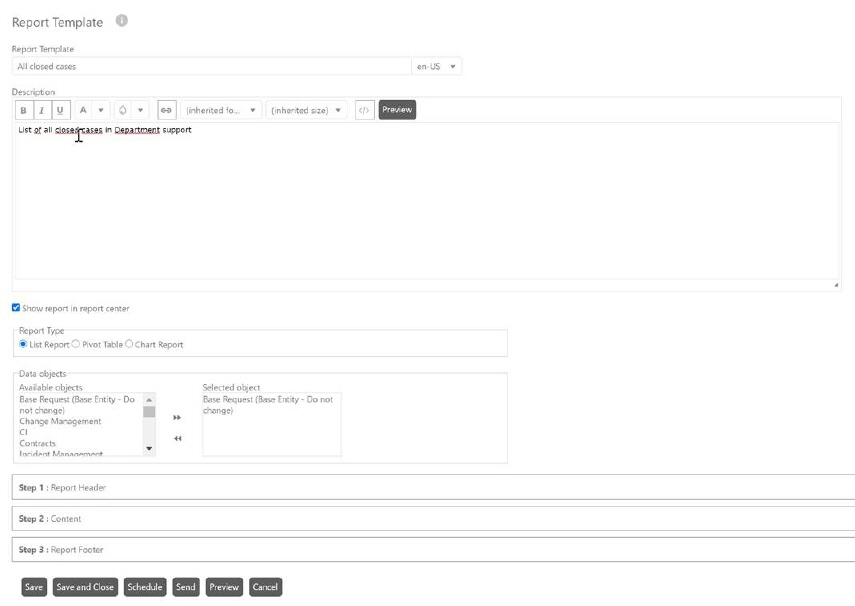
Add/Edit report template
The same form is opened for both Create and Edit. This list describes the different parts of the form:
|
Report Template |
Name of the Report Template. You can define the name in all available languages. Note that the report you create get the name from the field Report Header, see below. |
|
Description |
Description of the report. Write a description of the report objective. |
|
Show report in report center |
If you want to add this report to the list of
standard reports (menu on the left), you need to click on this
checkbox. By selecting this function, you must also adjust the permissions
who can see this report. You adjust the permissions in the list of all
reports by clicking on button Permissions |
|
Report Type |
List Report – Creates a list of the chosen properties from the selected data object. Additionally you can select some of the properties to show as a diagram. Properties selected for diagram do not have to be among the chosen properties for the list. Pivot table – A summary report with all chosen properties as rows and columns. The cell at the cross point displays the sum of objects having both properties. This type of report answers questions like “How many tickets has an agent in different groups?” You can also add calculations in the cross points, like “What is the average number of CIs for agent X in the group Y”. Diagram - Displays a diagram of selected type. |
|
Data Object |
Select the data object where report data should be collected from. You can select only one data object for the report. |
|
Report Header |
The Report Header is displayed at the top of the report. The text can be formatted. |
|
Content |
This part contains steps to decide what should be shown in the report. Which options you can select here depends on selected Report Type. You have to choose data in all options. Plus sign to the right makes the selections visible. These steps decides in detail which data the report should cover and how data will be presented. By use of the links below you can read separate sections which steps are needed to carry out to add Content for different Report Types. |
|
Report Footer |
Define what shall be displayed at the bottom of the report. |
|
Schedule (Button) |
Opens a form where you can create a schedule recurring dispatches of the report. Note that you have to save the Report Template before you can create a schedule. Read about Schedule Reports in section Schedule Reports. |
|
Send (Button) |
Create a report and dispatch it once by mail to selected recipients. Select to send the report as one of: •Comma separated text file (CSV file) •Excel file •PDF file The report will be automatically attached to the mail. The Add attachment link should be used only if you want to attach extra files to the dispatch. Last dispatch will be saved and displayed. |
|
Preview |
Preview the report created by the Report Template. Read more about Preview in section Preview Report. |
Read more:
”Create Report Template or edit existing" Distribute Reports List Reports
Create Report Template or edit existing Preview Report
”Create Report Template or edit existing" Distribute Reports
