
List View contains at the top a row with functions, can contain map view button, clear all filter button, refresh button, search box, settings for search in comments, export buttons and a configuration function to select which columns should be displayed in the list. Below this row is the ticket list. Top row of list is a header row where you can reach features for sorting and filtering.
Most part of this Dashboard Ticket List description is applicably also for Ticket Views (Views - Ticket & Task Lists). Views could contain different set of columns and could not be configured in the same way. A Ticket View is customized and configured when it is created. Features for e g searching and open details for tickets are however similar.
Below figure shows the ticket list (My Open Tickets):
Ticket List
The ticket list contains different columns, in this
example you can find Source
Icon, Id, Priority, Subject, Requester, Status, Group, Created Date, Updated Date, number of comments, Category and Assignee.
Columns displayed in the list is selectable. In the upper right corner there is
a button ( ) for selecting columns to be
displayed:
) for selecting columns to be
displayed:

Dashboard Columns Setting
In this form you can select which fields (columns) should be displayed by mark the checkboxes. You can change order of the columns by using the arrow buttons right to the list. Click a Field Name and move it up/down with the arrow buttons. Click Save when you finished the settings. Your settings will affect your Dashboard list, not other users. The settings are used when you select any list from Open Tickets or Customer Feedback lists.
The first column in the list contains symbol for source
(Ticket Source Icons).
Source means from where the ticket was originated. Sources can be any of:
System, Email, Chat, Facebook etc. The requesters set up as VIP have VIP icon
( ) associated with
their name in the list. Major incidents have major icon (
) associated with
their name in the list. Major incidents have major icon ( ) on the subject in the list.
Incidents which are escalated have respective level icon associated with their
id.
) on the subject in the list.
Incidents which are escalated have respective level icon associated with their
id.
.If you click on Revert to default, the view that was last created by the SADMIN user will be loaded and set as your personal view.

Dashboard Columns Setting SADMIN/ system admin role
If you are logged in as the SADMIN or agent with a system admin role, you will be given the option to create a default view by clicking on Save as default .That will allow the SADMIN to set a default setting from the Dashboard that all other agents can use. The application will perform a check to see if an Agent has not yet created a personal view, then the default view will be used.
Searching, filtering, sorting, paging, refresh and export functions available are similar to other lists and described in General User Interface.
Filter
For Views filter setting
is remembered in current browser session. As long as NSP is active in the
session the filter will be applied each time you return to the view (until you
clear or change the filter manually). If button Clear all
filter  is displayed above
the list this indicates there is a filter applied. If there is a filter applied
for a column this is also indicated as the three dot menu is highlighted:
is displayed above
the list this indicates there is a filter applied. If there is a filter applied
for a column this is also indicated as the three dot menu is highlighted:

For Dashboard ticket list applied filters are not saved, filter is reset next time you show the Dashboard ticket list.
If Open Tickets for Group is selected in dashboard it is possible to filter the list so only tickets belonging to a specific group is shown. Filter is a dropdown in upper left corner. Dropdown contains all groups the Agent is member of. You can select a specific group or All.

Group filter
Status widget
Ticket status widget shows in graph all tickets statuses
which are currently visible in selected list. By clicking on the selected
status, the list will be filtered and will show only tickets that have the
selected status. By clicking on button Clear on the widget  you will get back to the previous
widget view with all ticket statuses.
you will get back to the previous
widget view with all ticket statuses.
Column colors in the graph are the same colors as the colors for first stage where selected status is used for default ticket type. If the status is not configured in any stage for default ticket type, then the column color in graph will be taken from the first next ticket stage where selected status is used.
Automatic refresh
Above the list there is a Refresh button  to manually update it (get latest data
from database). You can enable also automatic refresh for dashboard and views.
User
profile contains a setting where you can define time interval for automatic
updates.
to manually update it (get latest data
from database). You can enable also automatic refresh for dashboard and views.
User
profile contains a setting where you can define time interval for automatic
updates.
Other features
The button 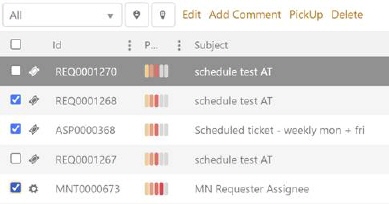 is for Comment
Search Setting. Search in comments are not default applied. When you
click this button four checkboxes are displayed. In those you can select for
which type of comments search should be included when using the search feature.
The four checkboxes are Solution Comments, Workaround Comments, Public
Comments and Internal Comments.
is for Comment
Search Setting. Search in comments are not default applied. When you
click this button four checkboxes are displayed. In those you can select for
which type of comments search should be included when using the search feature.
The four checkboxes are Solution Comments, Workaround Comments, Public
Comments and Internal Comments.
When you mouse over any Subject or Requester in the list, a quick info panel is opened on the right side of the column. The Subject info panel contains basic information about the ticket like its Id, Priority, Status, Subject, Description and latest comment if any exist. The Requester info panel contains Name, Email address, Organization and if the requester is VIP. Use of info panels (if they should be displayed or not when you mouse over Subject or Requester in the list) could be turned on/off in User Profile (Info Panel Configuration).
Map view button is used to view the tickets in map. More about Map view is explained in the following section, Map View.
Open a Ticket by clicking it in the list or using shortcut CTRL+ALT+O (and the Ticket ID). Ticket Detail view is explained in the section Ticket Details.