NSP provides an Agent interface that contains of the left bar having access buttons, top bar with tabs and other user related options. When you start NSP Dashboard is displayed, containing an overview of tickets and tasks connected to the Agent.
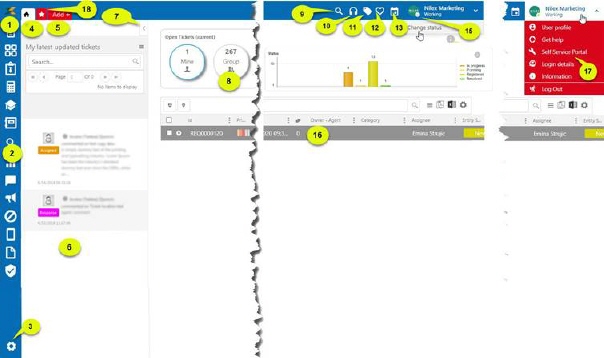
Below figure shows the components of Agent interface:
Agent interface
The components are described in the below list. The numbers in the figure corresponds to the numbers in the list:
1. Home Icon: This icon is used as a shortcut key to navigate to Dashboard from any other page in NSP.
2. Left navigation panel with buttons to access functions in NSP:
|
|
Views - Ticket & Task Lists : This selection displays Ticket and Task Views available for the Agent in the left navigation pane. |
|
|
CMDB: Go to home page of CMDB (Configurtion Management in NSP). |
|
|
Contracts: Go to home page of Contract Management. |
|
|
Order Management: Go to home page of Order Management. |
|
|
Knowledge Base: Go to home page of Knowledge Base. |
|
|
|
|
|
Search: Link to Search page, a feature to search data in NSP. |
|
|
Reports: Link to Reports page, standard reports in NSP. |
|
|
Social Media Manager: Go to home page of Social Media Management. |
|
|
Billboard Announcements: Go to home page of Billboard for Agents. |
|
|
Cancellation Management: Go to home page of Cancellation Management. |
|
|
Products. Go to home page of Products for Agents. |
|
|
Charging: Go to home page of Charging for Agents. |
|
|
GDPR: GDPR functions for Agents. |
3. Configurations: Opens Configuration Setting functions in the left navigation pane. This selection is only available for System Administrators (Agents having configuration permissions).
4. Home: Shortcut key to navigate back to the latest selected function in navigation panel, Configurations or Dashboard.
5.
Add +: This button is used to access forms to
create Ticket, Task,
CI or Contract. In a
dropdown menu Recently changed Tickets (max 3
latest changed) are displayed for direct access.
Add Ticket.
Add/Edit Task.
Add new CI.
Add
new Contract.
Add new KB
Article.
Create ticket from
template.
6. My latest updated tickets: This is a list of agent´s latest updated tickets (maximum 15 latest updated).
7. Hide/Show button for My latest updated tickets list. Could be used to get more space on screen for the ticket/task list, e g for users having lower screen resolution.
8.
Dashboard Summary Stats: Groups of icons showing
number of tickets and task currently connected to the Agent and the Groups agent
is member of. You can click the icons to display a list of the tasks or tickets
included in the selected category. This view offers as well as chart widget
showing the status of selected tickets.
Dashboard – Ticket and Task Overview.
10. Computer Telephony Integration - CTI. Open CTI form.
11. Tags function. Opens form for managing tags.
12. Favorites: Shows a list of items you have marked as favorite (Tickets, Tasks, CIs, Contracts or KB Articles). You can click an item in the list for quick access to the item.
13. Calendar. Opens Calendar form.
14.
Information/Help: This button shows a help text connected to the page/function
currently displayed. In the popup there is a link, Read more…, click this link
opens User Manual for the current function.
Help function.
15. User status button – if you want to change your current work status, click on this button. Within the popup filed you have the option to select the status, enter message and select the duration of the new status. The type of working status as well as the duration are obligatory fields. The new status will be automatically visible in the Resource calendars after the addition.
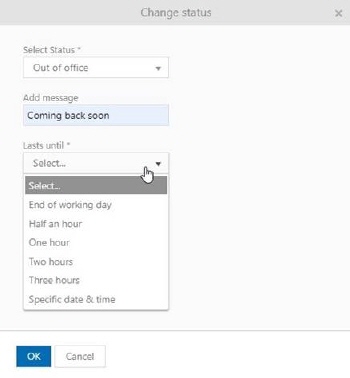
Change status popup
16. List of Tickets or Tasks: Shows the list according to selected Summary Stats.
17. This displays the profile picture and name of the logged in user. Clicking or mouse over this area opens the User Settings menu:
|
User Profile: |
Opens the profile page of the user in editing mode. User Settings. |
|
Get Help: |
Opens the User Manual in a new browser tab. |
|
Self Service Portal: |
The NSP Self Service portal is opened in a new tab. |
|
Login Details: |
Opens form where you can see available login methods and your login history. In this form there is also possibility to change your NSP password. See Login Details. |
|
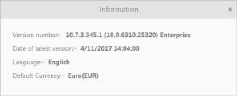
Information: |
Shows a form containing version information and basic language (NSP Standard Language) and currency settings:
|
|
Log Out: |
Current session is ended and log in page is displayed. |
18. Favorite ticket templates – by clicking on this icon you will get a dropdown list with favorite ticket templates. Clicking on a template from the list, a new ticket form will be automatically opened, with filled in data from the selected template. To add a ticket template as a favorite, you need to mark it as a favorite in the ticket template configuration.